> ## Documentation Index
> Fetch the complete documentation index at: https://clickflare.com/docs/llms.txt
> Use this file to discover all available pages before exploring further.
# How to Use Tags in ClickFlare
> Use tags to organize elements, filter reports, and manage campaigns more efficiently across your ClickFlare account.
Tags in ClickFlare allow you to **label, organize, and manage elements** across your account.
They provide a flexible way to filter reports, group campaigns, and structure data, especially useful for large accounts and upcoming AI-powered features.
Tags can be assigned **during element creation** or **in bulk** from any reporting or list view.
***
## What Are Tags Used For?
Tags help you:
* Organize campaigns and other elements logically
* Filter and segment data in reports
* Manage large accounts more efficiently
* Cross-campaign analysis
* Add structured context for ClickFlare AI
A single element can have **multiple tags**, and the same tag can be reused across different elements.
***
## When to Use Tags
Tags are best used whenever you want to group, analyze, or manage campaigns without changing your actual setup. Some examples include:
* Funnel stage tags (TOF, MOF, BOF, retargeting etc)
* Test vs scale tags (to avoid editing profitable campaigns by mistake)
* Different campaign angles (discount, free trial, UGC, testimonial)
These are just a few simple examples, but you can adapt these tags to fit your own needs.
***
## Elements That Support Tags
Tags can be assigned to the following elements in ClickFlare:
* Campaigns
* Traffic Sources
* Landers
* Offers
* Affiliate Networks
* Flows
This allows you to group data **across different entity types**, not just campaigns.
***
## Adding Tags When Creating or Editing an Element
When creating or editing any supported element:
1. Open the element setup window
2. Add one or more tags in the **Tags** field
3. Save the element
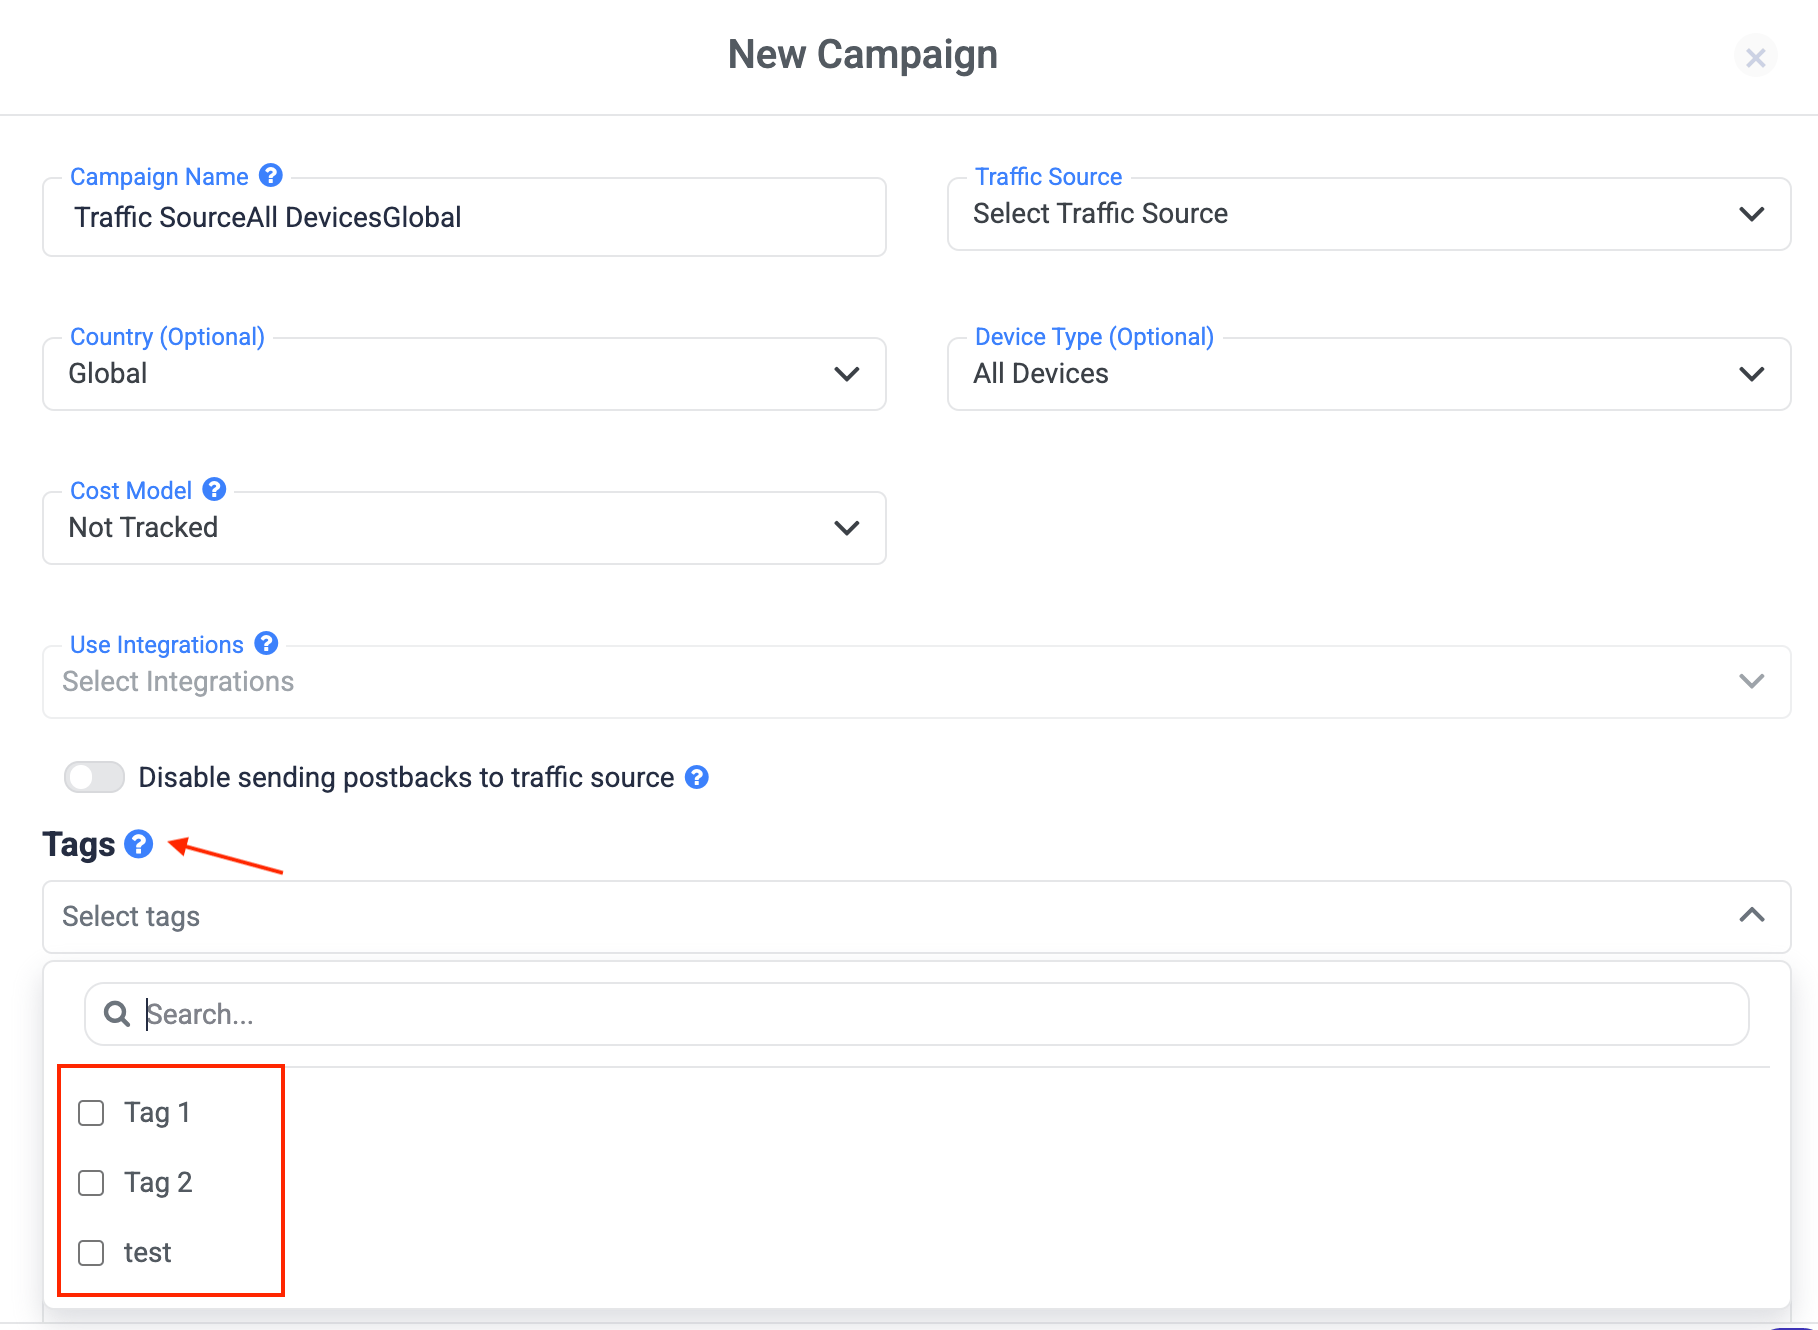 The tags are immediately applied and available for filtering and reporting.
***
## Managing Tags in Bulk (From Reports & List Views)
You can also **create, assign, or remove tags in bulk** directly from any list or reporting view (for example, Campaigns).
### How Bulk Tagging Works
1. Select one or more elements using the checkboxes
2. Click the **Tag icon** in the top action bar
* The tag action becomes available **only when at least one element is selected**
The tags are immediately applied and available for filtering and reporting.
***
## Managing Tags in Bulk (From Reports & List Views)
You can also **create, assign, or remove tags in bulk** directly from any list or reporting view (for example, Campaigns).
### How Bulk Tagging Works
1. Select one or more elements using the checkboxes
2. Click the **Tag icon** in the top action bar
* The tag action becomes available **only when at least one element is selected**
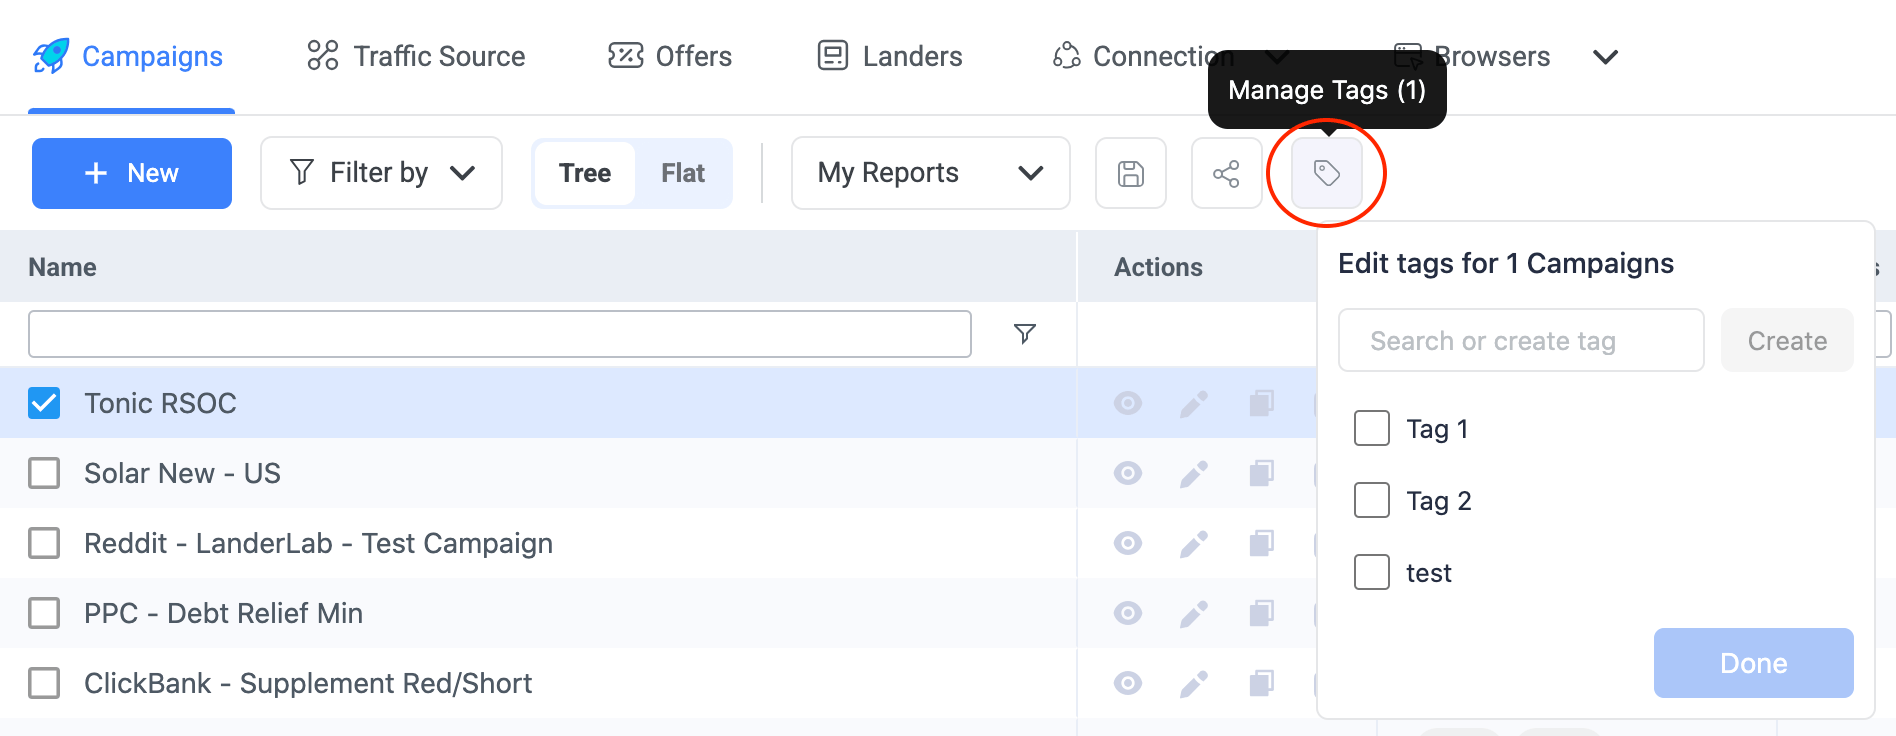 3. The **Edit Tags** panel opens, showing all existing tags
4. Use the search field to:
* Find existing tags
* Create new tags
5. Click **Done** to apply changes
3. The **Edit Tags** panel opens, showing all existing tags
4. Use the search field to:
* Find existing tags
* Create new tags
5. Click **Done** to apply changes
 All selected elements are updated at once.
***
## Understanding Tag States (Checked, Minus, Unchecked)
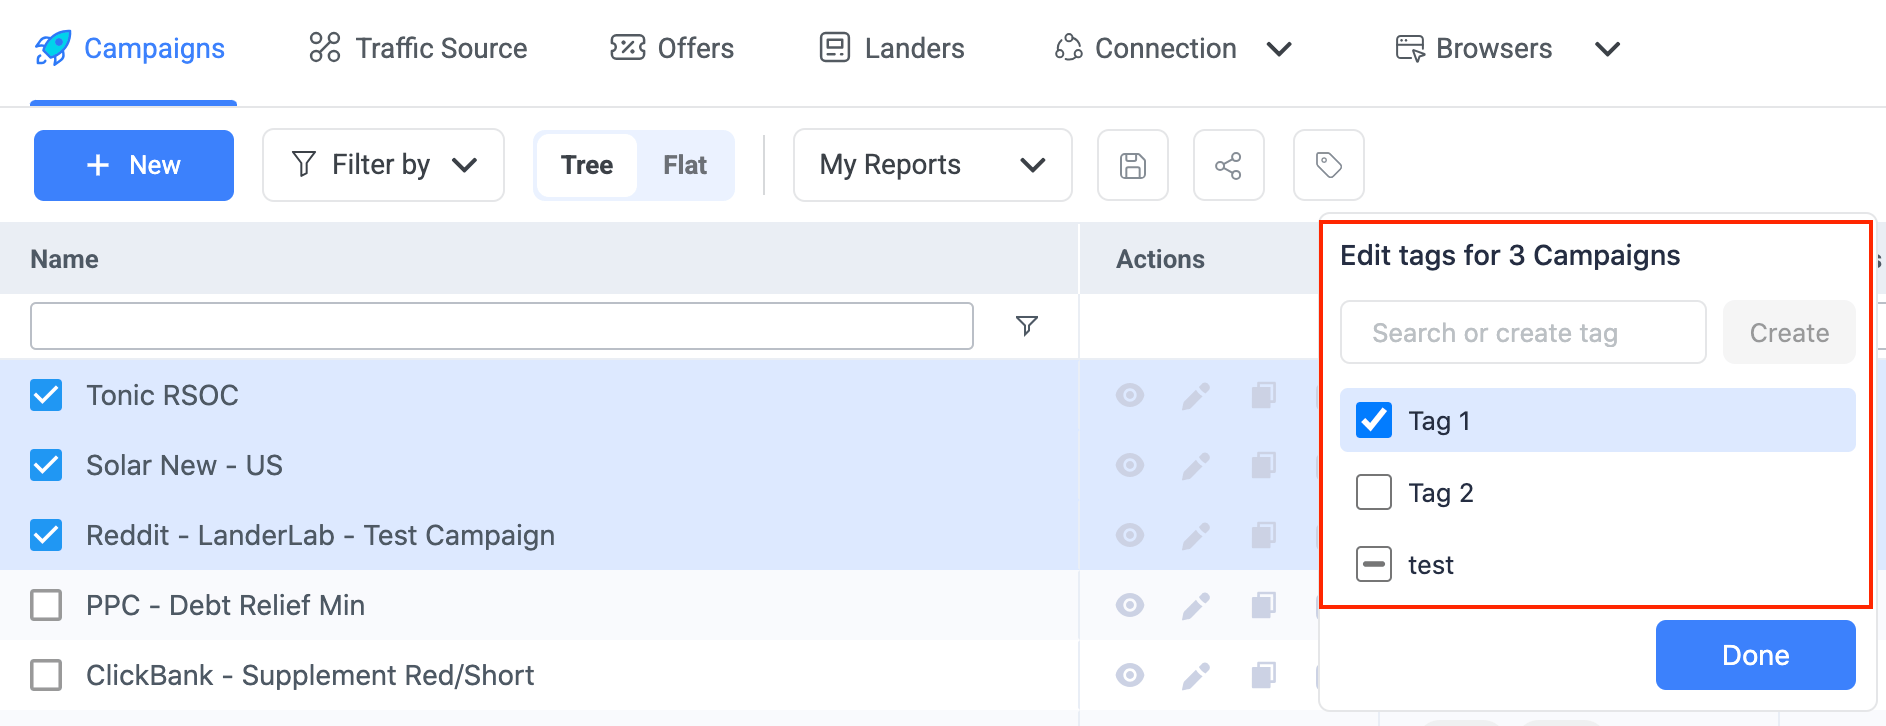
When managing tags in bulk, each tag can have **three possible states**:
### ✅ Checked
The tag is assigned to **all selected elements**.
### ➖ Minus (Indeterminate State)
The tag is assigned to **some, but not all**, of the selected elements.
* Clicking the minus icon will turn it into a **checkmark**
* This assigns the tag to **all selected elements**
### ⬜ Unchecked
The tag is not assigned to any of the selected elements.
* Clicking it assigns the tag to **all selected elements**
* Clicking again removes the tag from **all selected elements**
All selected elements are updated at once.
***
## Understanding Tag States (Checked, Minus, Unchecked)
When managing tags in bulk, each tag can have **three possible states**:
### ✅ Checked
The tag is assigned to **all selected elements**.
### ➖ Minus (Indeterminate State)
The tag is assigned to **some, but not all**, of the selected elements.
* Clicking the minus icon will turn it into a **checkmark**
* This assigns the tag to **all selected elements**
### ⬜ Unchecked
The tag is not assigned to any of the selected elements.
* Clicking it assigns the tag to **all selected elements**
* Clicking again removes the tag from **all selected elements**
 This makes it easy to standardize tags across many elements with a single click.
***
## Creating Tags
Tags can be created:
* During element creation or editing
* From the **bulk tag panel** using the tag icon
Once created, tags are reusable across all supported elements.
***
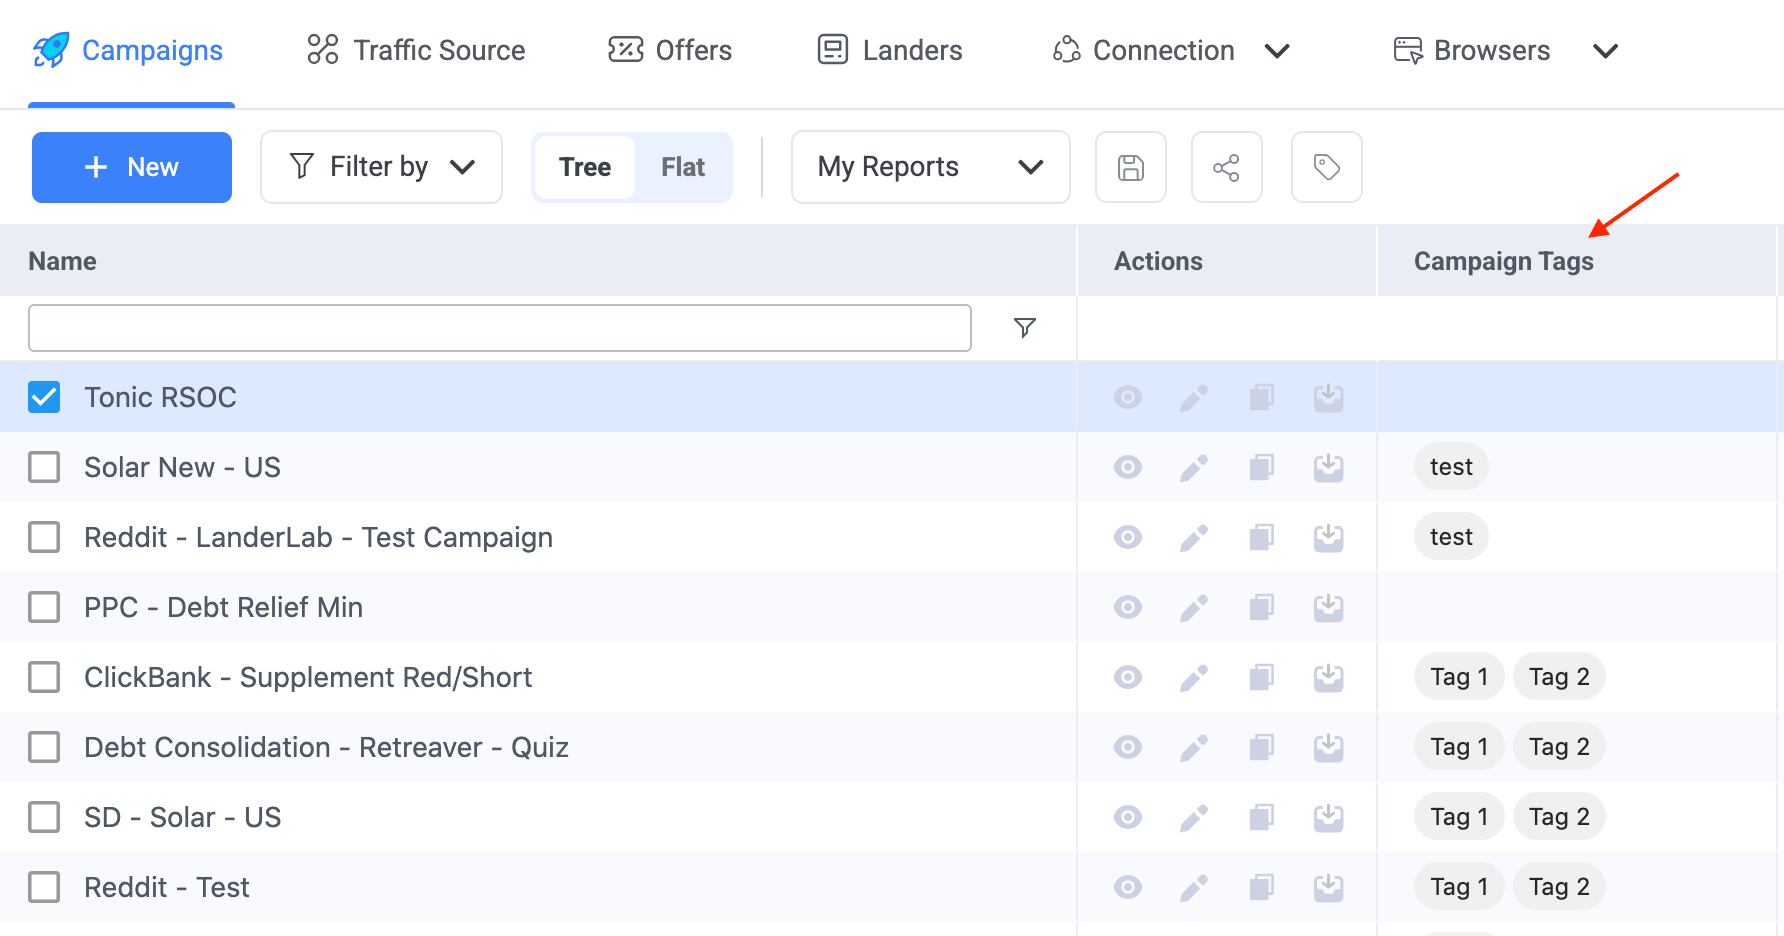
## Viewing Tags in the Tags Column
List and reporting views include a **Tags column**, which shows:
* All tags assigned to each element
* Multiple tags per element (displayed as labels)
This allows you to quickly see how campaigns and other elements are categorized.
***
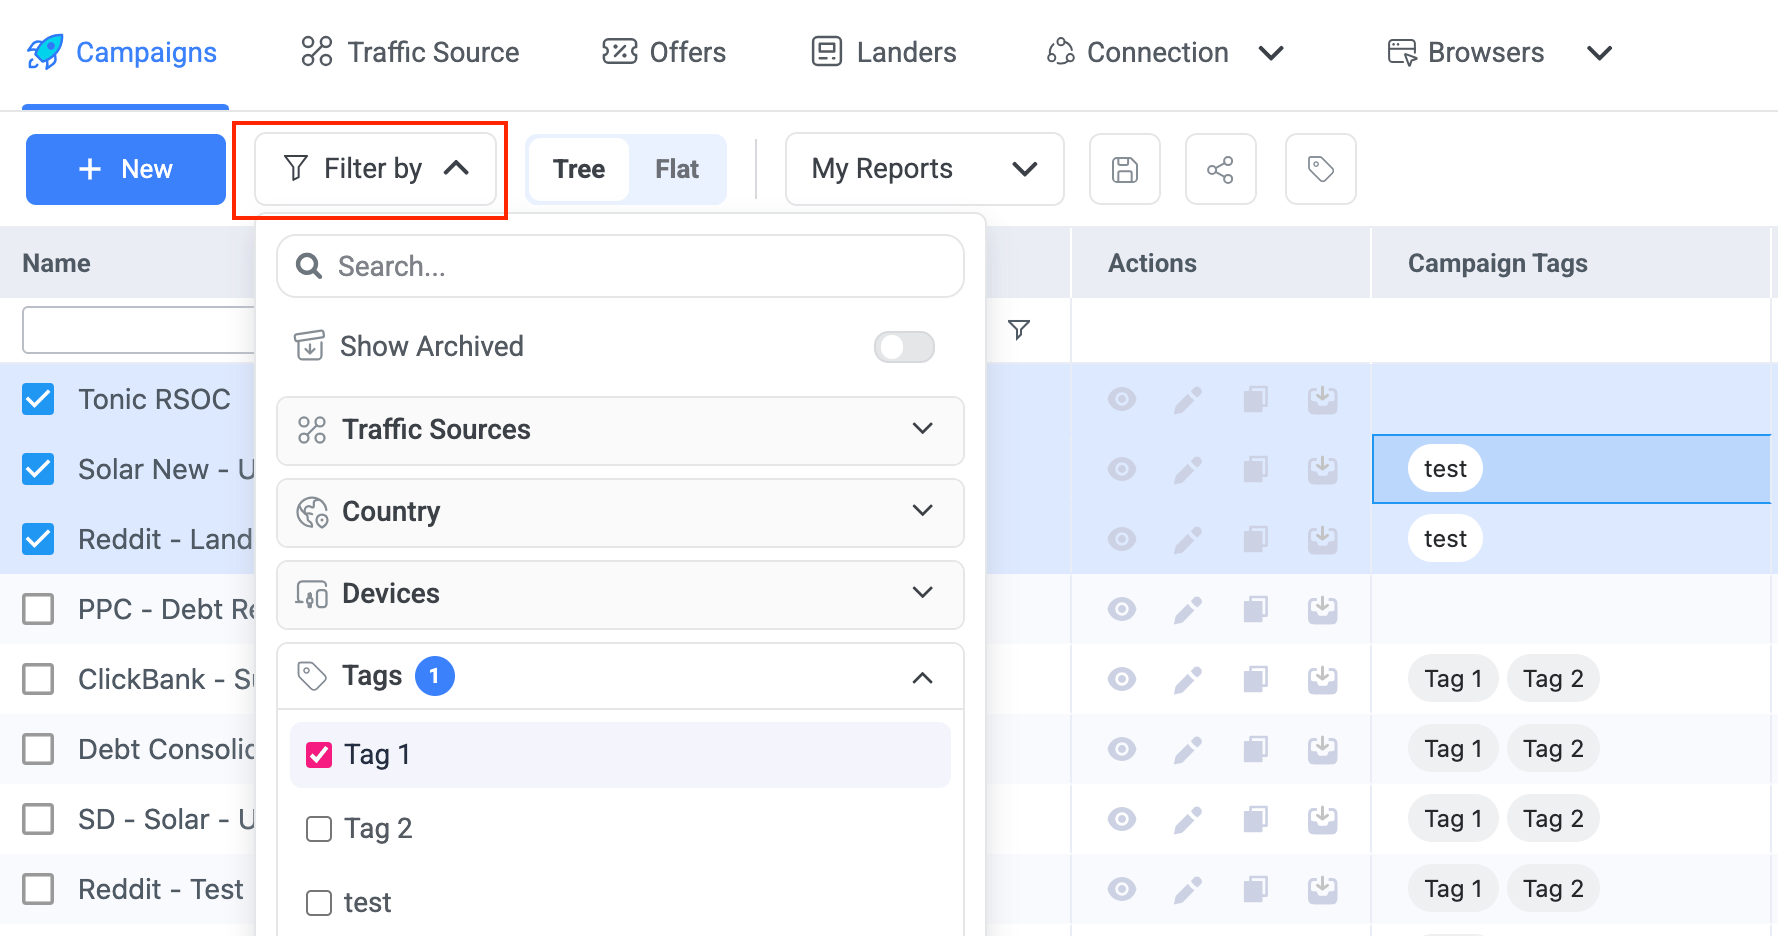
## Filtering Reports Using Tags
After tags are assigned, you can:
* Filter reports by one or more tags
* Combine tag filters with other dimensions (country, device, traffic source, etc.)
* Quickly isolate specific campaign groups
This makes it easy to standardize tags across many elements with a single click.
***
## Creating Tags
Tags can be created:
* During element creation or editing
* From the **bulk tag panel** using the tag icon
Once created, tags are reusable across all supported elements.
***
## Viewing Tags in the Tags Column
List and reporting views include a **Tags column**, which shows:
* All tags assigned to each element
* Multiple tags per element (displayed as labels)
This allows you to quickly see how campaigns and other elements are categorized.
***
## Filtering Reports Using Tags
After tags are assigned, you can:
* Filter reports by one or more tags
* Combine tag filters with other dimensions (country, device, traffic source, etc.)
* Quickly isolate specific campaign groups
 This is especially useful for:
* Vertical-based reporting
* Workflow management (e.g. testing vs scaling)
* Comparing performance across tagged segments
***
## Tags and ClickFlare AI
Tags play an important role in ClickFlare’s AI features.
By tagging campaigns and other elements consistently, you help AI:
* Understand campaign context (vertical, traffic type, intent)
* Group related campaigns automatically
* Provide more accurate analysis and recommendations
Using structured and consistent tags will improve AI-driven insights as these features expand.
***
## Best Practices for Tags
* Use **clear and consistent naming**
* Avoid duplicate tags with similar meanings
* Reuse the same tags across different element types
* Treat tags as a structural layer, not just labels
***
## FREQUENTLY ASKED QUESTIONS
Got questions? Find the answers below:
> **Q1**: Do tags affect tracking or performance?
**A1**: No. Tags are purely organizational. They do not impact tracking, attribution, delivery, or reporting accuracy.
> **Q2**: Can one element have multiple tags?
**A2**: Yes. You can assign multiple tags to a single element, and reuse the same tag across different elements.
> **Q3**: What should I use tags for?
**A3**: Tags are best used for grouping and analysis across campaigns, such as funnel stages, testing versus scaling, campaign angles, or internal workflows.
> **Q4**: Which elements support tags?
**A4**: Tags can be applied to campaigns, traffic sources, landers, offers, affiliate networks, and flows.
> **Q5**: Can I add or remove tags in bulk?
**A5**: Yes. Tags can be created, assigned, or removed in bulk from any list or reporting view.
> **Q6**: How do tags work with ClickFlare AI?
**A6**: Tags add structured context that helps ClickFlare AI better understand and group related campaigns, improving analysis and future recommendations.
> **Q7**: Are there best practices for tagging?
**A7**: Yes. Keep tag names short, consistent, and reusable. Treat tags as a structural layer for reporting and workflow, not just labels.
This is especially useful for:
* Vertical-based reporting
* Workflow management (e.g. testing vs scaling)
* Comparing performance across tagged segments
***
## Tags and ClickFlare AI
Tags play an important role in ClickFlare’s AI features.
By tagging campaigns and other elements consistently, you help AI:
* Understand campaign context (vertical, traffic type, intent)
* Group related campaigns automatically
* Provide more accurate analysis and recommendations
Using structured and consistent tags will improve AI-driven insights as these features expand.
***
## Best Practices for Tags
* Use **clear and consistent naming**
* Avoid duplicate tags with similar meanings
* Reuse the same tags across different element types
* Treat tags as a structural layer, not just labels
***
## FREQUENTLY ASKED QUESTIONS
Got questions? Find the answers below:
> **Q1**: Do tags affect tracking or performance?
**A1**: No. Tags are purely organizational. They do not impact tracking, attribution, delivery, or reporting accuracy.
> **Q2**: Can one element have multiple tags?
**A2**: Yes. You can assign multiple tags to a single element, and reuse the same tag across different elements.
> **Q3**: What should I use tags for?
**A3**: Tags are best used for grouping and analysis across campaigns, such as funnel stages, testing versus scaling, campaign angles, or internal workflows.
> **Q4**: Which elements support tags?
**A4**: Tags can be applied to campaigns, traffic sources, landers, offers, affiliate networks, and flows.
> **Q5**: Can I add or remove tags in bulk?
**A5**: Yes. Tags can be created, assigned, or removed in bulk from any list or reporting view.
> **Q6**: How do tags work with ClickFlare AI?
**A6**: Tags add structured context that helps ClickFlare AI better understand and group related campaigns, improving analysis and future recommendations.
> **Q7**: Are there best practices for tagging?
**A7**: Yes. Keep tag names short, consistent, and reusable. Treat tags as a structural layer for reporting and workflow, not just labels.