> ## Documentation Index
> Fetch the complete documentation index at: https://clickflare.com/docs/llms.txt
> Use this file to discover all available pages before exploring further.
# Campaign's Path Destination to Listicle
> Creating a campaign whose path destination goes through a Listicle
A campaign can direct a visitor to different paths and options to maximize profits. When creating a new campaign in ClickFlare, you can choose from **five different routing options** for your traffic. In this article, we’ll walk through how to set up a campaign that redirects traffic through a **Listicle**.
1. To create a new campaign, from anywhere inside ClickFlare, click on the **Campaigns** tab on the left.
2. Start by selecting the **+New** button on the top left of your screen.
3. Begin by **naming** your new campaign; keep in mind to use a memorable name.
4. Choose the **Traffic Source** for this campaign as well as its **Cost Model.**
5. Proceed to selecting your campaign's path transition.
**Redirect Tracking:** Visitors are routed through ClickFlare’s servers, allowing for advanced path logic like A/B testing, rule-based paths, weighted distribution, and AI optimization.
**Direct Tracking,** as the name suggests, visitors are sent straight to the destination site with no redirection through ClickFlare.
Note: You can also add an internal note to your campaign, such as its objective or testing goal.
6. In the **Destination** tab, choose **New Flow**, and pick one of the 4 provided Redirect Modes.
7. Select **Add Path** (the same process applies even when creating a path in Conditional Paths).
8. For this article, we are deciding that our traffic to go through a **Listicle**.
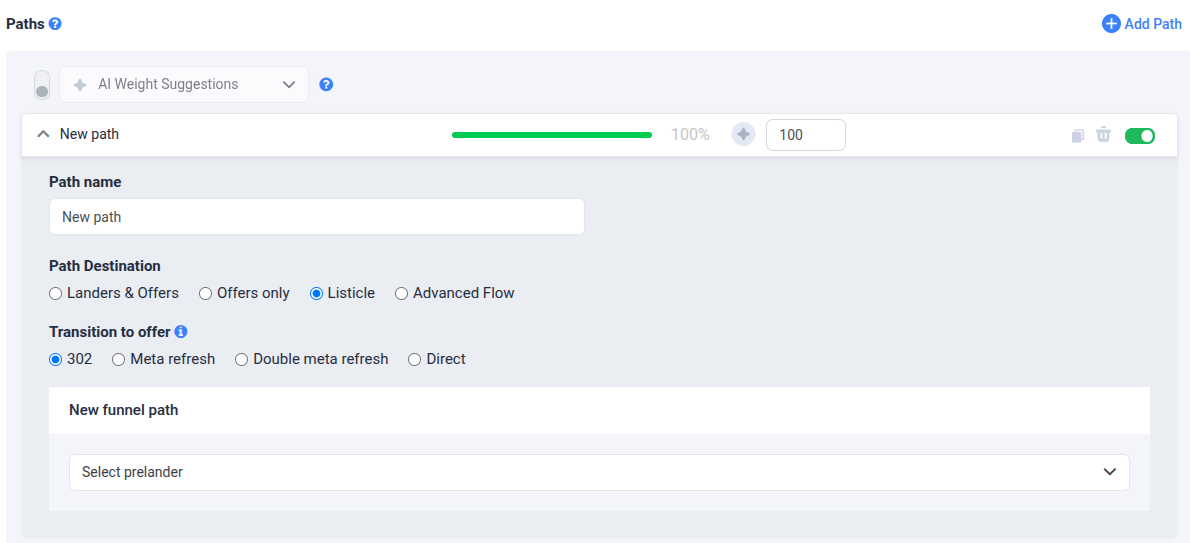 9. A **Listicle** allows you to create a more layered path for your visitors, extending the standard campaign funnel by adding an additional step with a lander. A visitor will first see a pre-lander that has links to subsequent landers; each of them contains links to different offers.
**Important**: A **Listicle** is the only campaign flow type where you can add a \*\*pre-lander (\*\*a web page that appears **before** the main landing page or offer page in a funnel is called a prelander)
Note: The traffic distribution is governed by a weight value. The proportion of weight values is reflected in a percentage of traffic distribution. This percentage always adds up to 100%.
10. Important here is to select as well your **Transition to the offer**.
11. Once everything is in place, click **Save**.
12. You'll be redirected to your **Campaigns** window, where you can see your newly created campaign join the list.
13. You can **preview**, **Edit**, **Clone,** or **archive** a campaign at any time.
9. A **Listicle** allows you to create a more layered path for your visitors, extending the standard campaign funnel by adding an additional step with a lander. A visitor will first see a pre-lander that has links to subsequent landers; each of them contains links to different offers.
**Important**: A **Listicle** is the only campaign flow type where you can add a \*\*pre-lander (\*\*a web page that appears **before** the main landing page or offer page in a funnel is called a prelander)
Note: The traffic distribution is governed by a weight value. The proportion of weight values is reflected in a percentage of traffic distribution. This percentage always adds up to 100%.
10. Important here is to select as well your **Transition to the offer**.
11. Once everything is in place, click **Save**.
12. You'll be redirected to your **Campaigns** window, where you can see your newly created campaign join the list.
13. You can **preview**, **Edit**, **Clone,** or **archive** a campaign at any time.