> ## Documentation Index
> Fetch the complete documentation index at: https://clickflare.com/docs/llms.txt
> Use this file to discover all available pages before exploring further.
# Account Setup Checklist
> Everything to configure before you launch your first campaign — General Settings, your domain, timezone, currency, and naming conventions.
ClickFlare's **General Settings** is where you configure the account-level defaults that affect every campaign you run — your timezone, currency, conversion reporting method, domain, and campaign naming. Getting these right before your first campaign saves you from inconsistent data and manual corrections later.
All of the settings covered in this article live in one place. Access them by clicking the **gear icon** (⚙) in the top-right corner of any page inside ClickFlare, then selecting **General Settings**.
***
## Setup Checklist
Work through these items in order. The first three are required before your tracking will work correctly — the rest are recommended but can be adjusted later.
* **Set your timezone** (Required)
All reporting timestamps will use this timezone. Choose the one that matches your ad accounts and affiliate network dashboards so date comparisons are accurate.
* **Set your default currency** (Required)
ClickFlare uses this as the base currency for all cost and revenue reporting. Set it to match the currency you primarily spend and earn in.
* **Add a custom tracking domain** (Required)
Your account comes with a dedicated domain, but it may be shared with other users. Set up a custom domain under **Settings → Domains** and set it as your Main Domain before running live campaigns.
* **Choose your Conversion Registration Time** (Recommended)
Decide whether conversions are dated to the original visit (**Visit Timestamp**) or to when the postback was received (**Postback Timestamp**). This affects how data lines up when filtering reports by date.
* **Configure a Campaign Naming Template** (Optional)
Set a token-based prefix that auto-populates your campaign name on creation — for example, country code and device type. Saves time and keeps naming consistent across your account.
* **Set a Visible Domain After Redirect** (if using DMR) (Optional)
If you plan to use Double Meta Refresh transition mode, configure this under **Settings → Domains** so your custom domain — not the shared ClickFlare subdomain — appears in the visitor's browser bar.
* **Set a Visible Page on Invalid Visit** (Optional)
By default, visiting your tracking domain without a campaign ID returns a 404. You can redirect those visits to any URL — for example, your main website or a fallback offer.
***
## General Settings — Field Reference
Navigate here via the **gear icon (⚙)** in the top-right corner of any ClickFlare page, then select **General Settings**.
### Conversion Registration Time
> Controls how conversions are dated in your reports. There are two options.
**Visit Timestamp** — the conversion is attributed to the date and time the original visit occurred. This is the default. Useful if you want conversions to appear alongside the visit that generated them, regardless of when the postback arrived.
**Postback Timestamp** — the conversion is attributed to the date and time ClickFlare received the postback. Useful when comparing your ClickFlare data against traffic source dashboards, which typically report by conversion receipt time.
*Example:* A user visits on Dec 2. The conversion postback arrives on Dec 5. With Visit Timestamp, filtering reports for Dec 5 will not show this conversion — you'd need to include Dec 2. With Postback Timestamp, it appears on Dec 5.
### Default Report Timezone
The timezone used for all timestamps across ClickFlare reports and logs. Choose from all standard IANA timezones. Match this to the timezone your primary ad account and affiliate network use — mismatched timezones are a common source of date discrepancies when comparing data across platforms.
### Default Currency
The base currency for all cost and revenue reporting. Select from all major currencies. When an affiliate network pays in a different currency, ClickFlare converts the payout to your base currency for unified reporting.
See [Multicurrency Support](/docs/en/tracking/multicurrency-support-in-click-flare-how-it-works) for how conversion rates are applied.
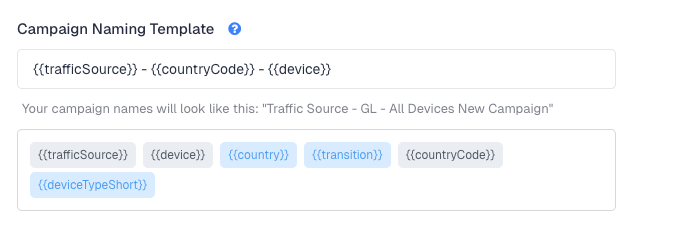
### Campaign Naming Template
A token-based pattern that is automatically prepended to every new campaign name at creation time. Leave this field empty if you prefer to name campaigns manually. Tokens are replaced with real values when a campaign is created — for example, setting the template to `countryCode_deviceTypeShort_` and creating a campaign targeting Italy on mobile will prefix the name with IT\_mob\_.
Available tokens:
`trafficSource` `device` `country` `transition` `countryCode` `deviceTypeShort`
 ***
## Domains Settings — Field Reference
Domain settings live one tab to the right of General Settings, under the same gear icon menu: (**⚙) Settings → Domains**.
### Main Domain
The domain ClickFlare uses to generate all your campaign URLs, click URLs, postback URLs, and tracking pixel URLs. You can set either a **Dedicated Domain** (auto-assigned by ClickFlare) or a **Custom Domain** as your Main Domain. Once set, all new campaign URLs are generated using this domain automatically.
### Dedicated Domain
A unique subdomain automatically assigned to your ClickFlare account (e.g. abc123.cf-track.io). Works immediately with no DNS setup required. Note that the dedicated domain may be shared with other ClickFlare users — for live ad campaigns, always use a Custom Domain instead.
### Custom Domain
A domain you own and connect to ClickFlare via DNS. Custom domains ensure your tracking URLs are exclusive to your account and improve trust signals for ad platforms. ClickFlare has setup guides for [Cloudflare](/docs/en/settings/cloudflare), [GoDaddy](/docs/en/settings/go-daddy), and [Namecheap](/docs/en/settings/namecheap).
### Visible Domain After Redirect
When using **Double Meta Refresh (DMR)** transition mode, this is the domain that briefly appears in the visitor's browser address bar during the redirect. Configure a custom domain here so the shared ClickFlare subdomain is never exposed to visitors or ad platform review bots.
### Visible Page on Invalid Visit
Defines what happens when someone accesses your tracking domain directly without a valid campaign ID in the URL. By default, they see a 404 page. You can enter any URL to redirect them instead — for example, your main website or a generic offer page.
**Always use a Custom Domain for live campaigns**
Running campaigns on the dedicated shared domain means your tracking URLs share reputation with other users. Ad platforms can flag or restrict shared tracking domains. Set up and verify a custom domain before going live.
***
## Conversion Registration Time — Which to Choose?
This is the setting new users most often configure incorrectly, because the right answer depends on how you compare data across platforms.
Use **Visit Timestamp** if you primarily analyse data within ClickFlare and care about seeing the full journey of each visit in a single date range. Conversions from a visit on Monday will always appear on Monday, regardless of when the postback arrived.
Use **Postback Timestamp** if you frequently compare ClickFlare conversion counts against your traffic source dashboard or affiliate network reports. Both platforms will then report conversions on the same date — the day the postback was received.
ℹ️ **You can change this setting at any time**
Switching between Visit Timestamp and Postback Timestamp does not affect stored data — it only changes how existing data is displayed in reports. There is no penalty to trying one and switching later.
***
**FREQUENTLY ASKED QUESTIONS**
Got questions? Find the answers below:
> **Q1**: Can I change my timezone or currency after I've already run campaigns?
**A1:** Yes, both can be changed at any time. Changing your timezone will shift how existing timestamps are displayed in reports. Changing your currency will affect how costs and revenues are shown going forward, but does not retroactively convert historical data stored in other currencies.
> **Q2**: What's the difference between my Main Domain and my Dedicated Domain?
**A2**: Your **Dedicated Domain** is the subdomain automatically assigned to your account by ClickFlare — it works immediately but may be shared with other users. Your **Main Domain** is the domain setting that determines which domain is used to generate campaign URLs. You can set either your Dedicated Domain or a Custom Domain as your Main Domain.
> **Q3**: Do I need to add a custom domain before I can track anything?
**A3**: No, your Dedicated Domain works out of the box and you can start tracking immediately. A custom domain is strongly recommended before running live paid campaigns, but is not required for testing or exploring the platform.
> **Q4**: If I set a Campaign Naming Template, can I still override the name manually when creating a campaign?
**A4**: Yes. The naming template adds a prefix automatically, but you can edit the full campaign name at any point during creation or after the campaign is saved. The template is a starting point, not a lock.
### Related Resources:
* [Domains in ClickFlare](/docs/en/settings/tracking-domains)
* [Adding a Custom Domain](/docs/en/settings/custom-domains)
* [Conversion Registration Time Reporting Guide](/docs/en/settings/conversion-registration-time-reporting)
* [Campaign Naming Template](/docs/en/settings/campaign-naming-template)
* [Multicurrency Support](/docs/en/tracking/multicurrency-support-in-click-flare-how-it-works)
***
## Domains Settings — Field Reference
Domain settings live one tab to the right of General Settings, under the same gear icon menu: (**⚙) Settings → Domains**.
### Main Domain
The domain ClickFlare uses to generate all your campaign URLs, click URLs, postback URLs, and tracking pixel URLs. You can set either a **Dedicated Domain** (auto-assigned by ClickFlare) or a **Custom Domain** as your Main Domain. Once set, all new campaign URLs are generated using this domain automatically.
### Dedicated Domain
A unique subdomain automatically assigned to your ClickFlare account (e.g. abc123.cf-track.io). Works immediately with no DNS setup required. Note that the dedicated domain may be shared with other ClickFlare users — for live ad campaigns, always use a Custom Domain instead.
### Custom Domain
A domain you own and connect to ClickFlare via DNS. Custom domains ensure your tracking URLs are exclusive to your account and improve trust signals for ad platforms. ClickFlare has setup guides for [Cloudflare](/docs/en/settings/cloudflare), [GoDaddy](/docs/en/settings/go-daddy), and [Namecheap](/docs/en/settings/namecheap).
### Visible Domain After Redirect
When using **Double Meta Refresh (DMR)** transition mode, this is the domain that briefly appears in the visitor's browser address bar during the redirect. Configure a custom domain here so the shared ClickFlare subdomain is never exposed to visitors or ad platform review bots.
### Visible Page on Invalid Visit
Defines what happens when someone accesses your tracking domain directly without a valid campaign ID in the URL. By default, they see a 404 page. You can enter any URL to redirect them instead — for example, your main website or a generic offer page.
**Always use a Custom Domain for live campaigns**
Running campaigns on the dedicated shared domain means your tracking URLs share reputation with other users. Ad platforms can flag or restrict shared tracking domains. Set up and verify a custom domain before going live.
***
## Conversion Registration Time — Which to Choose?
This is the setting new users most often configure incorrectly, because the right answer depends on how you compare data across platforms.
Use **Visit Timestamp** if you primarily analyse data within ClickFlare and care about seeing the full journey of each visit in a single date range. Conversions from a visit on Monday will always appear on Monday, regardless of when the postback arrived.
Use **Postback Timestamp** if you frequently compare ClickFlare conversion counts against your traffic source dashboard or affiliate network reports. Both platforms will then report conversions on the same date — the day the postback was received.
ℹ️ **You can change this setting at any time**
Switching between Visit Timestamp and Postback Timestamp does not affect stored data — it only changes how existing data is displayed in reports. There is no penalty to trying one and switching later.
***
**FREQUENTLY ASKED QUESTIONS**
Got questions? Find the answers below:
> **Q1**: Can I change my timezone or currency after I've already run campaigns?
**A1:** Yes, both can be changed at any time. Changing your timezone will shift how existing timestamps are displayed in reports. Changing your currency will affect how costs and revenues are shown going forward, but does not retroactively convert historical data stored in other currencies.
> **Q2**: What's the difference between my Main Domain and my Dedicated Domain?
**A2**: Your **Dedicated Domain** is the subdomain automatically assigned to your account by ClickFlare — it works immediately but may be shared with other users. Your **Main Domain** is the domain setting that determines which domain is used to generate campaign URLs. You can set either your Dedicated Domain or a Custom Domain as your Main Domain.
> **Q3**: Do I need to add a custom domain before I can track anything?
**A3**: No, your Dedicated Domain works out of the box and you can start tracking immediately. A custom domain is strongly recommended before running live paid campaigns, but is not required for testing or exploring the platform.
> **Q4**: If I set a Campaign Naming Template, can I still override the name manually when creating a campaign?
**A4**: Yes. The naming template adds a prefix automatically, but you can edit the full campaign name at any point during creation or after the campaign is saved. The template is a starting point, not a lock.
### Related Resources:
* [Domains in ClickFlare](/docs/en/settings/tracking-domains)
* [Adding a Custom Domain](/docs/en/settings/custom-domains)
* [Conversion Registration Time Reporting Guide](/docs/en/settings/conversion-registration-time-reporting)
* [Campaign Naming Template](/docs/en/settings/campaign-naming-template)
* [Multicurrency Support](/docs/en/tracking/multicurrency-support-in-click-flare-how-it-works)