> ## Documentation Index
> Fetch the complete documentation index at: https://clickflare.com/docs/llms.txt
> Use this file to discover all available pages before exploring further.
# Media.net
> Adding Media.net Integration
Thanks to ClickFlare's native API integration with **Media.net**, conversions and revenue are automatically pulled into ClickFlare every hour for up to **3 days** after a conversion occurs, ensuring your data is always up to date.
In this article, we'll go over the step-by-step process of setting up the API Integration with Media.net.
## What You’ll Need:
* An active **Media.net** account
* An active **ClickFlare** account
* Your **Media.net login credentials**
## Setting Up Media.net Integration in ClickFlare
### 1. Access the Integration Menu
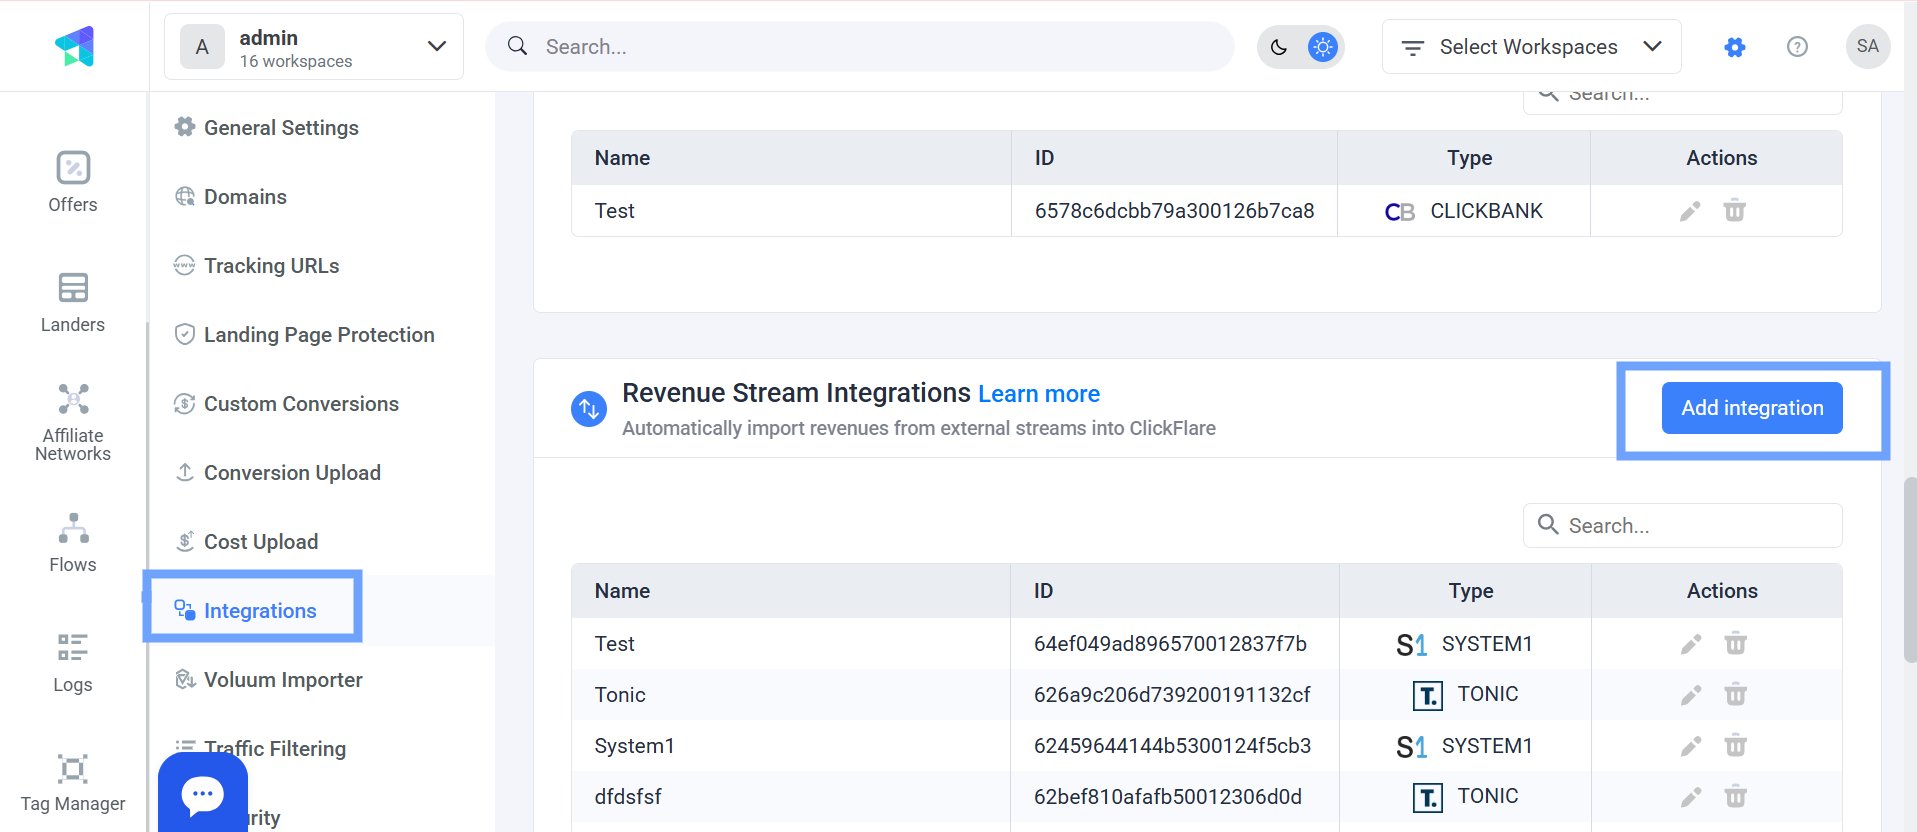
Go to the **Settings** menu (gear icon) in your ClickFlare dashboard and click on **Integrations**.
* Under *Revenue Stream Integrations*, click **Add Integration.**
* Give your new integration a **name**.
 Note: Have your integrations' connection info ready before proceeding to connect them with ClickFlare.
### 2. Configure the Integration:
* Choose the **Media.net** template
* Assign a **Name** to your integration
* **Name**: Enter account name.
* **Email**: Enter your Media.net email.
* **Password**: Enter the corresponding credential.
* Then click **Save**.
Click **+ Connect Account** under **Accounts**
### 3. Select the Custom Conversion
Choose the **Custom Conversion** in ClickFlare to which you want Media.net conversion events to be attributed.
To learn how to add a custom conversion in ClickFlare, follow our article [here](/docs/en/settings/custom-conversions).
### 4. Define the Channel Name
Select a **Channel Name** that ClickFlare will use to track the **ClickFlare Campaign ID**
> **Important:** Use this exact channel name when creating **offers** for Media.net to ensure click and conversion data aligns. e.g **chnm3=\{campaign\_id)**
Note: Have your integrations' connection info ready before proceeding to connect them with ClickFlare.
### 2. Configure the Integration:
* Choose the **Media.net** template
* Assign a **Name** to your integration
* **Name**: Enter account name.
* **Email**: Enter your Media.net email.
* **Password**: Enter the corresponding credential.
* Then click **Save**.
Click **+ Connect Account** under **Accounts**
### 3. Select the Custom Conversion
Choose the **Custom Conversion** in ClickFlare to which you want Media.net conversion events to be attributed.
To learn how to add a custom conversion in ClickFlare, follow our article [here](/docs/en/settings/custom-conversions).
### 4. Define the Channel Name
Select a **Channel Name** that ClickFlare will use to track the **ClickFlare Campaign ID**
> **Important:** Use this exact channel name when creating **offers** for Media.net to ensure click and conversion data aligns. e.g **chnm3=\{campaign\_id)**
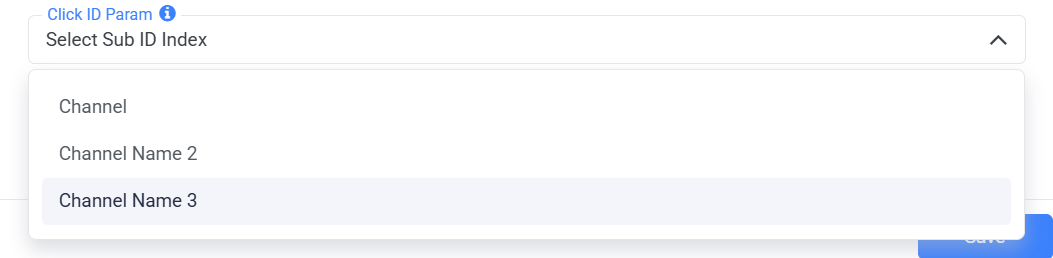 Note: You can choose any of the available channel names. Once you've selected a channel name, remember to consistently use it when passing the campaign ID while creating offers for this feed.
### 5. Add Required Tracking Parameters
When creating your **offer URL**, make sure to append the required tracking parameters:
```
https://example.com/offer-page?click_id={cf_click_id}&chnm3={campaign_id}
```
Important: Make sure to pass **\{cf\_click\_id}** to the **click\_id** parameter and **\{campaign\_id}** to **chnm3** in the offer URL
### 6. Use the Proper Postback Format
ClickFlare will pull conversions from Media.net using the following postback URL:
```
https://your_tracking_domain.com/cf/cv?click_id={click_id}¶m10={chnm3}&ct=click
```
**Note**: The custom conversion selected in the API integration must match the one used in the postback.
For example: **\&ct=click** parameter should align with the custom conversion Name you've chosen in The Revenue Stream Integration:
Note: You can choose any of the available channel names. Once you've selected a channel name, remember to consistently use it when passing the campaign ID while creating offers for this feed.
### 5. Add Required Tracking Parameters
When creating your **offer URL**, make sure to append the required tracking parameters:
```
https://example.com/offer-page?click_id={cf_click_id}&chnm3={campaign_id}
```
Important: Make sure to pass **\{cf\_click\_id}** to the **click\_id** parameter and **\{campaign\_id}** to **chnm3** in the offer URL
### 6. Use the Proper Postback Format
ClickFlare will pull conversions from Media.net using the following postback URL:
```
https://your_tracking_domain.com/cf/cv?click_id={click_id}¶m10={chnm3}&ct=click
```
**Note**: The custom conversion selected in the API integration must match the one used in the postback.
For example: **\&ct=click** parameter should align with the custom conversion Name you've chosen in The Revenue Stream Integration:  ### 7. Save & Finalize
Click **Save** to complete the integration. Your Media.net integration will now appear under **Revenue Stream Integrations**, and ClickFlare will begin syncing your conversion data.
Note: Media.net Revenue reporting operates on UTC.
***
**FREQUENTLY ASKED QUESTIONS**
Got questions? Find the answers below:
> **Q1**: How can i append keywords in the offer URL?
A1: Unlike other feed providers, **Media.net’s offer URL** only supports one keyword at a time. A common workaround for keyword rotation is to create multiple versions of the same offer, each using a different keyword, and run them under a single campaign.
> **Q2**: What happens if I don’t set up the postback in Media.net?
**A2**: ClickFlare won’t be able to record conversions or revenue. Make sure the postback is properly added in your Media.net account.
> **Q3**: What should I do if my Media.net conversions aren’t showing up in ClickFlare?
**A3**: Double-check that:
* The correct postback URL is added in Media.net
* The click ID \{cf\_click\_id} is passed correctly in the offer URL
> **Q4**: Can I pass additional data to Media.net?
**A4**: Yes, you can pass additional data in the offer URL by mapping the parameters you want to send to the available Media.net fields. For example: `chnm=country`.
### 7. Save & Finalize
Click **Save** to complete the integration. Your Media.net integration will now appear under **Revenue Stream Integrations**, and ClickFlare will begin syncing your conversion data.
Note: Media.net Revenue reporting operates on UTC.
***
**FREQUENTLY ASKED QUESTIONS**
Got questions? Find the answers below:
> **Q1**: How can i append keywords in the offer URL?
A1: Unlike other feed providers, **Media.net’s offer URL** only supports one keyword at a time. A common workaround for keyword rotation is to create multiple versions of the same offer, each using a different keyword, and run them under a single campaign.
> **Q2**: What happens if I don’t set up the postback in Media.net?
**A2**: ClickFlare won’t be able to record conversions or revenue. Make sure the postback is properly added in your Media.net account.
> **Q3**: What should I do if my Media.net conversions aren’t showing up in ClickFlare?
**A3**: Double-check that:
* The correct postback URL is added in Media.net
* The click ID \{cf\_click\_id} is passed correctly in the offer URL
> **Q4**: Can I pass additional data to Media.net?
**A4**: Yes, you can pass additional data in the offer URL by mapping the parameters you want to send to the available Media.net fields. For example: `chnm=country`.