> ## Documentation Index
> Fetch the complete documentation index at: https://clickflare.com/docs/llms.txt
> Use this file to discover all available pages before exploring further.
# Custom Webhook Integration
> Learn how to send event data directly from ClickFlare to any platform of your choice with ClickFlare's new custom webhook integration.
 ## What Is the Custom Webhook Integration?
The **Webhook Integration** in ClickFlare allows you to send event data directly from ClickFlare to any third-party endpoint using **GET** or **POST** methods.
This integration gives you full flexibility to connect ClickFlare with any platform of your choice, internal tool, CRM, or automation platform such as **Zapier**, **Make**, or **n8n**.
***
## What Can You Do with Custom Webhooks?
With the Webhook integration, you can:
* Fire **any ClickFlare event** (e.g., Visit, Click, Conversion, Custom Event) to any endpoint.
* Choose between **GET** and **POST** methods.
* Include ClickFlare macros anywhere (in the **URL**, **headers**, or **body**).
* Map up to **10 events** per integration.
* Map the **same event multiple times**, allowing you to send the same event to multiple destinations (for example, sending a “Purchase” event to both your CRM and analytics tool).
* Configure **campaign-level postbacks**, so each campaign can have its own Webhook configuration.
***
## How to Integrate Webhooks in ClickFlare
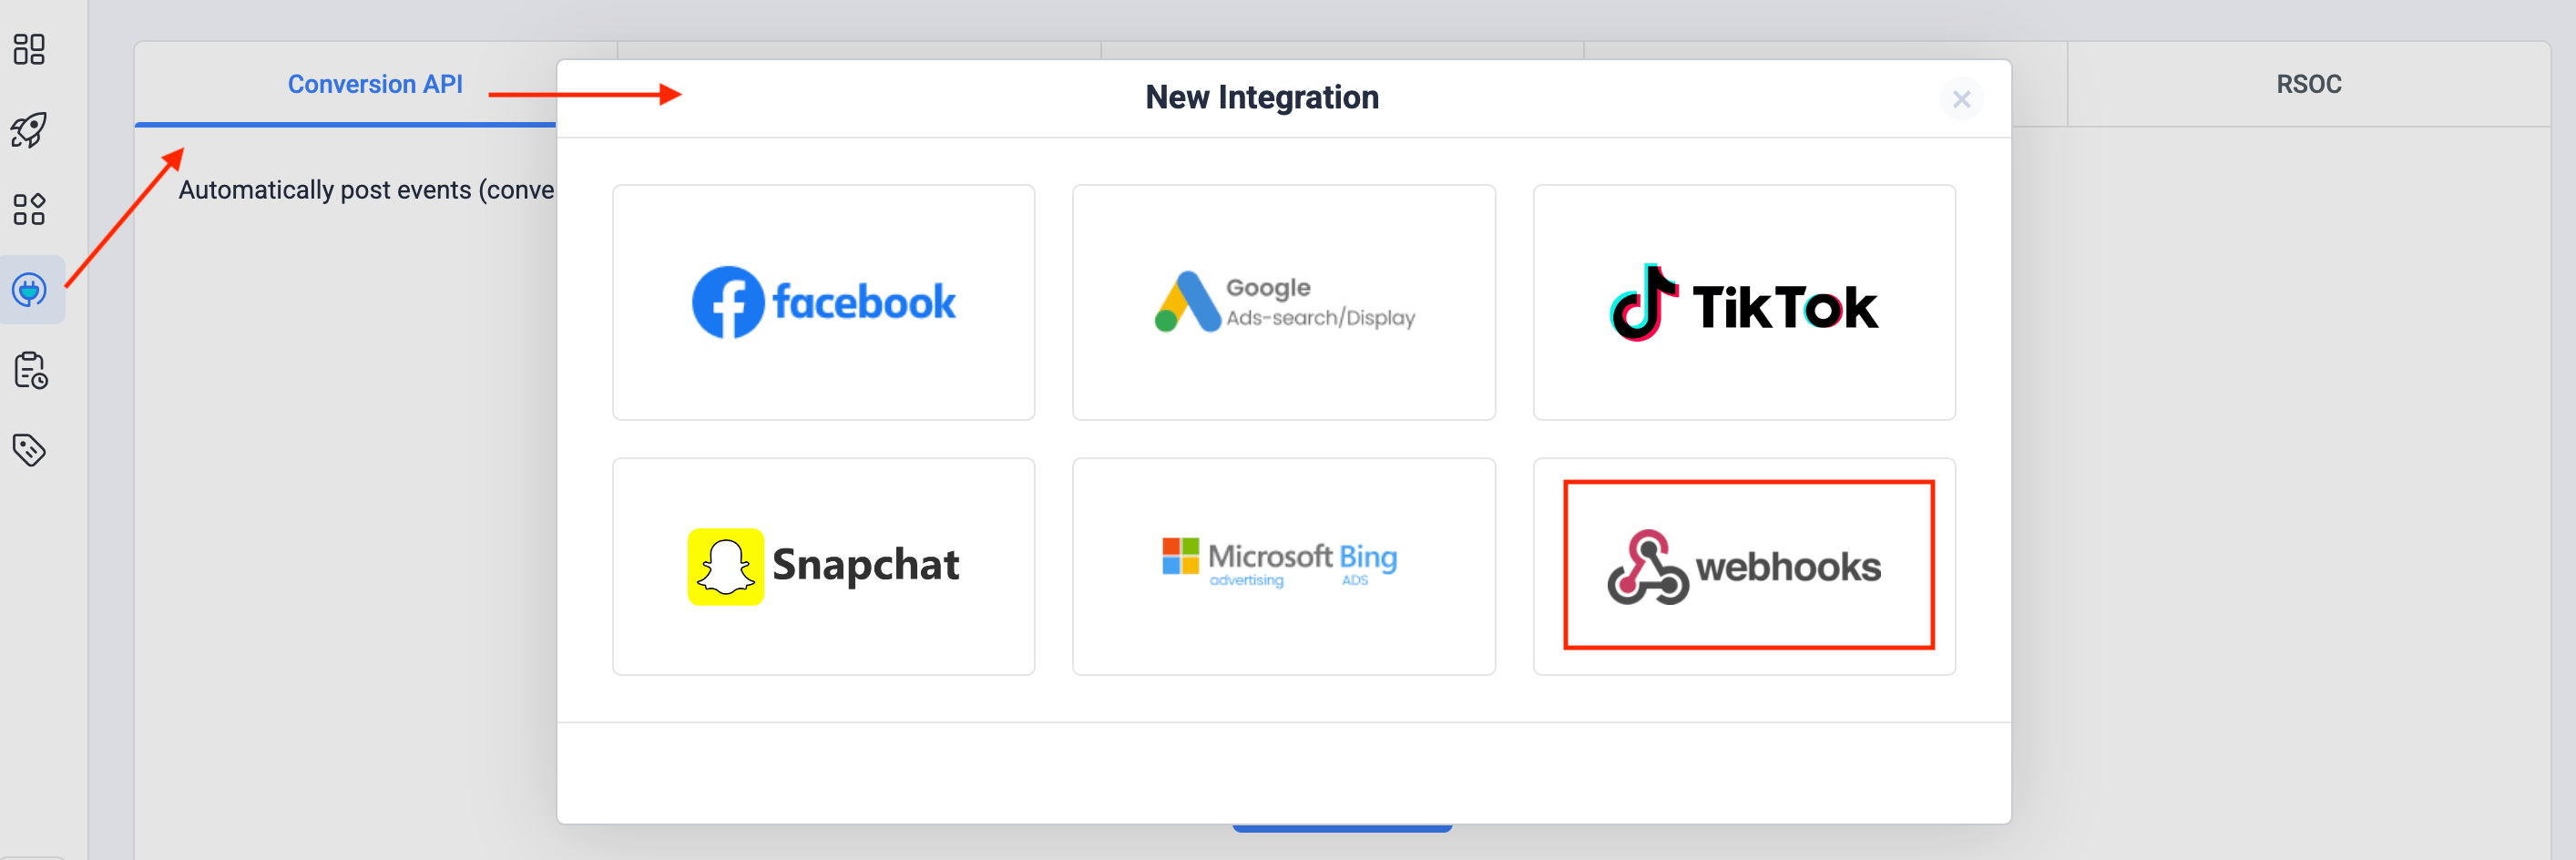
### Step 1: Create New Integration
1. Go to **Integrations**;
2. Click on Conversion API → Add Integration;
3. Choose **Webhooks** from the integration list.
## What Is the Custom Webhook Integration?
The **Webhook Integration** in ClickFlare allows you to send event data directly from ClickFlare to any third-party endpoint using **GET** or **POST** methods.
This integration gives you full flexibility to connect ClickFlare with any platform of your choice, internal tool, CRM, or automation platform such as **Zapier**, **Make**, or **n8n**.
***
## What Can You Do with Custom Webhooks?
With the Webhook integration, you can:
* Fire **any ClickFlare event** (e.g., Visit, Click, Conversion, Custom Event) to any endpoint.
* Choose between **GET** and **POST** methods.
* Include ClickFlare macros anywhere (in the **URL**, **headers**, or **body**).
* Map up to **10 events** per integration.
* Map the **same event multiple times**, allowing you to send the same event to multiple destinations (for example, sending a “Purchase” event to both your CRM and analytics tool).
* Configure **campaign-level postbacks**, so each campaign can have its own Webhook configuration.
***
## How to Integrate Webhooks in ClickFlare
### Step 1: Create New Integration
1. Go to **Integrations**;
2. Click on Conversion API → Add Integration;
3. Choose **Webhooks** from the integration list.
 ### Step 2: Configure Your Webhook
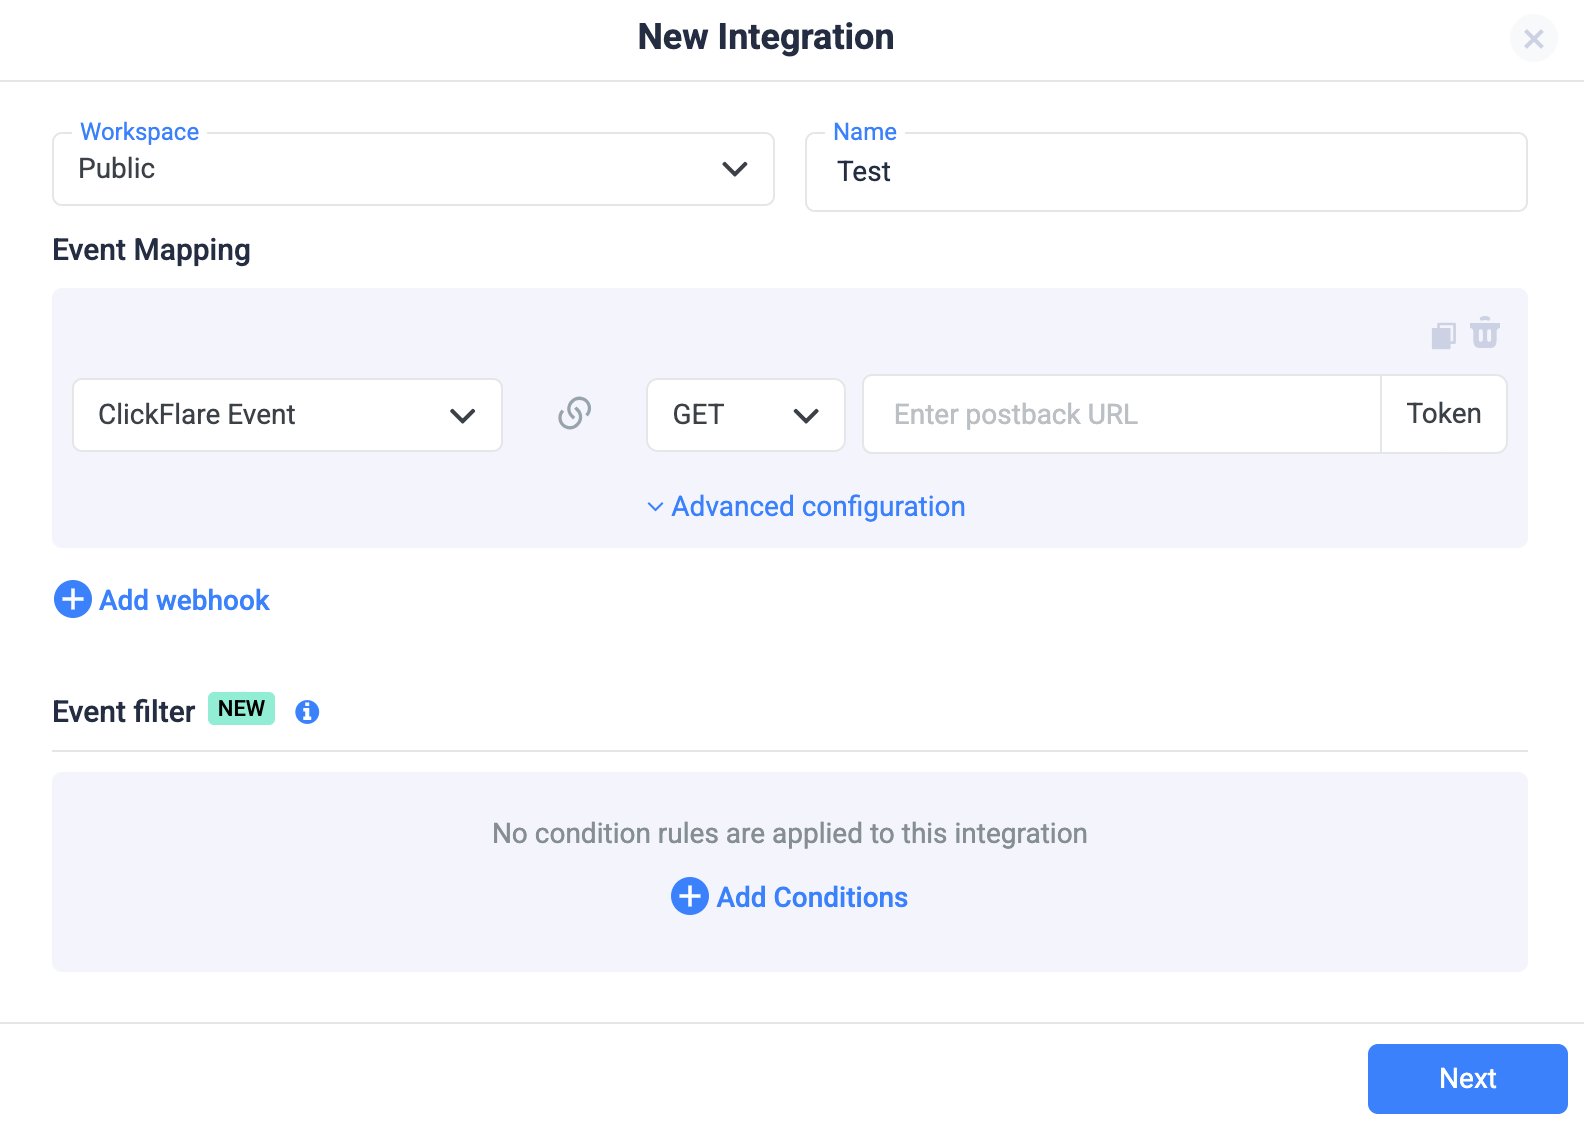
Once the Webhook integration setup window opens, you’ll see the configuration options below.
**1. Workspace and Name**
* **Workspace:** Select the workspace this integration will belong to (Public or Private);
* **Name:** Enter a name to identify your integration (e.g., “Purchase Event to CRM”).
**2. Event Mapping**
* Under **Event Mapping**, choose the **ClickFlare Event** you want to trigger the webhook for (e.g., Visit, Conversion, Purchase, Custom Event, etc.).
* Select the **Request Method** (**GET** or **POST**).
* Enter your **Webhook URL:** this is the endpoint where ClickFlare will send the event data.
* (Optional) **Add Headers** if the endpoint requires authentication or additional data by clicking on **Advanced Configuration**.
> In case of **POST webhooks** with JSON payloads, ClickFlare automatically includes the header
> `Content-Type: application/json.`
You can add up to **10 events** per integration by clicking **Add Webhook**.
Each event mapping can have its own configuration, including separate URLs, headers, and request methods.
### Step 2: Configure Your Webhook
Once the Webhook integration setup window opens, you’ll see the configuration options below.
**1. Workspace and Name**
* **Workspace:** Select the workspace this integration will belong to (Public or Private);
* **Name:** Enter a name to identify your integration (e.g., “Purchase Event to CRM”).
**2. Event Mapping**
* Under **Event Mapping**, choose the **ClickFlare Event** you want to trigger the webhook for (e.g., Visit, Conversion, Purchase, Custom Event, etc.).
* Select the **Request Method** (**GET** or **POST**).
* Enter your **Webhook URL:** this is the endpoint where ClickFlare will send the event data.
* (Optional) **Add Headers** if the endpoint requires authentication or additional data by clicking on **Advanced Configuration**.
> In case of **POST webhooks** with JSON payloads, ClickFlare automatically includes the header
> `Content-Type: application/json.`
You can add up to **10 events** per integration by clicking **Add Webhook**.
Each event mapping can have its own configuration, including separate URLs, headers, and request methods.
 **Example**
You can send the “Purchase” event twice — one to your CRM and one to a Google Sheet via Zapier:
| ClickFlare Event | Method | URL |
| ---------------- | ------ | ------------------------------------ |
| Purchase | POST | `https://crm.example.com/webhook` |
| Purchase | POST | `https://hooks.zapier.com/hooks/...` |
### Step 3: Using ClickFlare Macros
You can use **ClickFlare macros** anywhere inside the integration — in the **URL**, **body**, or **headers**. Macros will automatically be replaced with real values when the event fires.
**Example:**
If you include this URL:
```
https://example.com/api?click_id={cf_click_id}&payout={payout_currency}
```
ClickFlare will replace `cf_click_id` and `payout_currency` with the actual values for that conversion.
This flexibility lets you dynamically send campaign, visitor, or conversion data to any external platform.
### Step 4: Add Event Filters (Optional)
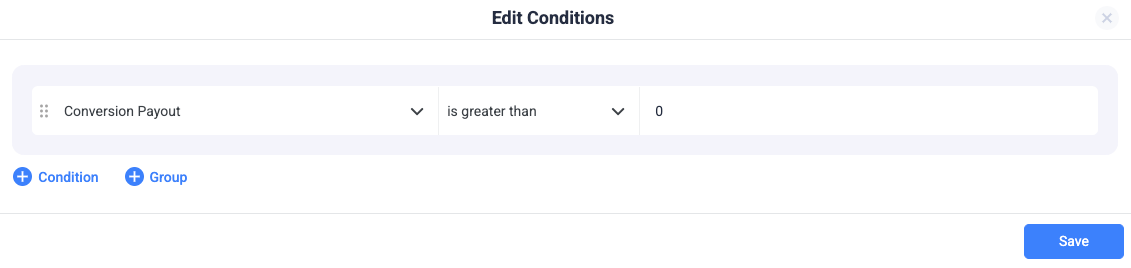
ClickFlare’s **Event Filter** feature lets you control which events trigger your Webhook.
For example, you can create rules such as:
* Fire the event **only if payout > 0**
* Fire the event **only for a specific campaign or offer**
* Fire events coming from a **specific country**
To add a condition, click **Add Conditions**, define your rules, and save.
**Example**
You can send the “Purchase” event twice — one to your CRM and one to a Google Sheet via Zapier:
| ClickFlare Event | Method | URL |
| ---------------- | ------ | ------------------------------------ |
| Purchase | POST | `https://crm.example.com/webhook` |
| Purchase | POST | `https://hooks.zapier.com/hooks/...` |
### Step 3: Using ClickFlare Macros
You can use **ClickFlare macros** anywhere inside the integration — in the **URL**, **body**, or **headers**. Macros will automatically be replaced with real values when the event fires.
**Example:**
If you include this URL:
```
https://example.com/api?click_id={cf_click_id}&payout={payout_currency}
```
ClickFlare will replace `cf_click_id` and `payout_currency` with the actual values for that conversion.
This flexibility lets you dynamically send campaign, visitor, or conversion data to any external platform.
### Step 4: Add Event Filters (Optional)
ClickFlare’s **Event Filter** feature lets you control which events trigger your Webhook.
For example, you can create rules such as:
* Fire the event **only if payout > 0**
* Fire the event **only for a specific campaign or offer**
* Fire events coming from a **specific country**
To add a condition, click **Add Conditions**, define your rules, and save.
 ### Step 5: Save and Apply
Once your configuration is complete, click **Next** and then **Save**.
Your Webhook Integration is now ready and will start firing automatically when the mapped events occur.
***
## Campaign-Level Webhooks
You can also configure **Webhooks on a campaign level**.
This allows each campaign to have its own dedicated Webhook setup. This is perfect for scenarios where different partners or networks require different postbacks.
For example:
* Campaign A sends conversions to `https://partnerA.com/postback`
* Campaign B sends conversions to `https://partnerB.com/postback`
Each campaign’s Webhook will fire independently based on its configuration.
***
## Best Practices
* Always **test your Webhook URL** to confirm that the data is being sent correctly.
* Use **POST** when you need to send structured payloads (like JSON or form data).
* Use **GET** when you just need to trigger a simple callback with query parameters.
* Use **Event Filters** to limit unnecessary events and get cleaner data.
***
**FREQUENTLY ASKED QUESTIONS**
Got questions? Find the answers below:
> **Q1:** Can I use ClickFlare macros inside the Webhook integration?
**A1**: Yes. You can use any ClickFlare macro in the **URL**, **headers**, or **body** of your Webhook. Macros will automatically be replaced with real-time values when the event fires.
> **Q2:** What’s the difference between GET and POST in Webhooks?
* **GET** is typically used for simple callbacks that pass data through the URL query string.
* **POST** is used when you need to send structured data, such as JSON or form data, in the request body.
If you choose **POST** with a JSON payload, ClickFlare automatically includes the header Content-Type: application/json.
> **Q3:** How many events can I map in a single Webhook integration?
**A3**: You can map up to **10 events** per integration. Each event can have its own configuration, URL, and request method.
> **Q4:** Can I send the same event to multiple destinations?
**A4**: Yes. You can map the same event multiple times. For example, a “Purchase” event can be sent to both your CRM and analytics tool simultaneously.
> **Q5:** Can each campaign have its own Webhook?
**A5**: Yes. ClickFlare allows **campaign-level Webhook postbacks**, so each campaign can have its own independent configuration and endpoints.
***
## Related Resources
* [ClickFlare Conversion API Integrations](/docs/en/integrations/adding-an-integration)
### Step 5: Save and Apply
Once your configuration is complete, click **Next** and then **Save**.
Your Webhook Integration is now ready and will start firing automatically when the mapped events occur.
***
## Campaign-Level Webhooks
You can also configure **Webhooks on a campaign level**.
This allows each campaign to have its own dedicated Webhook setup. This is perfect for scenarios where different partners or networks require different postbacks.
For example:
* Campaign A sends conversions to `https://partnerA.com/postback`
* Campaign B sends conversions to `https://partnerB.com/postback`
Each campaign’s Webhook will fire independently based on its configuration.
***
## Best Practices
* Always **test your Webhook URL** to confirm that the data is being sent correctly.
* Use **POST** when you need to send structured payloads (like JSON or form data).
* Use **GET** when you just need to trigger a simple callback with query parameters.
* Use **Event Filters** to limit unnecessary events and get cleaner data.
***
**FREQUENTLY ASKED QUESTIONS**
Got questions? Find the answers below:
> **Q1:** Can I use ClickFlare macros inside the Webhook integration?
**A1**: Yes. You can use any ClickFlare macro in the **URL**, **headers**, or **body** of your Webhook. Macros will automatically be replaced with real-time values when the event fires.
> **Q2:** What’s the difference between GET and POST in Webhooks?
* **GET** is typically used for simple callbacks that pass data through the URL query string.
* **POST** is used when you need to send structured data, such as JSON or form data, in the request body.
If you choose **POST** with a JSON payload, ClickFlare automatically includes the header Content-Type: application/json.
> **Q3:** How many events can I map in a single Webhook integration?
**A3**: You can map up to **10 events** per integration. Each event can have its own configuration, URL, and request method.
> **Q4:** Can I send the same event to multiple destinations?
**A4**: Yes. You can map the same event multiple times. For example, a “Purchase” event can be sent to both your CRM and analytics tool simultaneously.
> **Q5:** Can each campaign have its own Webhook?
**A5**: Yes. ClickFlare allows **campaign-level Webhook postbacks**, so each campaign can have its own independent configuration and endpoints.
***
## Related Resources
* [ClickFlare Conversion API Integrations](/docs/en/integrations/adding-an-integration)