> ## Documentation Index
> Fetch the complete documentation index at: https://clickflare.com/docs/llms.txt
> Use this file to discover all available pages before exploring further.
# Glitchy ↔ClickFlare Integration Guide
> Step-by-Step Guide to Setting Up ClickFlare and Glitchy S2S Postback Tracking
## Quick Setup Checklist
* **Create Glitchy Affiliate Network in ClickFlare**
*• Add from template → copy ClickFlare postback URL.*
* **Add Glitchy Offer in ClickFlare**
*• Select Glitchy as the network → paste offer URL → toggle **Append Click ID**.*
* **Set Postback in Glitchy**
*• Open the same offer in Glitchy → paste ClickFlare postback into **Conversion Attribution Postback**.*
* **Create Campaign in ClickFlare**
*• Select your Glitchy offer + traffic source → use the ClickFlare campaign URL in your traffic source.*
👉 Done! Clicks and conversions will now flow between **Glitchy** and **ClickFlare**.
***
## Introduction: What is Glitchy?
Glitchy is an **offer aggregator and affiliate network hub** that connects advertisers and publishers with a wide range of performance marketing offers. Instead of working with individual affiliate programs, marketers can access hundreds of offers through one platform. By integrating Glitchy with **ClickFlare**, you can track clicks, conversions, and payouts in real time, ensuring accurate attribution and campaign optimization.
***
## Before You Begin
Make sure you have:
* An **active ClickFlare account**
* An **active Glitchy account**
* Access to both platforms’ tracking and postback settings
***
## 1. Add Glitchy as an Affiliate Network in ClickFlare
ClickFlare provides a ready-made template for Glitchy, which makes setup simple.
1. In your **ClickFlare** dashboard, go to **Affiliate Networks**.
2. Click **Add New Network**.
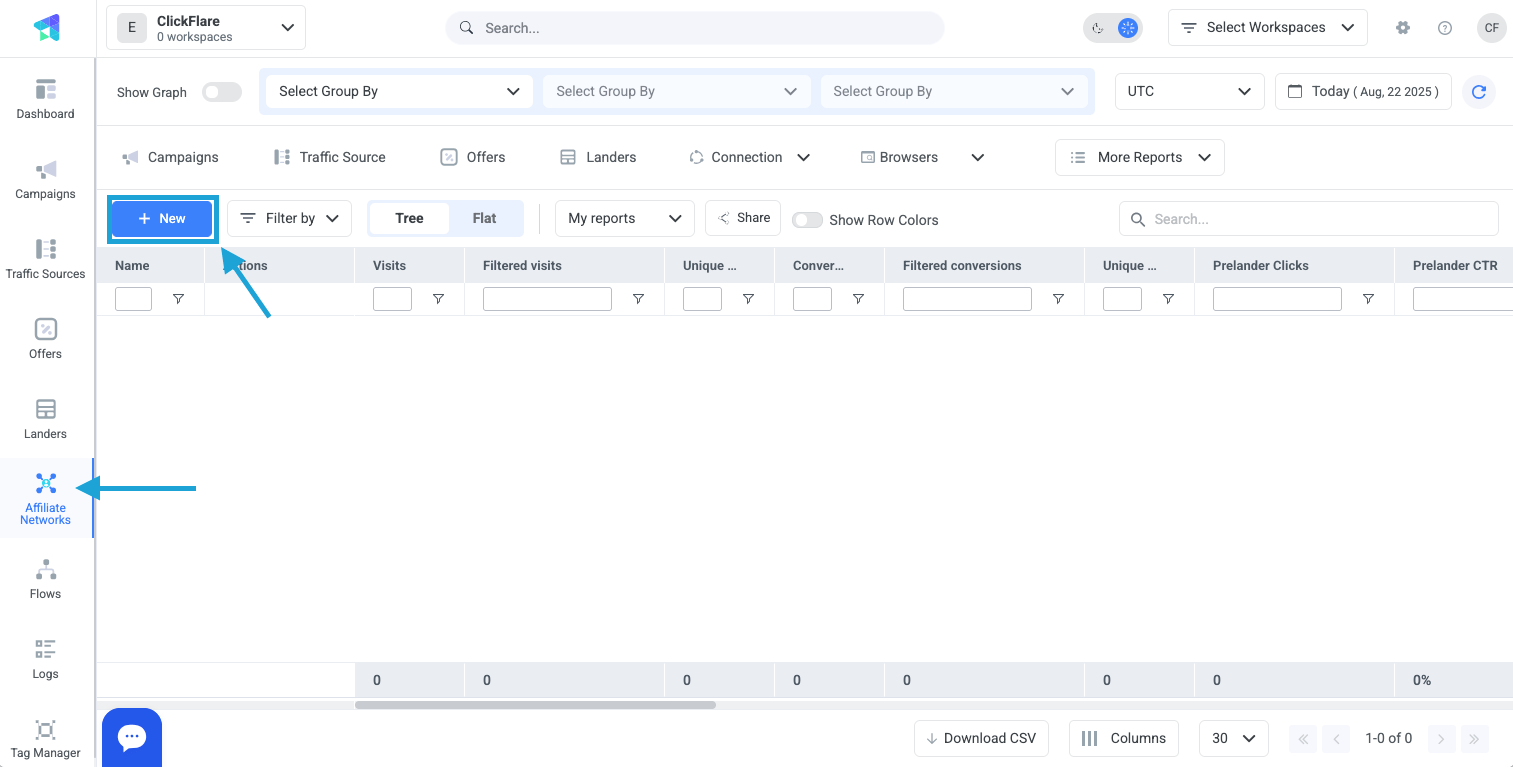 3. From the template list, select **Glitchy**.
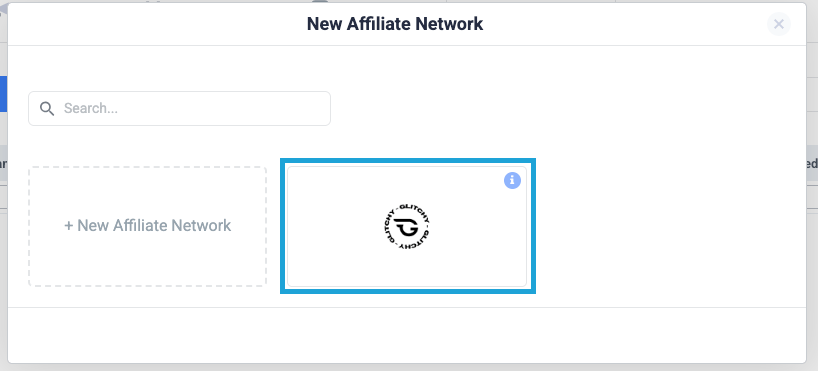 4. The template will automatically generate the proper **ClickFlare Postback URL**:
```
https://webeasyhit.com/cf/cv?click_id={source}&payout={payout}
```
5. Copy this URL — you will need it to configure postback tracking in Glitchy.
6. Save the Glitchy network in ClickFlare.
***
## 2. Add a Glitchy Offer to ClickFlare
#### A. Get the Offer Link from Glitchy
1. Log in to **Glitchy**.
2. Go to the **Offers** section.
3. Find the offer you want to promote and copy the affiliate link.
#### B. Configure the Offer in ClickFlare
1. In ClickFlare, go to **Offers** → **New Offer**.
2. Choose **Glitchy** as the affiliate network (created in Step 2).
3. Enter a descriptive offer name.
4. Paste the offer URL you copied from Glitchy.
5. Toggle **Append Click ID** so ClickFlare automatically adds its click identifier to the offer URL as "`source={cf_click_id}`" (see image below):
4. The template will automatically generate the proper **ClickFlare Postback URL**:
```
https://webeasyhit.com/cf/cv?click_id={source}&payout={payout}
```
5. Copy this URL — you will need it to configure postback tracking in Glitchy.
6. Save the Glitchy network in ClickFlare.
***
## 2. Add a Glitchy Offer to ClickFlare
#### A. Get the Offer Link from Glitchy
1. Log in to **Glitchy**.
2. Go to the **Offers** section.
3. Find the offer you want to promote and copy the affiliate link.
#### B. Configure the Offer in ClickFlare
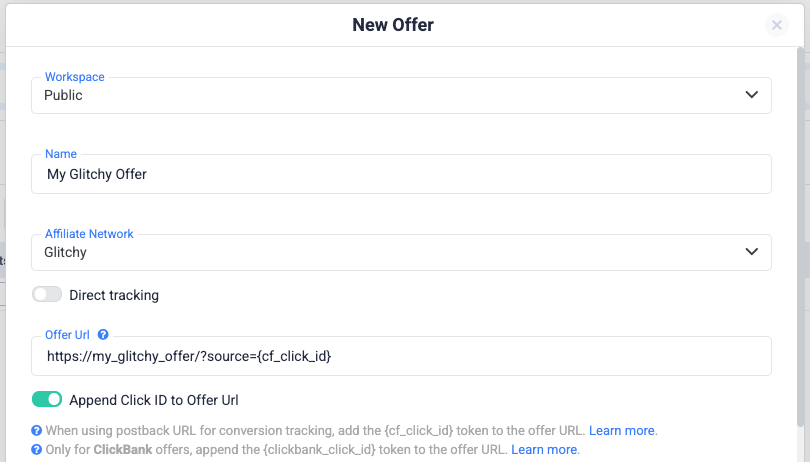
1. In ClickFlare, go to **Offers** → **New Offer**.
2. Choose **Glitchy** as the affiliate network (created in Step 2).
3. Enter a descriptive offer name.
4. Paste the offer URL you copied from Glitchy.
5. Toggle **Append Click ID** so ClickFlare automatically adds its click identifier to the offer URL as "`source={cf_click_id}`" (see image below):
 ***
## 3. Add ClickFlare Postback to Glitchy
To make sure conversions are sent back from Glitchy to ClickFlare:
1. Log in to your **Glitchy** account.
2. Go to the **Offers** section and open the same offer you configured in Step 2.
3. In the offer settings, locate the **Conversion Attribution Postback** field.
4. Paste the ClickFlare postback URL you copied in Step 1 (see image below):
```
https://webeasyhit.com/cf/cv?click_id={source}&payout={payout}
```
5. Click on **Add Postback URL** - \*a preview of the postback URL will show under the postback input field form
***
## 3. Add ClickFlare Postback to Glitchy
To make sure conversions are sent back from Glitchy to ClickFlare:
1. Log in to your **Glitchy** account.
2. Go to the **Offers** section and open the same offer you configured in Step 2.
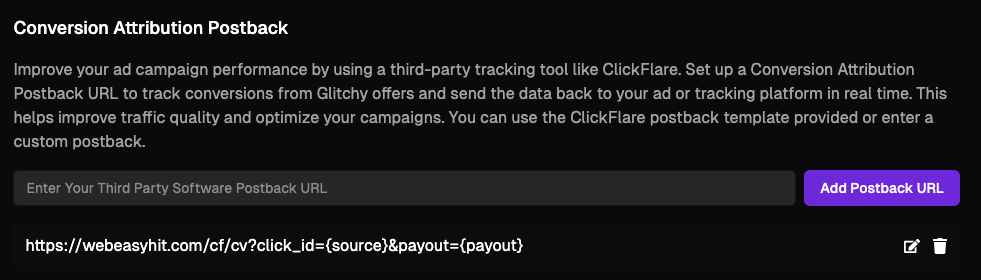
3. In the offer settings, locate the **Conversion Attribution Postback** field.
4. Paste the ClickFlare postback URL you copied in Step 1 (see image below):
```
https://webeasyhit.com/cf/cv?click_id={source}&payout={payout}
```
5. Click on **Add Postback URL** - \*a preview of the postback URL will show under the postback input field form
 \*
***
⚡ **Next Step: Create a Campaign in ClickFlare**
With the affiliate network, offer, and postback set up, the final step is to create a campaign in ClickFlare. Select your **Glitchy offer** and a **traffic source**, then use the generated **ClickFlare campaign URL** in your traffic source to start tracking.
Note: Campaign creation works the same way for all affiliate networks in ClickFlare, so the steps are always identical.
***
### How the Integration Works
| Step | Action |
| ---- | --------------------------------------------------------------------------------------------------------- |
| 1 | User clicks a ClickFlare campaign link in the traffic source (your ad) |
| 2 | ClickFlare records the click and redirects the user to the offer (with source=\{cf\_click\_id} appended.) |
| 3 | On conversion, Glitchy fires the ClickFlare postback for that offer. |
| 4 | ClickFlare attributes the conversion to the correct click and logs revenue/payout. |
***
### Testing the Setup
* **Click Test**: Open the ClickFlare campaign URL in your browser and confirm the click appears in ClickFlare.
* **Conversion Test**: Trigger a test conversion in Glitchy and verify it is logged in ClickFlare with payout data.
***
### Summary Table
| Component | Purpose | Example Setup |
| ----------------- | -------------------------------------------- | --------------------------------------------------- |
| Affiliate Network | Glitchy template in ClickFlare | Preconfigured with ClickFlare postback |
| Offer URL | Sends traffic & passes click ID | ...\&source=\{cf\_click\_id} |
| Postback URL | Sends conversions from Glitchy to ClickFlare | `https://webeasyhit.com/cf/cv?click_id=...&payout=` |
| Tokens | Enable proper attribution & payout logging | \{click\_id}, \{payout} |
***
### Final Notes
* Always double-check token mapping between Glitchy and ClickFlare.
* Set the **Conversion Attribution Postback** at the offer level in Glitchy to ensure proper tracking.
* Test both clicks and conversions before scaling traffic.
* Monitor dashboards in both systems to confirm that data matches.
***
👉 With these steps complete, your **ClickFlare ↔ Glitchy integration** is ready. You can now track offers, clicks, and conversions with full accuracy.
**FREQUENTLY ASKED QUESTIONS**
Got questions? Find the answers below:
> **Q1:** Do I always need to toggle “Append Click ID” when adding offers?
**A1**: Yes. This ensures ClickFlare passes its unique click identifier to Glitchy so conversions can be properly attributed.
> **Q2**: Can I track payouts from Glitchy in ClickFlare?
**A2**: Yes. Make sure the \{payout} token is included in the postback. This will allow ClickFlare to log revenue per conversion.
> **Q3**: What happens if I don’t add the postback in Glitchy?
**A3**: Clicks will still be tracked in ClickFlare, but conversions will not be recorded. Postback setup is required for conversion attribution.
> **Q4**: Do I need to repeat the setup for every offer?
**A4**: You only need to add the **Glitchy network once** in ClickFlare. For each new offer, you’ll add it separately under **Offers** and link it to the existing Glitchy network.
> **Q5**: Is campaign setup different for Glitchy compared to other networks?
**A5**: No. Campaign creation in ClickFlare works the same way regardless of the affiliate network.
## Related Resources:
* [How to Create a Campaign in ClickFlare](/docs/en/campaigns/creating-a-campaign-in-click-flare)
* [Adding an Affiliate Network in ClickFlare](/docs/en/tracking/adding-an-affiliate-network)
* [Postback Setup Basics](/docs/en/tracking/how-to-submit-an-s2s-postback-url-to-an-affiliate-network-in-clickflare)
* [Traffic Source Integration Guide](/docs/en/tracking/creating-a-traffic-source)
\*
***
⚡ **Next Step: Create a Campaign in ClickFlare**
With the affiliate network, offer, and postback set up, the final step is to create a campaign in ClickFlare. Select your **Glitchy offer** and a **traffic source**, then use the generated **ClickFlare campaign URL** in your traffic source to start tracking.
Note: Campaign creation works the same way for all affiliate networks in ClickFlare, so the steps are always identical.
***
### How the Integration Works
| Step | Action |
| ---- | --------------------------------------------------------------------------------------------------------- |
| 1 | User clicks a ClickFlare campaign link in the traffic source (your ad) |
| 2 | ClickFlare records the click and redirects the user to the offer (with source=\{cf\_click\_id} appended.) |
| 3 | On conversion, Glitchy fires the ClickFlare postback for that offer. |
| 4 | ClickFlare attributes the conversion to the correct click and logs revenue/payout. |
***
### Testing the Setup
* **Click Test**: Open the ClickFlare campaign URL in your browser and confirm the click appears in ClickFlare.
* **Conversion Test**: Trigger a test conversion in Glitchy and verify it is logged in ClickFlare with payout data.
***
### Summary Table
| Component | Purpose | Example Setup |
| ----------------- | -------------------------------------------- | --------------------------------------------------- |
| Affiliate Network | Glitchy template in ClickFlare | Preconfigured with ClickFlare postback |
| Offer URL | Sends traffic & passes click ID | ...\&source=\{cf\_click\_id} |
| Postback URL | Sends conversions from Glitchy to ClickFlare | `https://webeasyhit.com/cf/cv?click_id=...&payout=` |
| Tokens | Enable proper attribution & payout logging | \{click\_id}, \{payout} |
***
### Final Notes
* Always double-check token mapping between Glitchy and ClickFlare.
* Set the **Conversion Attribution Postback** at the offer level in Glitchy to ensure proper tracking.
* Test both clicks and conversions before scaling traffic.
* Monitor dashboards in both systems to confirm that data matches.
***
👉 With these steps complete, your **ClickFlare ↔ Glitchy integration** is ready. You can now track offers, clicks, and conversions with full accuracy.
**FREQUENTLY ASKED QUESTIONS**
Got questions? Find the answers below:
> **Q1:** Do I always need to toggle “Append Click ID” when adding offers?
**A1**: Yes. This ensures ClickFlare passes its unique click identifier to Glitchy so conversions can be properly attributed.
> **Q2**: Can I track payouts from Glitchy in ClickFlare?
**A2**: Yes. Make sure the \{payout} token is included in the postback. This will allow ClickFlare to log revenue per conversion.
> **Q3**: What happens if I don’t add the postback in Glitchy?
**A3**: Clicks will still be tracked in ClickFlare, but conversions will not be recorded. Postback setup is required for conversion attribution.
> **Q4**: Do I need to repeat the setup for every offer?
**A4**: You only need to add the **Glitchy network once** in ClickFlare. For each new offer, you’ll add it separately under **Offers** and link it to the existing Glitchy network.
> **Q5**: Is campaign setup different for Glitchy compared to other networks?
**A5**: No. Campaign creation in ClickFlare works the same way regardless of the affiliate network.
## Related Resources:
* [How to Create a Campaign in ClickFlare](/docs/en/campaigns/creating-a-campaign-in-click-flare)
* [Adding an Affiliate Network in ClickFlare](/docs/en/tracking/adding-an-affiliate-network)
* [Postback Setup Basics](/docs/en/tracking/how-to-submit-an-s2s-postback-url-to-an-affiliate-network-in-clickflare)
* [Traffic Source Integration Guide](/docs/en/tracking/creating-a-traffic-source)