> ## Documentation Index
> Fetch the complete documentation index at: https://clickflare.com/docs/llms.txt
> Use this file to discover all available pages before exploring further.
# How to Track Ringba Pay-Per-Call Campaigns with ClickFlare
> Learn how to set up reliable call tracking between Ringba and ClickFlare to attribute calls, optimize performance, and push conversion data to your ad platforms.
 **Pay-Per-Call** is a performance marketing model where advertisers pay publishers for qualified phone calls instead of clicks or impressions. **Ringba** is a call tracking and analytics platform that enables real-time call routing, attribution, and reporting.
This guide focuses on how to **track Ringba PPC campaigns using ClickFlare**. It assumes you already have campaigns set up in both platforms.
***
## Prerequisites
Before you begin, make sure you have:
* ✅ An active **ClickFlare** account
* ✅ An active **Ringba** account
* ✅ A **Ringba campaign** already created
* ✅ A **landing page** where users are redirected after clicking an ad
→ *Check out [**LanderLab.io**](https://landerlab.io) – a landing page builder with ready-made PPC templates*
***
## Why You Need a Tracker
Running Pay-Per-Call campaigns without a tracker means you're blind to what’s actually driving your results. A performance tracker helps you:
* **Split-test landing pages and auto-optimize** based on call performance
* **Combine cost, call, revenue, and funnel data** into one unified reporting view
* **Send call conversions server-side (via Conversion API) to ad platforms** — including enriched data like phone number, ZIP code, and custom parameters
* **Track button clicks, funnel steps, and drop-offs** to understand user behavior before the call
* **Attribute calls back to the original ad click, source, and creative**
***
## Why Use ClickFlare Specifically?
ClickFlare is the only trackers that includes a **built-in Tag Manager**, allowing you to:
* Inject the **Ringba Number Pool script conditionally** — for example, only after a user answers a certain quiz question
* Dynamically inject different **Ringba campaign scripts on the same landing page**, depending on user actions
* Do all of this **without ever modifying the page code manually** — no developer needed
This makes ClickFlare especially powerful for multi-step funnels, advanced segmentation, and clean campaign management.
***
## How It Works
Here’s how a typical Ringba + ClickFlare setup works:
1. A user clicks on your ad from a traffic source (Google, Facebook, Taboola, etc.)
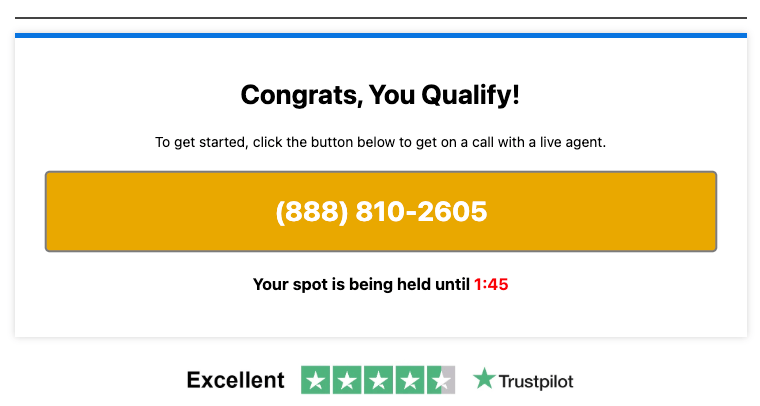
2. They land on your **landing page**, which displays a dynamic phone number
3. When the user **calls the number**, **Ringba** tracks the call
**Important:** Ringba dynamically replaces the number on the page using its **Number Pool script**. This script must be added to your page so that each user sees a unique number for proper call attribution.
**Pay-Per-Call** is a performance marketing model where advertisers pay publishers for qualified phone calls instead of clicks or impressions. **Ringba** is a call tracking and analytics platform that enables real-time call routing, attribution, and reporting.
This guide focuses on how to **track Ringba PPC campaigns using ClickFlare**. It assumes you already have campaigns set up in both platforms.
***
## Prerequisites
Before you begin, make sure you have:
* ✅ An active **ClickFlare** account
* ✅ An active **Ringba** account
* ✅ A **Ringba campaign** already created
* ✅ A **landing page** where users are redirected after clicking an ad
→ *Check out [**LanderLab.io**](https://landerlab.io) – a landing page builder with ready-made PPC templates*
***
## Why You Need a Tracker
Running Pay-Per-Call campaigns without a tracker means you're blind to what’s actually driving your results. A performance tracker helps you:
* **Split-test landing pages and auto-optimize** based on call performance
* **Combine cost, call, revenue, and funnel data** into one unified reporting view
* **Send call conversions server-side (via Conversion API) to ad platforms** — including enriched data like phone number, ZIP code, and custom parameters
* **Track button clicks, funnel steps, and drop-offs** to understand user behavior before the call
* **Attribute calls back to the original ad click, source, and creative**
***
## Why Use ClickFlare Specifically?
ClickFlare is the only trackers that includes a **built-in Tag Manager**, allowing you to:
* Inject the **Ringba Number Pool script conditionally** — for example, only after a user answers a certain quiz question
* Dynamically inject different **Ringba campaign scripts on the same landing page**, depending on user actions
* Do all of this **without ever modifying the page code manually** — no developer needed
This makes ClickFlare especially powerful for multi-step funnels, advanced segmentation, and clean campaign management.
***
## How It Works
Here’s how a typical Ringba + ClickFlare setup works:
1. A user clicks on your ad from a traffic source (Google, Facebook, Taboola, etc.)
2. They land on your **landing page**, which displays a dynamic phone number
3. When the user **calls the number**, **Ringba** tracks the call
**Important:** Ringba dynamically replaces the number on the page using its **Number Pool script**. This script must be added to your page so that each user sees a unique number for proper call attribution.
 ***
## Step 1: Pass the Click ID from ClickFlare to Ringba
This is the **standard setup** for most redirect-based campaigns.
### 1. Create the Lander as an Offer in ClickFlare
In ClickFlare, add your landing page as an **Offer**. This is required to properly pass the Click ID and track conversions.
### 2. Append the ClickFlare Click ID to the Offer URL
When setting up the offer, make sure the URL includes the Click ID token:
```
https://your-landing-page.com?clickid={cf_click_id}
```
This ensures that the clickid is passed to Ringba when the user lands on the page.
### 3. Create a URL Parameter in Ringba
1. Go to Integrations > URL Parameters
***
## Step 1: Pass the Click ID from ClickFlare to Ringba
This is the **standard setup** for most redirect-based campaigns.
### 1. Create the Lander as an Offer in ClickFlare
In ClickFlare, add your landing page as an **Offer**. This is required to properly pass the Click ID and track conversions.
### 2. Append the ClickFlare Click ID to the Offer URL
When setting up the offer, make sure the URL includes the Click ID token:
```
https://your-landing-page.com?clickid={cf_click_id}
```
This ensures that the clickid is passed to Ringba when the user lands on the page.
### 3. Create a URL Parameter in Ringba
1. Go to Integrations > URL Parameters
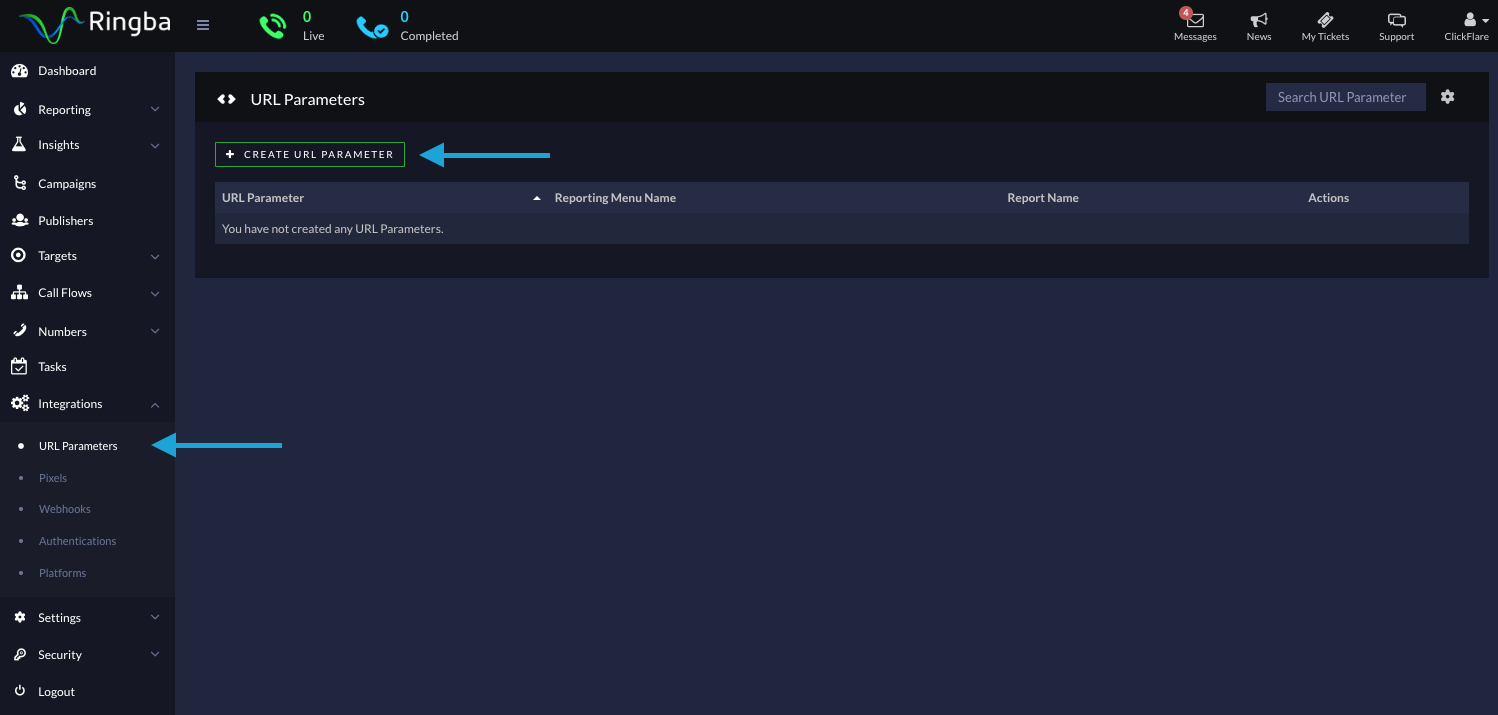 2. Click \*\*Create URL Parameter
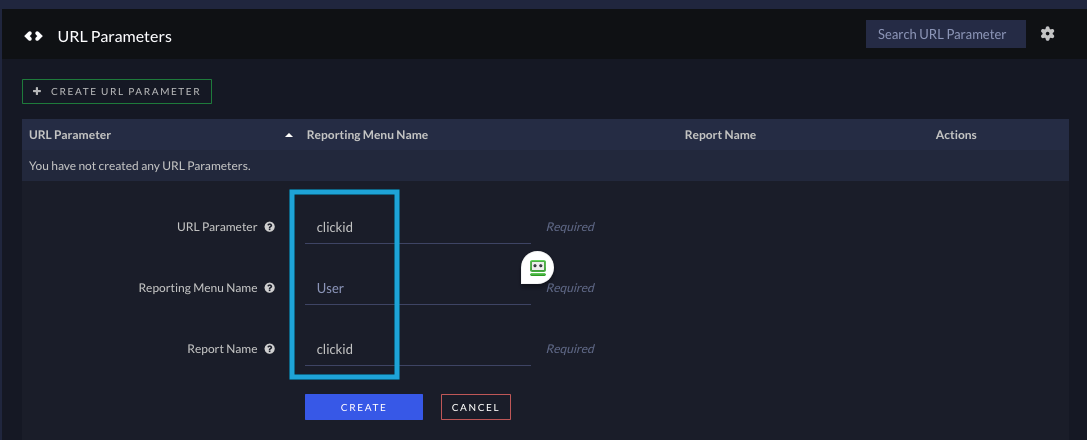 \*\*
3. Name it clickid → token \[tag:User:clickid] will be created
### 4. Attach the Parameter to Your Campaign
1. Open your Ringba campaign
2. In the **URL Parameters** section, click **Add URL Parameter**
3. Select `clickid` from the existing list and click \*\*Add
\*\*
3. Name it clickid → token \[tag:User:clickid] will be created
### 4. Attach the Parameter to Your Campaign
1. Open your Ringba campaign
2. In the **URL Parameters** section, click **Add URL Parameter**
3. Select `clickid` from the existing list and click \*\*Add
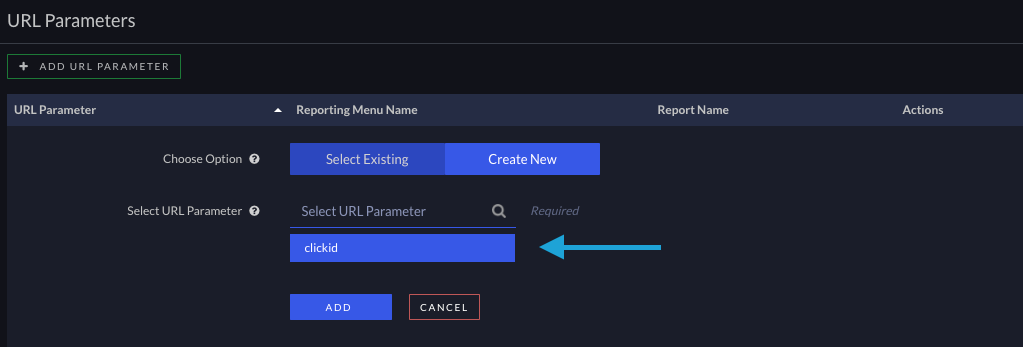 \*\*
This is the **standard setup** for most redirect-based campaigns.
## Step 2: Send Call Conversions from Ringba to ClickFlare
### 1. Copy Your ClickFlare Postback URL
* In ClickFlare, go to **Settings → Tracking URLs**
* Copy your **Postback URL**, which will look like this:
```
https://your_tracking_domain.com/cf/cv?click_id=REPLACE&payout=OPTIONAL&txid=OPTIONAL¶m1=OPTIONAL¶m2=OPTIONAL¶m3=OPTIONAL&ct=REPLACE
```
### 2. Create a Pixel in Ringba
1. Go to Integrations > Pixels
2. Click **Create Pixel**
3. Paste your ClickFlare postback URL
### 3. Add Tokens to the Postback
Use Ringba tokens to dynamically pass data to ClickFlare:
| Parameter | Ringba Token | Purpose |
| ---------- | ----------------------------------------------------- | --------------------- |
| click\_id | \[tag:User:clickid] | Required for tracking |
| payout | \[Call:-ConversionAmount] | Revenue |
| txid | \[Call:InboundCallId] | Unique call ID |
| ct | conv | Converted Call |
| param1 –20 | e.g., \[tag:InboundNumber:Number], \[tag:Geo:ZipCode] | Extra metadata |
\*\*
This is the **standard setup** for most redirect-based campaigns.
## Step 2: Send Call Conversions from Ringba to ClickFlare
### 1. Copy Your ClickFlare Postback URL
* In ClickFlare, go to **Settings → Tracking URLs**
* Copy your **Postback URL**, which will look like this:
```
https://your_tracking_domain.com/cf/cv?click_id=REPLACE&payout=OPTIONAL&txid=OPTIONAL¶m1=OPTIONAL¶m2=OPTIONAL¶m3=OPTIONAL&ct=REPLACE
```
### 2. Create a Pixel in Ringba
1. Go to Integrations > Pixels
2. Click **Create Pixel**
3. Paste your ClickFlare postback URL
### 3. Add Tokens to the Postback
Use Ringba tokens to dynamically pass data to ClickFlare:
| Parameter | Ringba Token | Purpose |
| ---------- | ----------------------------------------------------- | --------------------- |
| click\_id | \[tag:User:clickid] | Required for tracking |
| payout | \[Call:-ConversionAmount] | Revenue |
| txid | \[Call:InboundCallId] | Unique call ID |
| ct | conv | Converted Call |
| param1 –20 | e.g., \[tag:InboundNumber:Number], \[tag:Geo:ZipCode] | Extra metadata |
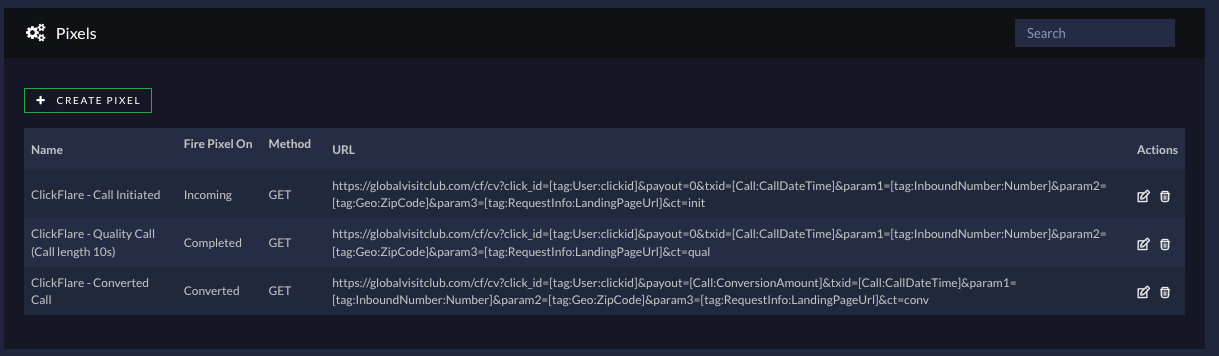 > **Note:** To use these postbacks in Ringba, make sure you’ve already created the corresponding **custom conversions** in ClickFlare, as shown in the image below.
>
> **
> **Note:** To use these postbacks in Ringba, make sure you’ve already created the corresponding **custom conversions** in ClickFlare, as shown in the image below.
>
> **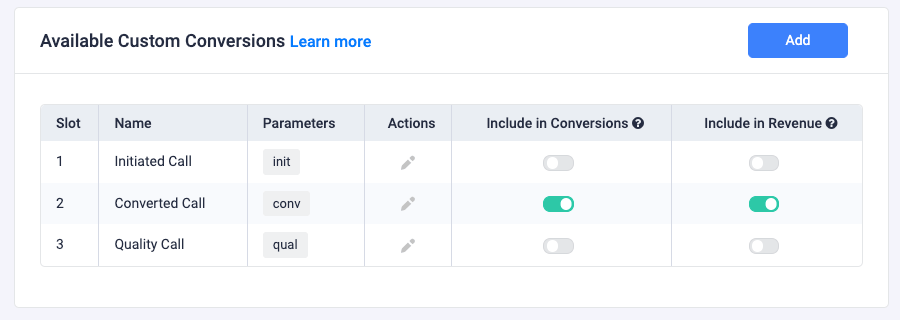 **
### ✅ Example ClickFlare Postback
```
https://your_tracking_domain.com/cf/cv?click_id=[tag:User:clickid]&payout=[Call:ConversionAmount]&txid=[Call:CallDateTime]¶m1=[tag:InboundNumber:Number]¶m2=[tag:Geo:ZipCode]¶m3=[tag:RequestInfo:LandingPageUrl]&ct=converted_call
```
> 🧠 Customize tokens based on what’s important to track for your campaigns.
***
## Alternative Implementation Scenarios
If you're not injecting the Ringba script on page load (standard case), here are three alternative setups depending on your needs:
### Use Case 1: Redirect Tracking + Script on Page Load
✅ *This is the default setup covered above.*
Works with any source that supports redirects (e.g., Facebook, TikTok, Taboola).
Inject the Ringba Number Pool script directly in the \ of the landing page.
### Use Case 2: Redirect Tracking + Delayed Script Injection
**When to use:** You want to show the phone number only to users who reach a certain step (e.g., after answering a quiz like shown in the image below).
**
### ✅ Example ClickFlare Postback
```
https://your_tracking_domain.com/cf/cv?click_id=[tag:User:clickid]&payout=[Call:ConversionAmount]&txid=[Call:CallDateTime]¶m1=[tag:InboundNumber:Number]¶m2=[tag:Geo:ZipCode]¶m3=[tag:RequestInfo:LandingPageUrl]&ct=converted_call
```
> 🧠 Customize tokens based on what’s important to track for your campaigns.
***
## Alternative Implementation Scenarios
If you're not injecting the Ringba script on page load (standard case), here are three alternative setups depending on your needs:
### Use Case 1: Redirect Tracking + Script on Page Load
✅ *This is the default setup covered above.*
Works with any source that supports redirects (e.g., Facebook, TikTok, Taboola).
Inject the Ringba Number Pool script directly in the \ of the landing page.
### Use Case 2: Redirect Tracking + Delayed Script Injection
**When to use:** You want to show the phone number only to users who reach a certain step (e.g., after answering a quiz like shown in the image below).
 * You still use redirect (click ID passed via URL)
* Delay script injection using **ClickFlare Tag Manager**
* Set a trigger (for example, when the user clicks on **any of the buttons in question 2**.)
* You still use redirect (click ID passed via URL)
* Delay script injection using **ClickFlare Tag Manager**
* Set a trigger (for example, when the user clicks on **any of the buttons in question 2**.)
 *Note: In the example above, the button click is being tracked using the clicked element’s ID.*
* Use the **"Inject Ringba Script"** tag and your Ringba Campaign ID
*Note: In the example above, the button click is being tracked using the clicked element’s ID.*
* Use the **"Inject Ringba Script"** tag and your Ringba Campaign ID
 **Info:** The tag simply injects the Ringba Number Pool script using the Ringba Campaign ID you provide.
**Why it matters:**
Every time the Ringba script loads, a number is pulled from your number pool. If you show numbers to all visitors immediately, you may run out of available numbers quickly — especially with limited pools. When that happens, Ringba will no longer be able to track calls accurately. By delaying script injection, you allocate numbers only to users who are engaged and more likely to convert.
### Use Case 3: Direct Tracking (Google Ads, Bing, YouTube)
**When to use:** Redirects are not allowed.
* ClickFlare stores the click ID in a cookie
* Use the **“Inject Ringba and push cf\_click\_id”** tag in ClickFlare
* This tag will:
1. Inject the Ringba script
2. Retrieve the click ID from the cookie
3. Push the click ID to Ringba
**Info:** The tag simply injects the Ringba Number Pool script using the Ringba Campaign ID you provide.
**Why it matters:**
Every time the Ringba script loads, a number is pulled from your number pool. If you show numbers to all visitors immediately, you may run out of available numbers quickly — especially with limited pools. When that happens, Ringba will no longer be able to track calls accurately. By delaying script injection, you allocate numbers only to users who are engaged and more likely to convert.
### Use Case 3: Direct Tracking (Google Ads, Bing, YouTube)
**When to use:** Redirects are not allowed.
* ClickFlare stores the click ID in a cookie
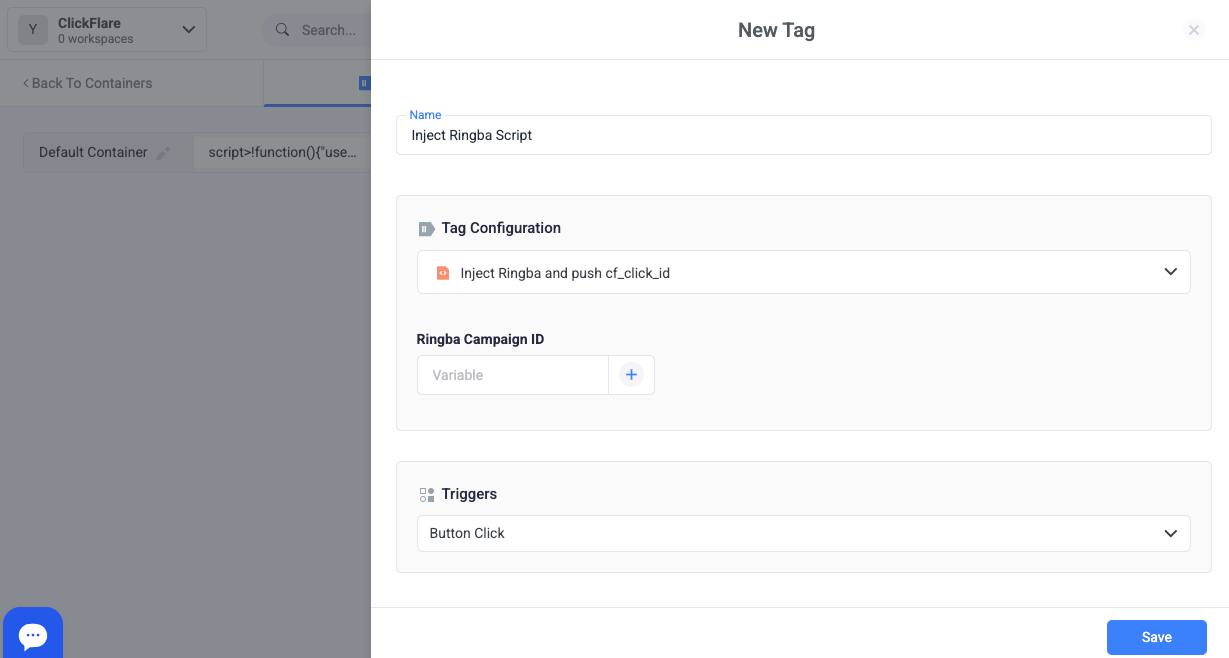
* Use the **“Inject Ringba and push cf\_click\_id”** tag in ClickFlare
* This tag will:
1. Inject the Ringba script
2. Retrieve the click ID from the cookie
3. Push the click ID to Ringba
 Info: ⏳ Retrieving the click ID from the cookie takes \~1–2 seconds. Delay number display slightly to avoid missing the ID.
> ⚠️ **Important:** When using ClickFlare's Tag Manager, you must add the **ClickFlare container script** to your landing page.
> To do this:
>
> 1. Go to **Tag Manager** in ClickFlare
> 2. Select or create a **container**
> 3. Set up your **tags and triggers** as described above
> 4. **Copy and paste the container script** into your landing page \ section
## Best Practices
> ⚠️ If using ClickFlare’s tag to inject Ringba script, **do not add it manually** in the page to avoid duplicate script execution.
>
> ✅ Whenever possible, use **redirect tracking** — it ensures the click ID is available immediately via URL, making tracking more robust.
***
## Testing & Validation
Before launching your campaign, it's important to run a quick test to ensure everything is working properly.
### ✅ Basic Testing Steps
1. **Visit your landing page** using a ClickFlare campaign link
2. **Check the following:**
* *clickid* is appended to the **Offer URL**
* The phone number on the page is replaced — this confirms that the **Ringba script loaded correctly**
3. **If you're using ClickFlare Tag Manager** to inject the Ringba script:
* Open your browser’s console (Inspect Element → Console)
* Look for the success message indicating the script was injected correctly
Info: ⏳ Retrieving the click ID from the cookie takes \~1–2 seconds. Delay number display slightly to avoid missing the ID.
> ⚠️ **Important:** When using ClickFlare's Tag Manager, you must add the **ClickFlare container script** to your landing page.
> To do this:
>
> 1. Go to **Tag Manager** in ClickFlare
> 2. Select or create a **container**
> 3. Set up your **tags and triggers** as described above
> 4. **Copy and paste the container script** into your landing page \ section
## Best Practices
> ⚠️ If using ClickFlare’s tag to inject Ringba script, **do not add it manually** in the page to avoid duplicate script execution.
>
> ✅ Whenever possible, use **redirect tracking** — it ensures the click ID is available immediately via URL, making tracking more robust.
***
## Testing & Validation
Before launching your campaign, it's important to run a quick test to ensure everything is working properly.
### ✅ Basic Testing Steps
1. **Visit your landing page** using a ClickFlare campaign link
2. **Check the following:**
* *clickid* is appended to the **Offer URL**
* The phone number on the page is replaced — this confirms that the **Ringba script loaded correctly**
3. **If you're using ClickFlare Tag Manager** to inject the Ringba script:
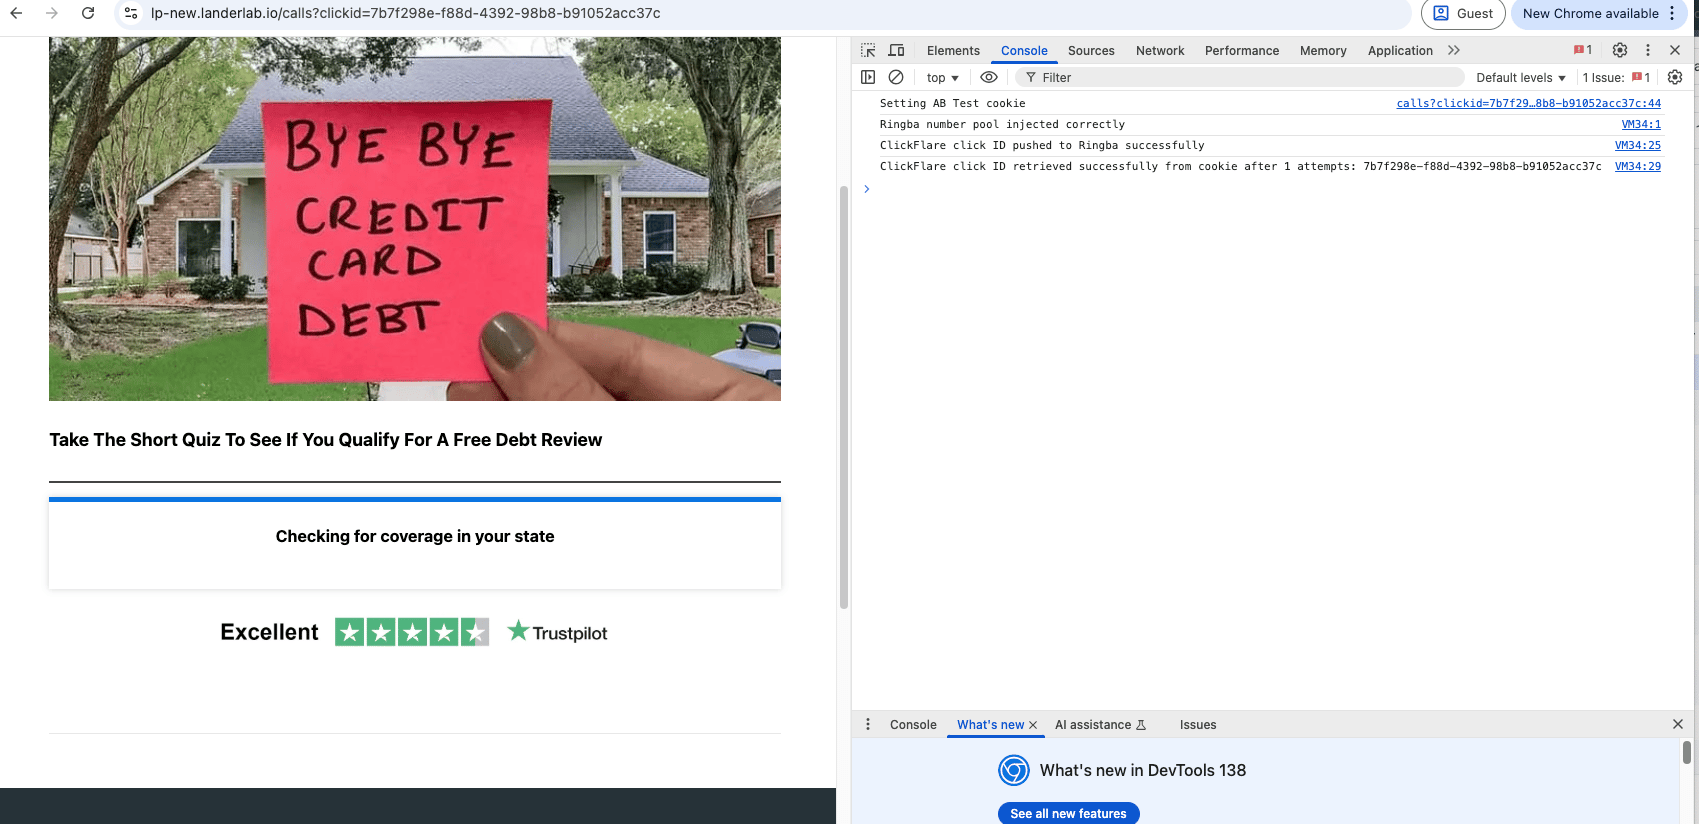
* Open your browser’s console (Inspect Element → Console)
* Look for the success message indicating the script was injected correctly
 4. **Make a test call**
### 🔍 Verify Tracking
* The call should appear inside your **Ringba dashboard**
* The conversion should be recorded in **ClickFlare** under the correct campaign
**FREQUENTLY ASKED QUESTIONS (FAQ)**
Got questions? Find the answers below:
> **Q1**: Do I need to add the Ringba script directly to the page?
**A1**: Only if you're not using ClickFlare’s built-in Tag Manager. If you're using ClickFlare tags to inject the Ringba script, **do not add it manually** to avoid duplicate injection.
> **Q2**: What happens if my Ringba number pool runs out?
**A2**: If your number pool is exhausted, Ringba may still route the call, but **tracking will fail** — meaning the call won’t be attributed to the correct click. To avoid this, consider delaying script injection using ClickFlare Tag Manager for only qualified users.
> **Q3**: Can I use the same landing page for different Ringba campaigns?
**A3**: Yes. With ClickFlare Tag Manager, you can conditionally inject different Ringba scripts based on user behavior, campaign, or triggers — all on the same landing page.
> **Q4**: Do I need to modify the landing page every time I change my Ringba campaign?
**A4**: No. If you use ClickFlare’s Tag Manager, **you can control script injection entirely within the platform**, without touching the landing page code again.
> **Q5**: Can I pass additional data like ZIP, campaign ID, or call duration?
**A5**: Yes. You can include extra values using param1 to param20 in the postback URL and insert the corresponding Ringba tokens. Customize these based on what you need to analyze or pass back to ad platforms.
## Related Resources
* [Tracking Conversions Using S2S Postback](/docs/en/tracking/tracking-conversions-using-s2s-postback)
* [How Click and Conversion Data is Transferred in ClickFlare](/docs/en/tracking/click-conversion-data-transfer-clickflare)
* [Creating a Custom Conversion in ClickFlare](/docs/en/settings/custom-conversions)
* [How to Use ClickFlare's Tag Manager](/docs/en/tag-manager-1/what-is-the-tag-manager)
* [LanderLab.io – Build High-Converting Landing Pages](https://landerlab.io)
4. **Make a test call**
### 🔍 Verify Tracking
* The call should appear inside your **Ringba dashboard**
* The conversion should be recorded in **ClickFlare** under the correct campaign
**FREQUENTLY ASKED QUESTIONS (FAQ)**
Got questions? Find the answers below:
> **Q1**: Do I need to add the Ringba script directly to the page?
**A1**: Only if you're not using ClickFlare’s built-in Tag Manager. If you're using ClickFlare tags to inject the Ringba script, **do not add it manually** to avoid duplicate injection.
> **Q2**: What happens if my Ringba number pool runs out?
**A2**: If your number pool is exhausted, Ringba may still route the call, but **tracking will fail** — meaning the call won’t be attributed to the correct click. To avoid this, consider delaying script injection using ClickFlare Tag Manager for only qualified users.
> **Q3**: Can I use the same landing page for different Ringba campaigns?
**A3**: Yes. With ClickFlare Tag Manager, you can conditionally inject different Ringba scripts based on user behavior, campaign, or triggers — all on the same landing page.
> **Q4**: Do I need to modify the landing page every time I change my Ringba campaign?
**A4**: No. If you use ClickFlare’s Tag Manager, **you can control script injection entirely within the platform**, without touching the landing page code again.
> **Q5**: Can I pass additional data like ZIP, campaign ID, or call duration?
**A5**: Yes. You can include extra values using param1 to param20 in the postback URL and insert the corresponding Ringba tokens. Customize these based on what you need to analyze or pass back to ad platforms.
## Related Resources
* [Tracking Conversions Using S2S Postback](/docs/en/tracking/tracking-conversions-using-s2s-postback)
* [How Click and Conversion Data is Transferred in ClickFlare](/docs/en/tracking/click-conversion-data-transfer-clickflare)
* [Creating a Custom Conversion in ClickFlare](/docs/en/settings/custom-conversions)
* [How to Use ClickFlare's Tag Manager](/docs/en/tag-manager-1/what-is-the-tag-manager)
* [LanderLab.io – Build High-Converting Landing Pages](https://landerlab.io)