> ## Documentation Index
> Fetch the complete documentation index at: https://clickflare.com/docs/llms.txt
> Use this file to discover all available pages before exploring further.
# How to Track Your Shopify Store with ClickFlare: From Product Views to Final Sale
> Step-by-step guide to tracking Shopify events like product views, add-to-carts, and purchases using ClickFlare’s click-level tracking and webhooks.
 This guide explains how to track conversions from your Shopify store using ClickFlare. It covers the full setup process from defining custom conversion events to configuring the Shopify theme to fire those conversions.
***
## 🚀 Why Use ClickFlare to Track Your Shopify Store
ClickFlare gives you full-funnel, click-level tracking — something traditional Shopify apps can’t do.
With ClickFlare, you can:
* **Easily set it up in minutes** — no complex development required
* **Track each user’s journey** from ad click to final purchase
* **Rotate and test landers** before sending traffic to your Shopify store
* **Attribute conversions** from both paid and organic channels
* **Send 100% of conversions** back to ad platforms server-side
* **See all key metrics** (costs, conversions, upsells, ROAS) in one dashboard
> 🧠 Whether you're running ads, SEO, or email flows — ClickFlare gives you the data and attribution accuracy you need to scale.
***
## 🧭 Overview
This guide walks you through tracking the following Shopify events using ClickFlare:
* **View Content** → view\_content
* **Add to Cart** → add\_to\_cart
* **Checkout Initiated** → checkout\_initiated
* **Checkout Completed** → sale and product\_sale (for item-level tracking)
The setup is split into two parts:
1. **ClickFlare Setup** – define events, landers (optional), and campaigns
2. **Shopify Setup** – add tracking scripts and configure webhooks
***
## I. 🔧 ClickFlare Setup
### 1. Create Custom Conversion Events
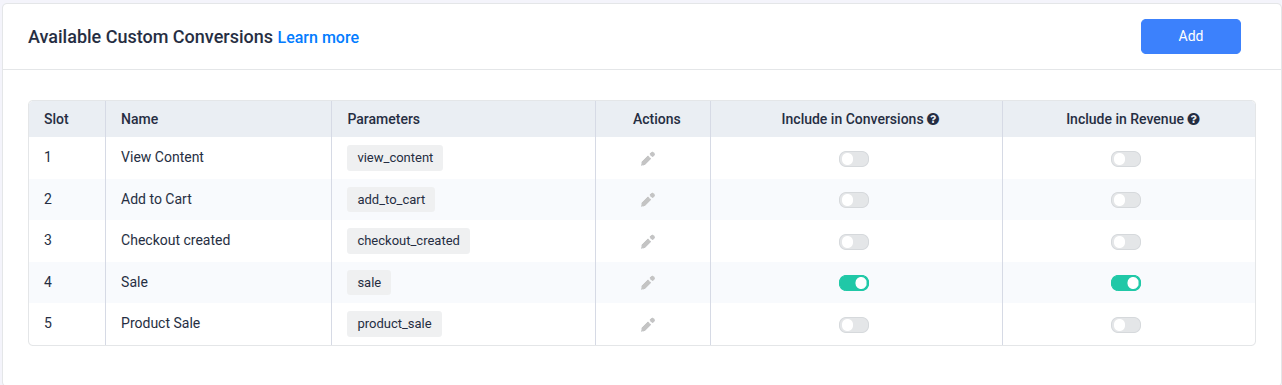
You’ll need to create a custom conversion in ClickFlare for each Shopify event we are going to track.
**Steps:**
1. Go to **Settings > Custom Conversions**
2. Click **Add**
3. Create a separate custom event for each of the following:
* `view_content`
* `add_to_cart`
* `checkout_created`
* `sale`
* `product_sale`
**Important:** Use these exact event identifiers as shown above.
You can refer to the image below for an example configuration.
This guide explains how to track conversions from your Shopify store using ClickFlare. It covers the full setup process from defining custom conversion events to configuring the Shopify theme to fire those conversions.
***
## 🚀 Why Use ClickFlare to Track Your Shopify Store
ClickFlare gives you full-funnel, click-level tracking — something traditional Shopify apps can’t do.
With ClickFlare, you can:
* **Easily set it up in minutes** — no complex development required
* **Track each user’s journey** from ad click to final purchase
* **Rotate and test landers** before sending traffic to your Shopify store
* **Attribute conversions** from both paid and organic channels
* **Send 100% of conversions** back to ad platforms server-side
* **See all key metrics** (costs, conversions, upsells, ROAS) in one dashboard
> 🧠 Whether you're running ads, SEO, or email flows — ClickFlare gives you the data and attribution accuracy you need to scale.
***
## 🧭 Overview
This guide walks you through tracking the following Shopify events using ClickFlare:
* **View Content** → view\_content
* **Add to Cart** → add\_to\_cart
* **Checkout Initiated** → checkout\_initiated
* **Checkout Completed** → sale and product\_sale (for item-level tracking)
The setup is split into two parts:
1. **ClickFlare Setup** – define events, landers (optional), and campaigns
2. **Shopify Setup** – add tracking scripts and configure webhooks
***
## I. 🔧 ClickFlare Setup
### 1. Create Custom Conversion Events
You’ll need to create a custom conversion in ClickFlare for each Shopify event we are going to track.
**Steps:**
1. Go to **Settings > Custom Conversions**
2. Click **Add**
3. Create a separate custom event for each of the following:
* `view_content`
* `add_to_cart`
* `checkout_created`
* `sale`
* `product_sale`
**Important:** Use these exact event identifiers as shown above.
You can refer to the image below for an example configuration.
 ***
### 2. Create a Traffic Source
1. From the left menu, go to **Traffic Sources**
2. Click the **+ New** button to add a new traffic source
3. Choose a template from the list (e.g., **Meta**, **Google Ads**, **TikTok**)
4. Fill in the following:
* **Traffic Source Name**
* **Workspace**
* **Currency** used for cost reporting
* **Cost Integration** — connect to pull ad spend automatically
> 💡 ClickFlare templates will auto-fill most parameters (like click ID macros). You can always adjust them if needed.
***
### 3. (Optional) Add a Lander Before Shopify
If you're sending traffic to a quiz, article, or presell page before Shopify:
1. Go to **Landers > New Lander**
2. Enter your lander URL and **give it a name**
3. Save the lander to generate your ClickFlare **click URL**
**Advanced Funnels:** With ClickFlare’s **visual Advanced Flow builder**, you can set up multi-step funnels with up to **3 landers before the Shopify store**, and rotate different landers or even multiple Shopify stores at each step.
> **Note:** Be sure to update the CTA buttons or links on your lander to use the **ClickFlare click URL**. This ensures tracking continuity when users are redirected to Shopify.
***
### 4. Create an Offer (Your Shopify Store)
1. Go to **Offers > New** Offer
2. Paste your Shopify store URL (e.g., [https://yourstore.myshopify.com](https://yourstore.myshopify.com))
**Important:** Always append the **ClickFlare click and campaign ID** to your offer URL (your Shopify store link), so the click can be tracked through to the conversion.
The final URL should look like this:
```
https://yourstore.myshopify.com?click_id={cf_click_id}&cpid={campaign_id}
```
***
### 5. Create a Tracking Campaign (Per Traffic Source)\*\*\*
1. Go to **Campaigns > New Campaign**
2. Choose:
* **Redirect Tracking** — use this if your traffic source allows redirects. This method enables **lander rotation and A/B testing**.
* **Direct Tracking** — use this if you're sending traffic **directly to your Lander or Shopify**, or if your traffic source doesn’t allow redirects (e.g., Google Ads).
3. Configure:
* **Campaign Name:** e.g., *Shopify – Meta*
* **Traffic Source:** select the one created in step 2
* **Lander (optional):** select your lander from step 3
* **Offer:** select your Shopify store offer
4. In the **Tracking tab**, copy the **ClickFlare Campaign URL** - this is the link you'll use in your traffic source when setting up your ads
> 📌 Create one campaign per traffic source to ensure clean attribution.
***
### 6. Create a Campaign for Organic Traffic
While not mandatory, we recommend setting up a dedicated campaign for **organic traffic** (e.g., SEO, direct visits, email, influencers). This helps you attribute conversions that didn’t come from paid traffic sources — and otherwise may go untracked.
**Steps:**
1. **Duplicate an existing campaign**
2. **Create a new traffic source** called **Organic** and assign it to this campaign
3. **Keep using the same offer** from step 4 (your Shopify store)
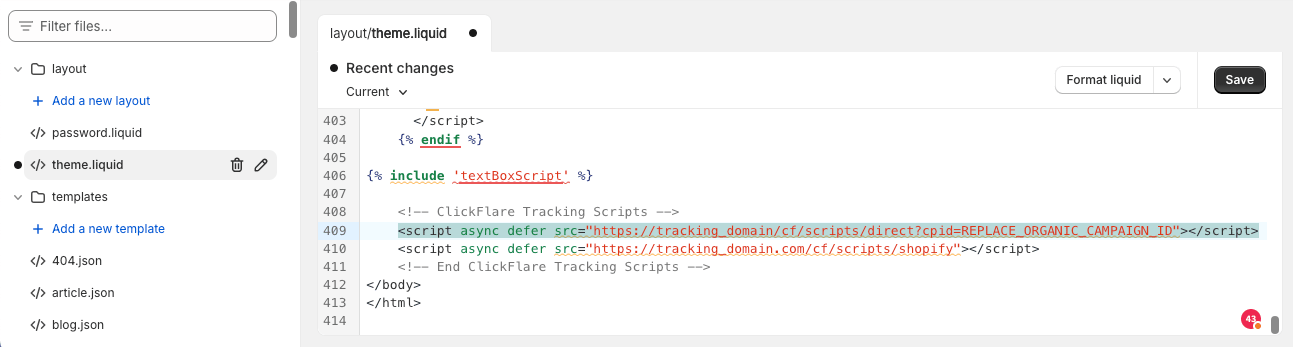
For a direct campaign, make sure to inject the ClickFlare direct tracking script in the page inside the theme.liquid:
`https://trackin_domain.com/cf/scripts/direct?cpid=CLICKFLARE_ORGANIC_CAMPIGN_ID`
***
### 2. Create a Traffic Source
1. From the left menu, go to **Traffic Sources**
2. Click the **+ New** button to add a new traffic source
3. Choose a template from the list (e.g., **Meta**, **Google Ads**, **TikTok**)
4. Fill in the following:
* **Traffic Source Name**
* **Workspace**
* **Currency** used for cost reporting
* **Cost Integration** — connect to pull ad spend automatically
> 💡 ClickFlare templates will auto-fill most parameters (like click ID macros). You can always adjust them if needed.
***
### 3. (Optional) Add a Lander Before Shopify
If you're sending traffic to a quiz, article, or presell page before Shopify:
1. Go to **Landers > New Lander**
2. Enter your lander URL and **give it a name**
3. Save the lander to generate your ClickFlare **click URL**
**Advanced Funnels:** With ClickFlare’s **visual Advanced Flow builder**, you can set up multi-step funnels with up to **3 landers before the Shopify store**, and rotate different landers or even multiple Shopify stores at each step.
> **Note:** Be sure to update the CTA buttons or links on your lander to use the **ClickFlare click URL**. This ensures tracking continuity when users are redirected to Shopify.
***
### 4. Create an Offer (Your Shopify Store)
1. Go to **Offers > New** Offer
2. Paste your Shopify store URL (e.g., [https://yourstore.myshopify.com](https://yourstore.myshopify.com))
**Important:** Always append the **ClickFlare click and campaign ID** to your offer URL (your Shopify store link), so the click can be tracked through to the conversion.
The final URL should look like this:
```
https://yourstore.myshopify.com?click_id={cf_click_id}&cpid={campaign_id}
```
***
### 5. Create a Tracking Campaign (Per Traffic Source)\*\*\*
1. Go to **Campaigns > New Campaign**
2. Choose:
* **Redirect Tracking** — use this if your traffic source allows redirects. This method enables **lander rotation and A/B testing**.
* **Direct Tracking** — use this if you're sending traffic **directly to your Lander or Shopify**, or if your traffic source doesn’t allow redirects (e.g., Google Ads).
3. Configure:
* **Campaign Name:** e.g., *Shopify – Meta*
* **Traffic Source:** select the one created in step 2
* **Lander (optional):** select your lander from step 3
* **Offer:** select your Shopify store offer
4. In the **Tracking tab**, copy the **ClickFlare Campaign URL** - this is the link you'll use in your traffic source when setting up your ads
> 📌 Create one campaign per traffic source to ensure clean attribution.
***
### 6. Create a Campaign for Organic Traffic
While not mandatory, we recommend setting up a dedicated campaign for **organic traffic** (e.g., SEO, direct visits, email, influencers). This helps you attribute conversions that didn’t come from paid traffic sources — and otherwise may go untracked.
**Steps:**
1. **Duplicate an existing campaign**
2. **Create a new traffic source** called **Organic** and assign it to this campaign
3. **Keep using the same offer** from step 4 (your Shopify store)
For a direct campaign, make sure to inject the ClickFlare direct tracking script in the page inside the theme.liquid:
`https://trackin_domain.com/cf/scripts/direct?cpid=CLICKFLARE_ORGANIC_CAMPIGN_ID`
 ***
## II. 🛒 Shopify Setup
Now that your ClickFlare setup is complete, log in to your Shopify admin to complete the final steps.
***
### 1. Add the ClickFlare Script to Your Shopify Theme
**Required Step — Do not skip.** This script is essential for tracking visitor sessions and on-site events like product views and add-to-carts.
Without this script, **tracking will not work**.
**Steps:**
1. \*\*Go to \*\*Online Store > Themes in your Shopify admin
**
***
## II. 🛒 Shopify Setup
Now that your ClickFlare setup is complete, log in to your Shopify admin to complete the final steps.
***
### 1. Add the ClickFlare Script to Your Shopify Theme
**Required Step — Do not skip.** This script is essential for tracking visitor sessions and on-site events like product views and add-to-carts.
Without this script, **tracking will not work**.
**Steps:**
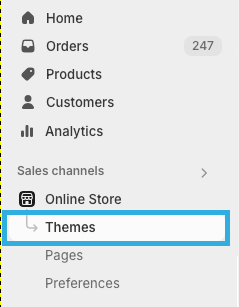
1. \*\*Go to \*\*Online Store > Themes in your Shopify admin
** **
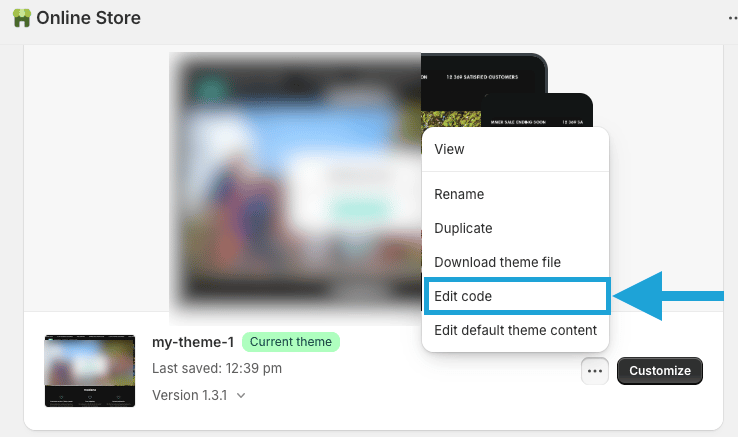
2. Click the **three-dot menu** next to your active theme and select Edit Code
**
**
2. Click the **three-dot menu** next to your active theme and select Edit Code
** **
3. Under the **Layout** folder, open `theme.liquid`
4. Scroll to the bottom of the file and paste the following script **just before the closing \ tag**:
**
3. Under the **Layout** folder, open `theme.liquid`
4. Scroll to the bottom of the file and paste the following script **just before the closing \ tag**: