> ## Documentation Index
> Fetch the complete documentation index at: https://clickflare.com/docs/llms.txt
> Use this file to discover all available pages before exploring further.
# How to Track Your WooCommerce Store with ClickFlare (Full Funnel Tracking Guide)
> Learn how to integrate WooCommerce with ClickFlare to track user journeys, purchase events, upsells, order bumps, refunds, and other transaction data across any funnel setup.
 This guide explains how to track conversions and user behavior from your WooCommerce store using ClickFlare. It covers the full setup—from defining conversion events in ClickFlare to installing and configuring the ClickFlare WooCommerce plugin.
***
## 📡 What This Integration Allows You to Track
With this integration, ClickFlare can track the full user journey and all key WooCommerce events generated by your customers. This includes standard events such as *checkouts*, *sales*, *product-level sales*, and advanced events like *upsells*, *order* *bumps*, *refunds*, *cancellations*, *subscriptions*, *partial refunds*, *shipping amounts,* and *tax values.*
You can track users whether they land directly on your WooCommerce store (including direct-to-product URLs), or whether they first pass through a third-party [lander](https://landerlab.io/), quiz, or advertorial.
ClickFlare supports both redirect tracking and direct tracking (required for channels like Google Ads) and can also attribute conversions from organic traffic. For direct-tracking and organic flows, the only requirement is to insert the ClickFlare Direct Tracking Script inside the ClickFlare WooCommerce plugin settings. The rest of this guide explains how to configure each part of the setup.
***
## 🚀 Why Use ClickFlare to Track Your WooCommerce Store
ClickFlare gives you **full-funnel, click-level tracking** for WooCommerce—far beyond what typical WordPress or WooCommerce plugins can provide.
With ClickFlare, you can:
* Track every user journey from **ad click → product page → checkout → final sale**
* See product-level performance using **product\_sale**, **upsells**, **order bumps**, **subscriptions**, **refunds**, etc.
* Track funnels where users first land on a **presell page** before reaching your WooCommerce store
* Track **direct tracking campaigns** such as Google Ads, Bing, and SEO where redirects are not possible
* Attribute conversions from both **paid and organic channels**
* Send 100% of conversions back to your ad platforms **server-side**
* Track across **multiple stores**, funnels, and offers inside one ClickFlare workspace
🧠 Whether your traffic is coming from ads, email flows, SEO, influencers, or organic sources—ClickFlare gives you the attribution accuracy you need to scale.
***
## Part I — 🔧 ClickFlare Setup
### 1. Create Custom Conversion Events
You must create custom conversions in ClickFlare for every WooCommerce event you want to track.
These events will be triggered automatically by the WooCommerce plugin.
**Steps:**
1. Go to **Settings → Custom Conversions**
2. Click **Add**
3. Create each event listed below using the exact parameter name (see image below):
| **Event Name** | **Parameter** | **Purpose** |
| -------------- | ----------------- | ---------------------- |
| Checkout | checkout\_created | Checkout created |
| Sale | sale | Main purchase event |
| Product Sale | product\_sale | Item-level revenue |
| Upsell | upsell | Upsell actions |
| Product Upsell | product\_upsell | Product-level upsell |
| Order Bump | order\_bump | Order bump conversions |
| Subscription | subscription | Recurring payments |
| Cancellation | order\_cancelled | Cancelled orders |
| Refund | refund | Full refund |
| Partial Refund | partial\_refund | Partial refund amounts |
| Tax | tax | Tax value tracking |
| Shipping | shipping | Shipping cost tracking |
This guide explains how to track conversions and user behavior from your WooCommerce store using ClickFlare. It covers the full setup—from defining conversion events in ClickFlare to installing and configuring the ClickFlare WooCommerce plugin.
***
## 📡 What This Integration Allows You to Track
With this integration, ClickFlare can track the full user journey and all key WooCommerce events generated by your customers. This includes standard events such as *checkouts*, *sales*, *product-level sales*, and advanced events like *upsells*, *order* *bumps*, *refunds*, *cancellations*, *subscriptions*, *partial refunds*, *shipping amounts,* and *tax values.*
You can track users whether they land directly on your WooCommerce store (including direct-to-product URLs), or whether they first pass through a third-party [lander](https://landerlab.io/), quiz, or advertorial.
ClickFlare supports both redirect tracking and direct tracking (required for channels like Google Ads) and can also attribute conversions from organic traffic. For direct-tracking and organic flows, the only requirement is to insert the ClickFlare Direct Tracking Script inside the ClickFlare WooCommerce plugin settings. The rest of this guide explains how to configure each part of the setup.
***
## 🚀 Why Use ClickFlare to Track Your WooCommerce Store
ClickFlare gives you **full-funnel, click-level tracking** for WooCommerce—far beyond what typical WordPress or WooCommerce plugins can provide.
With ClickFlare, you can:
* Track every user journey from **ad click → product page → checkout → final sale**
* See product-level performance using **product\_sale**, **upsells**, **order bumps**, **subscriptions**, **refunds**, etc.
* Track funnels where users first land on a **presell page** before reaching your WooCommerce store
* Track **direct tracking campaigns** such as Google Ads, Bing, and SEO where redirects are not possible
* Attribute conversions from both **paid and organic channels**
* Send 100% of conversions back to your ad platforms **server-side**
* Track across **multiple stores**, funnels, and offers inside one ClickFlare workspace
🧠 Whether your traffic is coming from ads, email flows, SEO, influencers, or organic sources—ClickFlare gives you the attribution accuracy you need to scale.
***
## Part I — 🔧 ClickFlare Setup
### 1. Create Custom Conversion Events
You must create custom conversions in ClickFlare for every WooCommerce event you want to track.
These events will be triggered automatically by the WooCommerce plugin.
**Steps:**
1. Go to **Settings → Custom Conversions**
2. Click **Add**
3. Create each event listed below using the exact parameter name (see image below):
| **Event Name** | **Parameter** | **Purpose** |
| -------------- | ----------------- | ---------------------- |
| Checkout | checkout\_created | Checkout created |
| Sale | sale | Main purchase event |
| Product Sale | product\_sale | Item-level revenue |
| Upsell | upsell | Upsell actions |
| Product Upsell | product\_upsell | Product-level upsell |
| Order Bump | order\_bump | Order bump conversions |
| Subscription | subscription | Recurring payments |
| Cancellation | order\_cancelled | Cancelled orders |
| Refund | refund | Full refund |
| Partial Refund | partial\_refund | Partial refund amounts |
| Tax | tax | Tax value tracking |
| Shipping | shipping | Shipping cost tracking |
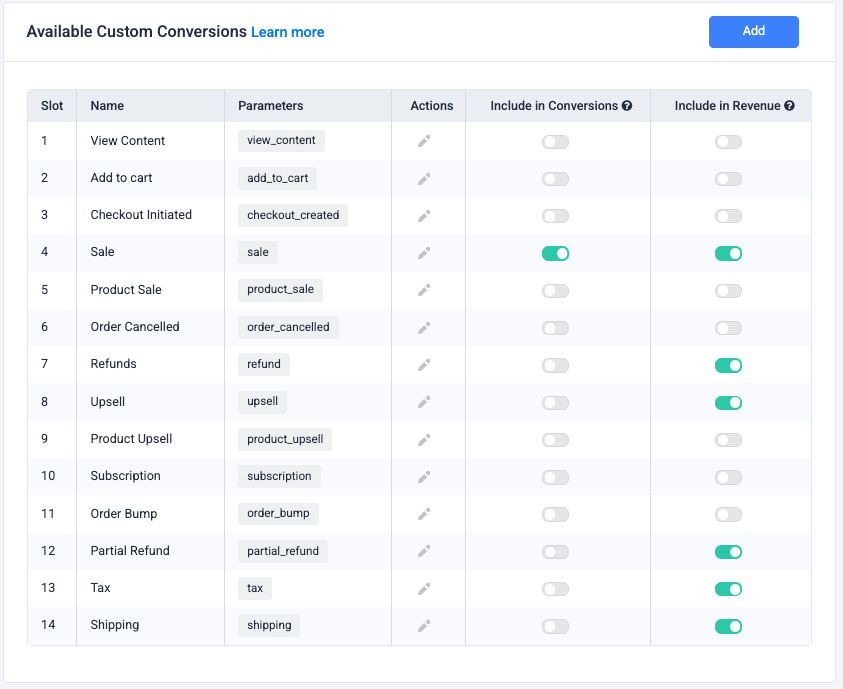 **Note**: The list above includes all WooCommerce events ClickFlare can track. Create only the events you need or that your store will generate; adding all events is optional.
***
### 2. Create a Traffic Source
1. From the left menu, go to **Traffic Sources**
2. Click the **+ New** button to add a new traffic source
3. Choose a template from the list (e.g., **Meta**, **Google Ads**, **TikTok**)
4. Fill in the following:
* **Traffic Source Name**
* **Workspace**
* **Currency** used for cost reporting
* **Cost Integration** — connect to pull ad spend automatically
> 💡 ClickFlare templates will auto-fill most parameters (like click ID macros). You can always adjust them if needed.
***
### 3. (Optional) Add a Lander Before WooCommerce
If your funnel includes a quiz, presell, article, advertorial, or pre-lander:
1. Go to **Landers → New Lander**
2. Enter your lander URL
3. Save the lander to generate your ClickFlare click URL
Advanced Funnels: With ClickFlare’s visual Advanced Flow builder, you can set up multi-step funnels with up to 3 landers before the WooCommerce store, and rotate different landers or even multiple WooCommerce stores at each step.
> **Note:** Be sure to update the CTA buttons or links on your lander to use the **ClickFlare click URL**. This ensures tracking continuity when users are redirected to WooCommerce.
***
### 4. Create an Offer (Your WooCommerce Store)
1. Go to **Offers → New Offer**
2. Paste your WooCommerce store URL
Example:
[https://yourstore.com](https://yourstore.com)
**Append ClickFlare tracking parameters**
This ensures the click ID follows the user into the store.
Final URL format:
```
https://yourstore.com?click_id={cf_click_id}&cpid={campaign_id}
```
***
### 5. Create a Tracking Campaign (Per Traffic Source)
1. Go to **Campaigns → New Campaign**
2. Choose:
* **Redirect Tracking** → if redirects are allowed
* **Direct Tracking** → for Google Ads, Bing, SEO, direct-to-store flows
*Make sure to insert the ClickFlare Direct Tracking Script in the WooCommerce plugin (see the WooCommerce Setup section).*
3. Configure:
* **Campaign Name** (e.g., WooCommerce – Meta)
* **Traffic Source** (from step 2)
* **Lander** (optional)
* **Offer** (your WooCommerce store offer)
4. Go to the **Tracking** tab
5. Copy the **ClickFlare Campaign URL**
Use this URL inside your traffic source (Meta, TikTok, Taboola, etc.).
**Note:** Create **one campaign per traffic source** for clean attribution.
***
### 6. Create a Campaign for Organic Traffic *(Optional)*
This ensures SEO, direct, email, and influencer sales are properly attributed.
Steps:
1. Duplicate an existing campaign
2. Create a traffic source named **Organic**
3. Assign it to this campaign
4. Use the same WooCommerce offer
5. Insert the ClickFlare script inside your WooCommerce site’s header/footer (the plugin also supports this).
**Note**: The list above includes all WooCommerce events ClickFlare can track. Create only the events you need or that your store will generate; adding all events is optional.
***
### 2. Create a Traffic Source
1. From the left menu, go to **Traffic Sources**
2. Click the **+ New** button to add a new traffic source
3. Choose a template from the list (e.g., **Meta**, **Google Ads**, **TikTok**)
4. Fill in the following:
* **Traffic Source Name**
* **Workspace**
* **Currency** used for cost reporting
* **Cost Integration** — connect to pull ad spend automatically
> 💡 ClickFlare templates will auto-fill most parameters (like click ID macros). You can always adjust them if needed.
***
### 3. (Optional) Add a Lander Before WooCommerce
If your funnel includes a quiz, presell, article, advertorial, or pre-lander:
1. Go to **Landers → New Lander**
2. Enter your lander URL
3. Save the lander to generate your ClickFlare click URL
Advanced Funnels: With ClickFlare’s visual Advanced Flow builder, you can set up multi-step funnels with up to 3 landers before the WooCommerce store, and rotate different landers or even multiple WooCommerce stores at each step.
> **Note:** Be sure to update the CTA buttons or links on your lander to use the **ClickFlare click URL**. This ensures tracking continuity when users are redirected to WooCommerce.
***
### 4. Create an Offer (Your WooCommerce Store)
1. Go to **Offers → New Offer**
2. Paste your WooCommerce store URL
Example:
[https://yourstore.com](https://yourstore.com)
**Append ClickFlare tracking parameters**
This ensures the click ID follows the user into the store.
Final URL format:
```
https://yourstore.com?click_id={cf_click_id}&cpid={campaign_id}
```
***
### 5. Create a Tracking Campaign (Per Traffic Source)
1. Go to **Campaigns → New Campaign**
2. Choose:
* **Redirect Tracking** → if redirects are allowed
* **Direct Tracking** → for Google Ads, Bing, SEO, direct-to-store flows
*Make sure to insert the ClickFlare Direct Tracking Script in the WooCommerce plugin (see the WooCommerce Setup section).*
3. Configure:
* **Campaign Name** (e.g., WooCommerce – Meta)
* **Traffic Source** (from step 2)
* **Lander** (optional)
* **Offer** (your WooCommerce store offer)
4. Go to the **Tracking** tab
5. Copy the **ClickFlare Campaign URL**
Use this URL inside your traffic source (Meta, TikTok, Taboola, etc.).
**Note:** Create **one campaign per traffic source** for clean attribution.
***
### 6. Create a Campaign for Organic Traffic *(Optional)*
This ensures SEO, direct, email, and influencer sales are properly attributed.
Steps:
1. Duplicate an existing campaign
2. Create a traffic source named **Organic**
3. Assign it to this campaign
4. Use the same WooCommerce offer
5. Insert the ClickFlare script inside your WooCommerce site’s header/footer (the plugin also supports this).
 ```
```
**Note**: If you are using Direct Tracking for paid campaigns only (e.g., Google Ads) and do not want to track organic traffic, remove the `cpid=CLICKFLARE_ORGANIC_CAMPAIGN_ID` parameter from the script above.
***
## Part II — 🛒 WooCommerce Setup
Now that ClickFlare is configured, let’s complete the WooCommerce integration.
### 1. Install the ClickFlare WooCommerce Plugin
1. Go to **Plugins → Add New**
2. Click **Upload Plugin**
3. Download the plugin from:
**[Click Here for the link](https://otrscr.s3.eu-west-1.amazonaws.com/dev/clickflare-io.zip)**
4. Upload the ZIP
5. Click **Install Now**
*
```
```
**Note**: If you are using Direct Tracking for paid campaigns only (e.g., Google Ads) and do not want to track organic traffic, remove the `cpid=CLICKFLARE_ORGANIC_CAMPAIGN_ID` parameter from the script above.
***
## Part II — 🛒 WooCommerce Setup
Now that ClickFlare is configured, let’s complete the WooCommerce integration.
### 1. Install the ClickFlare WooCommerce Plugin
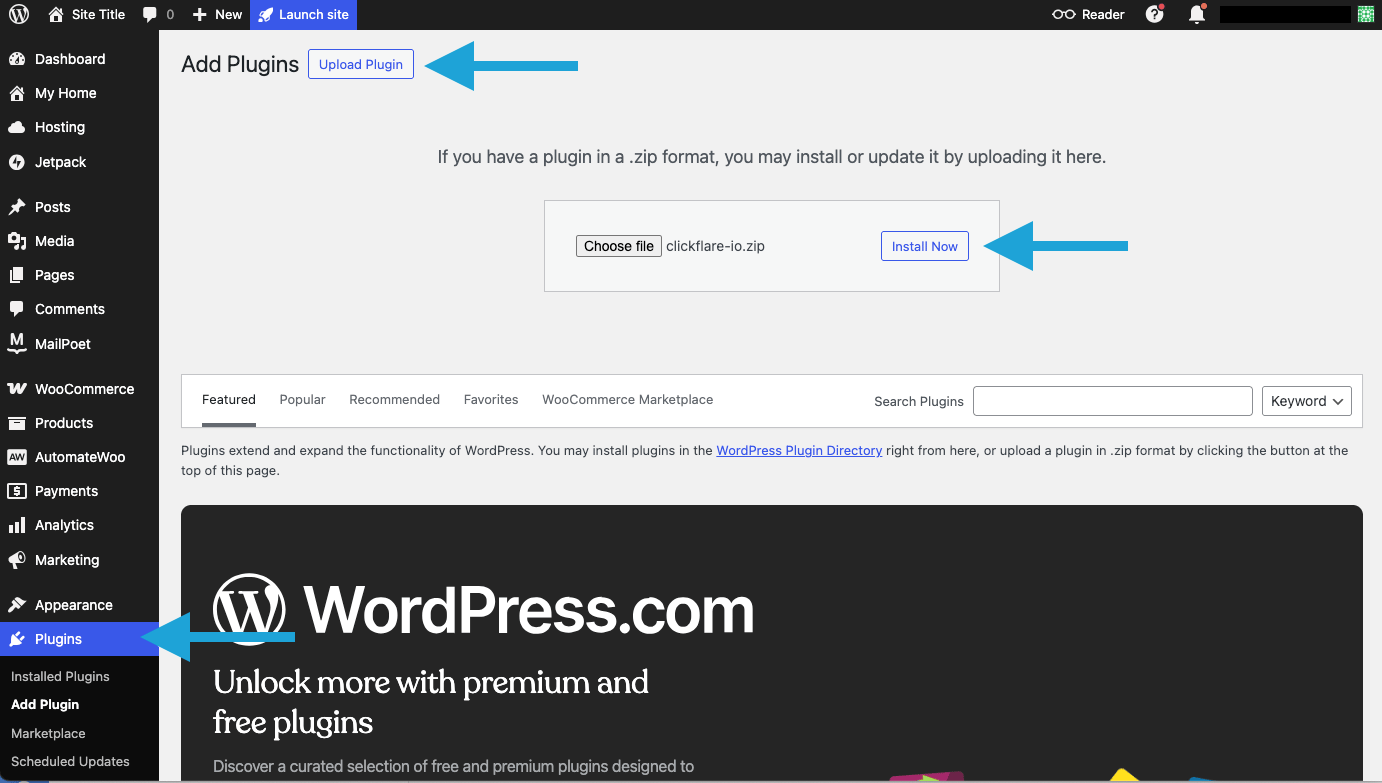
1. Go to **Plugins → Add New**
2. Click **Upload Plugin**
3. Download the plugin from:
**[Click Here for the link](https://otrscr.s3.eu-west-1.amazonaws.com/dev/clickflare-io.zip)**
4. Upload the ZIP
5. Click **Install Now**
* *
### 2. Configure the Plugin Settings
1. Go to **Plugins → Installed Plugins**
2. Find **ClickFlare**
3. Click **Settings**
*
### 2. Configure the Plugin Settings
1. Go to **Plugins → Installed Plugins**
2. Find **ClickFlare**
3. Click **Settings**
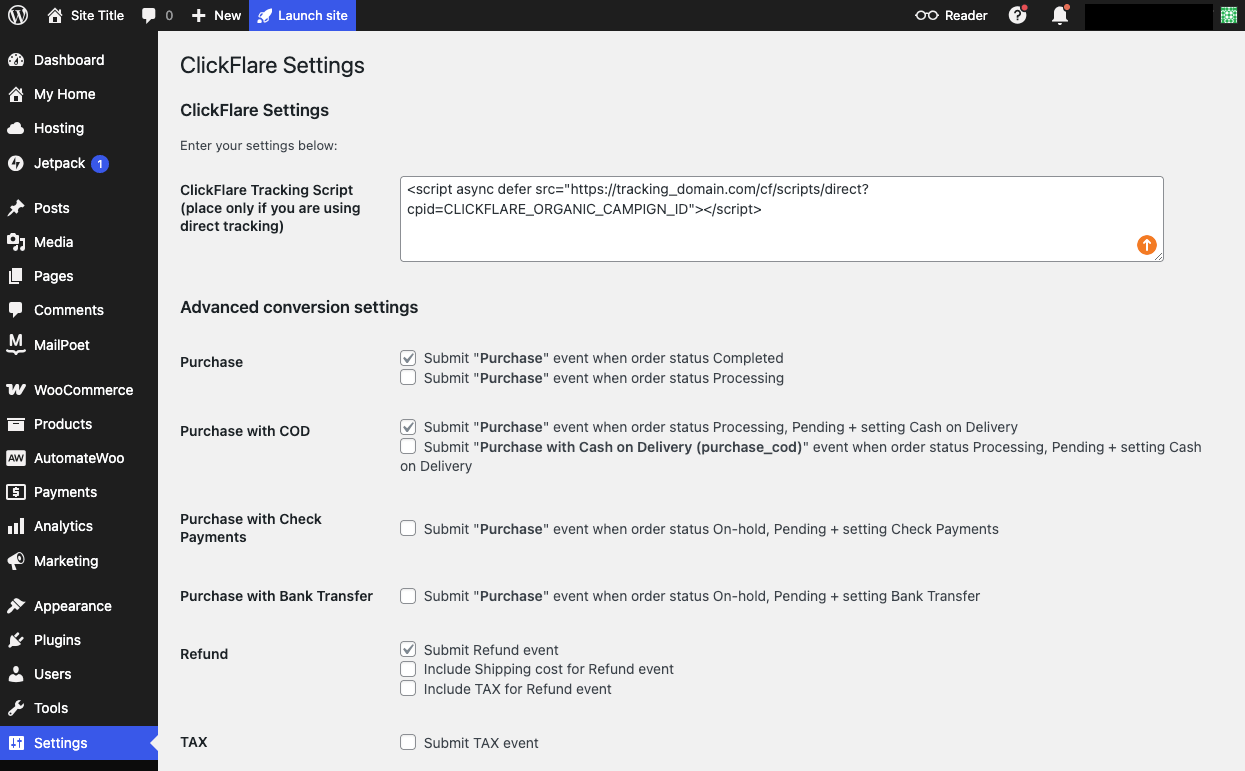 Inside the settings page, you can configure:
* **Purchase event logic**
Choose when a purchase should be submitted (e.g., Processing, Completed, specific payment methods).
* **Additional event toggles**
Enable or disable reporting for refunds, partial refunds, tax, shipping, order bumps, payment-method–specific purchases, etc.
* **Direct Tracking Script**
Paste the ClickFlare Direct Tracking Script in the field at the top only if you are using Direct Tracking (Google Ads, Bing, direct-to-store flows, or organic traffic).
* **General event behavior**
Adjust all options based on your store’s workflow and the events you expect ClickFlare to track.
***
## III — 🔍 Verifying the Integration
To test the setup:
**1. Click a campaign URL**
Use a real ClickFlare campaign link.
**2. Perform a test purchase**
Use a test gateway or a low-priced product.
**3. Go to ClickFlare: Reports → Conversions**
Filter by:
* Event: sale, checkout\_created, etc.
* Campaign: the one used in your test
You should now see:
* Correct attribution
* Correct event types
* Revenue values
* Product-level tracking
***
**FREQUENTLY ASKED QUESTIONS**
Got questions? Find the answers below:
> **Q1:** Do I need a lander before WooCommerce?
**A1**: No. You can send traffic straight to WooCommerce. But a lander allows split testing and warm-up angles.
> **Q2:** What’s the difference between Redirect and Direct Tracking?
**A2**: Redirect Tracking allows you to rotate landers, apply conditional routing, and capture click data.
Direct Tracking is used when sending traffic straight to **WooCommerce**, especially when redirects are not allowed (e.g., Google Ads).
Whenever possible, use Redirect Tracking; it gives you more control, better flexibility, and access to advanced funnel features.
> **Q3:** Why do I need to append the click ID to my WooCommerce store URL?
**A3:** Appending cf\_click\_id=\{cf\_click\_id} ensures that ClickFlare can associate conversions back to the original click. This is especially important for **Redirect Tracking campaigns**, where the ClickFlare **direct tracking script** is not installed on WooCommerce. Without this, ClickFlare won’t be able to attribute conversions accurately.
> **Q4:** Is it necessary to set up a separate campaign for organic traffic?
**A4**: Not mandatory, but highly recommended. Without a campaign for organic traffic, conversions from unpaid sources (SEO, email, etc.) may go unattributed.
> **Q5:** How many landers or steps can I use before the WooCommerce store?
**A5**: ClickFlare allows up to **3 lander steps** before the WooCommerce offer. You can build multi-step funnels visually using the Advanced Flow editor.
> **Q6:** Can I track multiple WooCommerce stores?
**A6**: Yes. Create multiple Offers and assign each store to the correct campaign.
> **Q7:** Do I need both plugin + direct tracking script?
**A7**:
* Redirect campaigns → Plugin alone is enough
* Direct tracking campaigns → Plugin **+** ClickFlare script required
### Related Resources:
* [Create Custom Conversion Events](/docs/en/settings/custom-conversions)
* [Direct Tracking Setup Guide](/docs/en/tracking/direct-tracking-clickflare)
* [How Information is Passed Between Systems](/docs/en/tracking/click-conversion-data-transfer-clickflare)
* [Meta/Facebook Conversion API Integration](/docs/en/integrations/facebook)
Inside the settings page, you can configure:
* **Purchase event logic**
Choose when a purchase should be submitted (e.g., Processing, Completed, specific payment methods).
* **Additional event toggles**
Enable or disable reporting for refunds, partial refunds, tax, shipping, order bumps, payment-method–specific purchases, etc.
* **Direct Tracking Script**
Paste the ClickFlare Direct Tracking Script in the field at the top only if you are using Direct Tracking (Google Ads, Bing, direct-to-store flows, or organic traffic).
* **General event behavior**
Adjust all options based on your store’s workflow and the events you expect ClickFlare to track.
***
## III — 🔍 Verifying the Integration
To test the setup:
**1. Click a campaign URL**
Use a real ClickFlare campaign link.
**2. Perform a test purchase**
Use a test gateway or a low-priced product.
**3. Go to ClickFlare: Reports → Conversions**
Filter by:
* Event: sale, checkout\_created, etc.
* Campaign: the one used in your test
You should now see:
* Correct attribution
* Correct event types
* Revenue values
* Product-level tracking
***
**FREQUENTLY ASKED QUESTIONS**
Got questions? Find the answers below:
> **Q1:** Do I need a lander before WooCommerce?
**A1**: No. You can send traffic straight to WooCommerce. But a lander allows split testing and warm-up angles.
> **Q2:** What’s the difference between Redirect and Direct Tracking?
**A2**: Redirect Tracking allows you to rotate landers, apply conditional routing, and capture click data.
Direct Tracking is used when sending traffic straight to **WooCommerce**, especially when redirects are not allowed (e.g., Google Ads).
Whenever possible, use Redirect Tracking; it gives you more control, better flexibility, and access to advanced funnel features.
> **Q3:** Why do I need to append the click ID to my WooCommerce store URL?
**A3:** Appending cf\_click\_id=\{cf\_click\_id} ensures that ClickFlare can associate conversions back to the original click. This is especially important for **Redirect Tracking campaigns**, where the ClickFlare **direct tracking script** is not installed on WooCommerce. Without this, ClickFlare won’t be able to attribute conversions accurately.
> **Q4:** Is it necessary to set up a separate campaign for organic traffic?
**A4**: Not mandatory, but highly recommended. Without a campaign for organic traffic, conversions from unpaid sources (SEO, email, etc.) may go unattributed.
> **Q5:** How many landers or steps can I use before the WooCommerce store?
**A5**: ClickFlare allows up to **3 lander steps** before the WooCommerce offer. You can build multi-step funnels visually using the Advanced Flow editor.
> **Q6:** Can I track multiple WooCommerce stores?
**A6**: Yes. Create multiple Offers and assign each store to the correct campaign.
> **Q7:** Do I need both plugin + direct tracking script?
**A7**:
* Redirect campaigns → Plugin alone is enough
* Direct tracking campaigns → Plugin **+** ClickFlare script required
### Related Resources:
* [Create Custom Conversion Events](/docs/en/settings/custom-conversions)
* [Direct Tracking Setup Guide](/docs/en/tracking/direct-tracking-clickflare)
* [How Information is Passed Between Systems](/docs/en/tracking/click-conversion-data-transfer-clickflare)
* [Meta/Facebook Conversion API Integration](/docs/en/integrations/facebook)