> ## Documentation Index
> Fetch the complete documentation index at: https://clickflare.com/docs/llms.txt
> Use this file to discover all available pages before exploring further.
# Inuvo Integration Guide
> A step-by-step guide on how to integrate Inuvo RSOC with ClickFlare
 Thanks to ClickFlare's API integration with Inuvo RSOC, you can automatically pull conversions and revenue into ClickFlare with accuracy.
The revenue and conversions are retrieved every hour for up to 3 days from the moment the conversion happens, ensuring you always have the most up-to-date revenue data.
In this article, we'll walk through the step-by-step process of setting up the API integration with Inuvo RSOC.
## What You’ll Need for the Integration:
* An active **Inuvo RSOC Account**.
* An active **ClickFlare Account**.
* Your **Inuvo RSOC Email and Password**.
## Adding the Inuvo RSOC Integration to ClickFlare
To add Inuvo RSOC integration to your ClickFlare account, follow these steps:
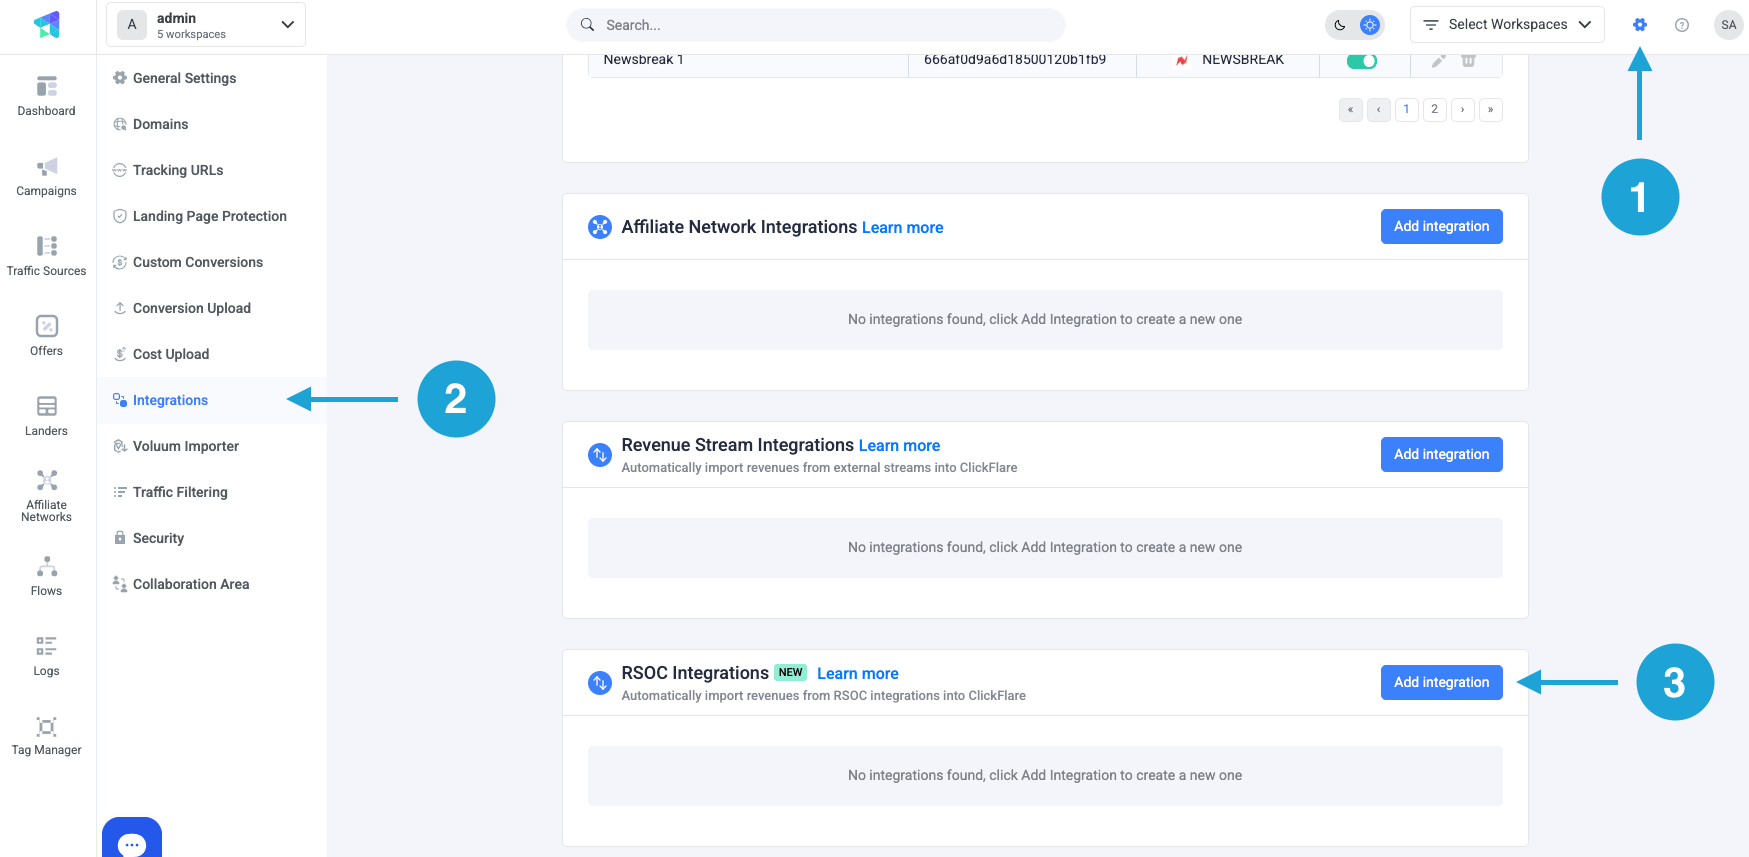
1. **Access the Integrations Menu:**
* Click on the **Settings Menu** (gear icon).
* Under **RSOC Integrations**, click **Add Integration**.
Thanks to ClickFlare's API integration with Inuvo RSOC, you can automatically pull conversions and revenue into ClickFlare with accuracy.
The revenue and conversions are retrieved every hour for up to 3 days from the moment the conversion happens, ensuring you always have the most up-to-date revenue data.
In this article, we'll walk through the step-by-step process of setting up the API integration with Inuvo RSOC.
## What You’ll Need for the Integration:
* An active **Inuvo RSOC Account**.
* An active **ClickFlare Account**.
* Your **Inuvo RSOC Email and Password**.
## Adding the Inuvo RSOC Integration to ClickFlare
To add Inuvo RSOC integration to your ClickFlare account, follow these steps:
1. **Access the Integrations Menu:**
* Click on the **Settings Menu** (gear icon).
* Under **RSOC Integrations**, click **Add Integration**.
 2. **Configure the Integration:**
* Choose the **Inuvo RSOC** template.
* Assign a **Name** to your integration.
* Click **+ Connect Account** under Accounts.
* Enter your **account name and Access Token**, then click **Save**.
2. **Configure the Integration:**
* Choose the **Inuvo RSOC** template.
* Assign a **Name** to your integration.
* Click **+ Connect Account** under Accounts.
* Enter your **account name and Access Token**, then click **Save**.
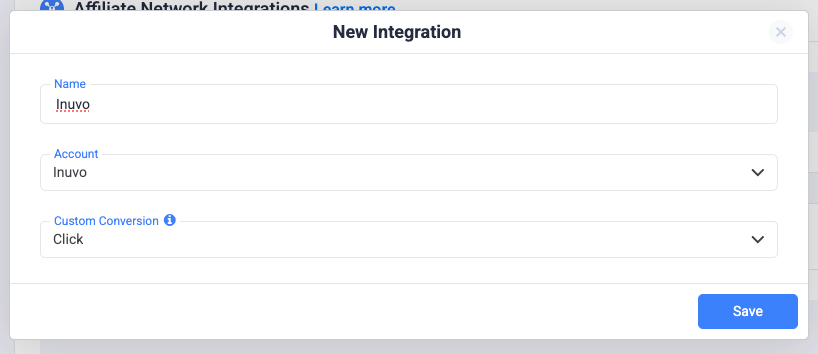 3. **Select a Custom Conversion:**
* Choose the **custom conversion event** you want to attribute the conversion data to.
* If you haven’t created a custom conversion yet, follow our [custom conversion guide](/docs/en/settings/custom-conversions) to set one up.
4. **Save the Integration:**
* Click on **Save**, and the new integration will appear under the **Revenue Stream Integrations** section.
## Offer URL Template for Inuvo RSOC
When setting up offers in ClickFlare, ensure the correct tracking parameters are used. Below is an example offer URL:
```
https://your_website.com/article/article_topic?camp_id=REPLACE_CAMPAIGN_ID&click_id={cf_click_id}&fbclid={external_id}
```
**Important Note**: To ensure accurate tracking, pass **\{cf\_click\_id}** to the **click\_id** parameter and the Inuvo campaign ID to the **camp\_id** parameter in the offer URL.
## Postback Template for Inuvo RSOC
To enable real-time conversion tracking, set up a postback in Inuvo RSOC using the template below:
```
https://your_tracking_domain.com/cf/cv?click_id={click_id}¶m10={campid}¶m1={query}&txid={datetimepst}&ct=click
```
Important Note: This postback is **required**; without it, conversions and revenue will **not** be recorded in ClickFlare. Make sure it is properly configured in your Inuvo account to ensure accurate tracking.
## Additional Considerations
* **Time Zone Alignment:** Inuvo RSOC revenue reporting operates on **PST time**. Ensure your ClickFlare settings are set to PST when reviewing reports.
* **Currency Settings:** Inuvo RSOC earnings are reported in **USD**. When setting up your offers in ClickFlare, ensure that **USD** is selected at the offer level. ClickFlare will automatically convert the currency to your default reporting currency based on your settings.
**FREQUENTLY ASKED QUESTIONS**
Got questions? Find the answers below:
> **Q1**: How often is revenue and conversion data updated?
**A1**: Revenue and conversions are pulled every hour for up to 3 days from the moment the conversion happens.
> **Q2**: What happens if I don't set up the postback in Inuvo RSOC?
**A2**: If the postback is not configured, **no conversions or revenue** will be recorded in ClickFlare. Ensure the postback is correctly set up to track performance accurately.
> **Q3**: Can I track multiple Inuvo RSOC accounts in ClickFlare?
**A3**: Yes, you can add multiple Inuvo RSOC accounts by repeating the integration process for each account.
> **Q4**: What currency does Inuvo RSOC report revenue in?
**A4**: Inuvo RSOC reports revenue in **USD**. ClickFlare will convert it into your default reporting currency based on your settings.
> **Q5:** What time zone should I use in ClickFlare for Inuvo RSOC tracking?
**A5**: Inuvo RSOC operates on **PST time**. Ensure your ClickFlare account is set to PST to match reporting data correctly.
## Related Resources:
* [About RSOC](/docs/en/integrations/about-rsoc)
3. **Select a Custom Conversion:**
* Choose the **custom conversion event** you want to attribute the conversion data to.
* If you haven’t created a custom conversion yet, follow our [custom conversion guide](/docs/en/settings/custom-conversions) to set one up.
4. **Save the Integration:**
* Click on **Save**, and the new integration will appear under the **Revenue Stream Integrations** section.
## Offer URL Template for Inuvo RSOC
When setting up offers in ClickFlare, ensure the correct tracking parameters are used. Below is an example offer URL:
```
https://your_website.com/article/article_topic?camp_id=REPLACE_CAMPAIGN_ID&click_id={cf_click_id}&fbclid={external_id}
```
**Important Note**: To ensure accurate tracking, pass **\{cf\_click\_id}** to the **click\_id** parameter and the Inuvo campaign ID to the **camp\_id** parameter in the offer URL.
## Postback Template for Inuvo RSOC
To enable real-time conversion tracking, set up a postback in Inuvo RSOC using the template below:
```
https://your_tracking_domain.com/cf/cv?click_id={click_id}¶m10={campid}¶m1={query}&txid={datetimepst}&ct=click
```
Important Note: This postback is **required**; without it, conversions and revenue will **not** be recorded in ClickFlare. Make sure it is properly configured in your Inuvo account to ensure accurate tracking.
## Additional Considerations
* **Time Zone Alignment:** Inuvo RSOC revenue reporting operates on **PST time**. Ensure your ClickFlare settings are set to PST when reviewing reports.
* **Currency Settings:** Inuvo RSOC earnings are reported in **USD**. When setting up your offers in ClickFlare, ensure that **USD** is selected at the offer level. ClickFlare will automatically convert the currency to your default reporting currency based on your settings.
**FREQUENTLY ASKED QUESTIONS**
Got questions? Find the answers below:
> **Q1**: How often is revenue and conversion data updated?
**A1**: Revenue and conversions are pulled every hour for up to 3 days from the moment the conversion happens.
> **Q2**: What happens if I don't set up the postback in Inuvo RSOC?
**A2**: If the postback is not configured, **no conversions or revenue** will be recorded in ClickFlare. Ensure the postback is correctly set up to track performance accurately.
> **Q3**: Can I track multiple Inuvo RSOC accounts in ClickFlare?
**A3**: Yes, you can add multiple Inuvo RSOC accounts by repeating the integration process for each account.
> **Q4**: What currency does Inuvo RSOC report revenue in?
**A4**: Inuvo RSOC reports revenue in **USD**. ClickFlare will convert it into your default reporting currency based on your settings.
> **Q5:** What time zone should I use in ClickFlare for Inuvo RSOC tracking?
**A5**: Inuvo RSOC operates on **PST time**. Ensure your ClickFlare account is set to PST to match reporting data correctly.
## Related Resources:
* [About RSOC](/docs/en/integrations/about-rsoc)