> ## Documentation Index
> Fetch the complete documentation index at: https://clickflare.com/docs/llms.txt
> Use this file to discover all available pages before exploring further.
# Track Funnelish Campaigns Through ClickFlare
> Learn how to track page events, checkout events, and purchase events from Funnelish into ClickFlare.
 This guide explains how to integrate Funnelish with ClickFlare using the ClickFlare Funnelish script and Funnelish automations. When set up correctly, ClickFlare will track:
* **view\_content** (page views)
* **checkout\_created** (checkout page loads)
* **sale** (completed purchase)
* **product\_sale** (product-level sale details)
***
## 1. Create Custom Conversions in ClickFlare
ClickFlare requires four custom conversion events to properly classify Funnelish actions.
### How to Create Them
1. Go to **ClickFlare → Settings → Custom Conversions**
2. Click **Add**
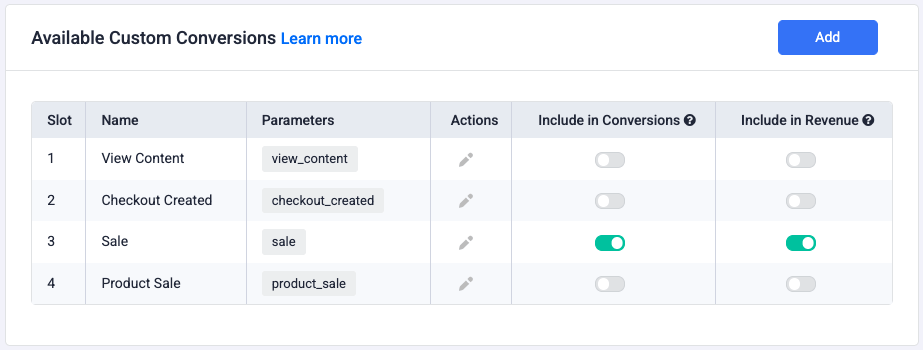
3. Create the following conversions with these exact parameter names:
This guide explains how to integrate Funnelish with ClickFlare using the ClickFlare Funnelish script and Funnelish automations. When set up correctly, ClickFlare will track:
* **view\_content** (page views)
* **checkout\_created** (checkout page loads)
* **sale** (completed purchase)
* **product\_sale** (product-level sale details)
***
## 1. Create Custom Conversions in ClickFlare
ClickFlare requires four custom conversion events to properly classify Funnelish actions.
### How to Create Them
1. Go to **ClickFlare → Settings → Custom Conversions**
2. Click **Add**
3. Create the following conversions with these exact parameter names:
 ### Important
* Only the **Sale** event should typically be included in revenue reporting.
* Parameters must match exactly—this is what ClickFlare listens for.
***
## 2. Add the ClickFlare Funnelish Script to Your Funnel
Next, you must install the ClickFlare Funnelish script inside Funnelish. This script captures page events and automatically fires **view\_content** and **checkout\_created**.
### Script to Add
Replace your-tracking-domain.com with your ClickFlare tracking domain:
```csharp theme={null}
```
### Where to Add It
1. In Funnelish, go to **Funnels** (See image below).
2. Select your funnel.
3. Open **Settings** from the left-side menu.
4. Under **Custom Codes**, click **Create a new code**.
5. Paste the ClickFlare script above.
### Important
* Only the **Sale** event should typically be included in revenue reporting.
* Parameters must match exactly—this is what ClickFlare listens for.
***
## 2. Add the ClickFlare Funnelish Script to Your Funnel
Next, you must install the ClickFlare Funnelish script inside Funnelish. This script captures page events and automatically fires **view\_content** and **checkout\_created**.
### Script to Add
Replace your-tracking-domain.com with your ClickFlare tracking domain:
```csharp theme={null}
```
### Where to Add It
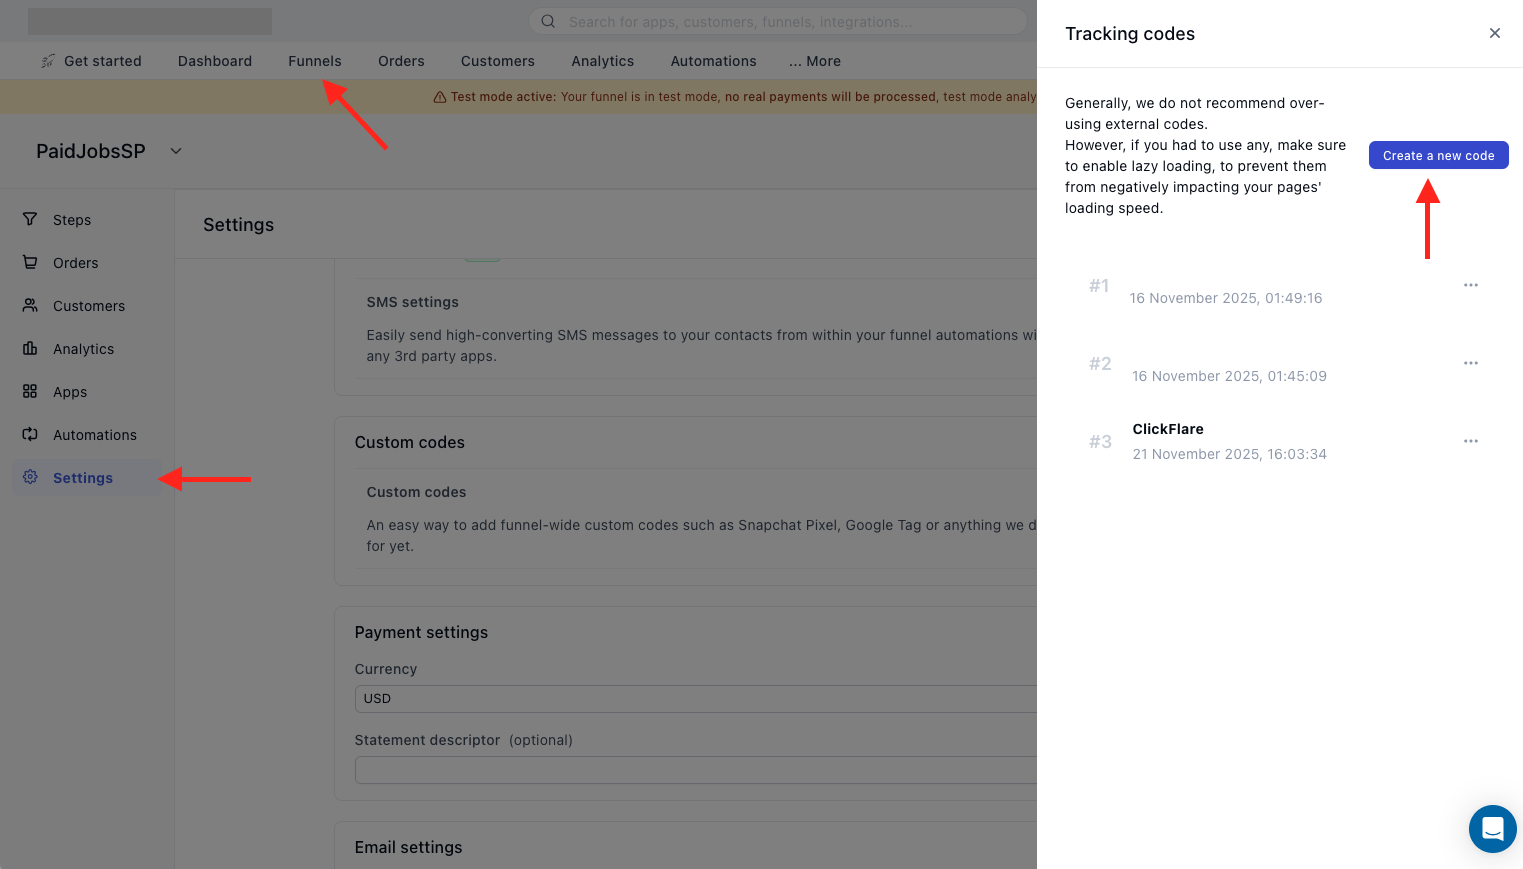
1. In Funnelish, go to **Funnels** (See image below).
2. Select your funnel.
3. Open **Settings** from the left-side menu.
4. Under **Custom Codes**, click **Create a new code**.
5. Paste the ClickFlare script above.
 This will add the script globally to all steps of the selected funnel.
### Important Requirement
* **Your checkout step name MUST contain the word “Checkout”.**
Example: “Checkout”, “My Checkout Step”, “Checkout Page”.
The script uses the step name to recognize and trigger *checkout\_created*.
***
## 3. Create a Funnelish Automation to Send Purchase Events to ClickFlare
Purchases must be sent via webhook, because Funnelish does not send purchase events through the script.
### How to Create the Automation
While inside your funnel:
1. Go to **Automations** (left menu).
2. Click **Create New Automation → Start from Scratch → Create**.
3. Set the **Trigger:** to **On Purchase (All steps)**.
4. Click **Add Action → Webhook**.
5. Paste the ClickFlare webhook URL:
```javascript theme={null}
https://your-tracking-domain.com/cf/webhooks/funnelish
```
6. Add one more action: **End Automation**
7. Save your automation
Your automation will look like this:
This will add the script globally to all steps of the selected funnel.
### Important Requirement
* **Your checkout step name MUST contain the word “Checkout”.**
Example: “Checkout”, “My Checkout Step”, “Checkout Page”.
The script uses the step name to recognize and trigger *checkout\_created*.
***
## 3. Create a Funnelish Automation to Send Purchase Events to ClickFlare
Purchases must be sent via webhook, because Funnelish does not send purchase events through the script.
### How to Create the Automation
While inside your funnel:
1. Go to **Automations** (left menu).
2. Click **Create New Automation → Start from Scratch → Create**.
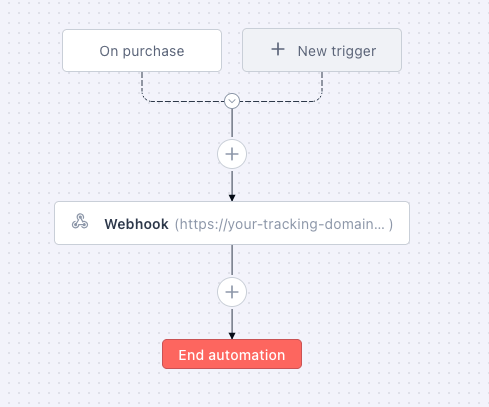
3. Set the **Trigger:** to **On Purchase (All steps)**.
4. Click **Add Action → Webhook**.
5. Paste the ClickFlare webhook URL:
```javascript theme={null}
https://your-tracking-domain.com/cf/webhooks/funnelish
```
6. Add one more action: **End Automation**
7. Save your automation
Your automation will look like this:
 ***
## 4. Pass the ClickFlare Click ID to Funnelish Offers
For conversion attribution to work, every offer URL you create in ClickFlare, must have the ClickFlare click ID appended as follows:
```javascript theme={null}
?click_id={cf_click_id}
```
Example:
```
https://myfunnelishfunnel.com/upsell?click_id={cf_click_id}
```
ClickFlare will automatically replace \{cf\_click\_id} with the unique ID for each visitor.
***
## Important Requirement
Your Funnelish **Checkout step name must include the word “Checkout”**.
Examples:
* “Checkout”
* “Checkout Page”
* “Step 2 – Checkout”
If the step name does *not* contain “Checkout”, the **checkout\_created** event will not fire.
***
## Summary
Once all steps are completed:
* **view\_content** and **checkout\_created** events fire through the Funnelish script
* **sale** and **product\_sale** events fire through the Funnelish webhook
* ClickFlare custom conversions classify each event correctly
* Passing \{cf\_click\_id} ensures accurate attribution
* Checkout tracking only works if the step name includes **“Checkout”**
***
**FREQUENTLY ASKED QUESTIONS**
Got questions? Find the answers below:
> **Q1:** Do I need both the script *and* the webhook?
**A1: Yes.** The script handles *view\_content* and *checkout\_created*. The webhook handles *sale* and *product\_sale*.
Both are required for full tracking.
> **Q2:** Does the ClickFlare script slow down Funnelish pages?
**A2:** No. The script loads asynchronously and has no impact on page load performance.
> **Q3**: Can I track upsells, downsells, and OTOs?
**A3:** Yes — as long as the click ID is passed (e.g., in the URL) and the purchase event triggers the Funnelish “On Purchase” automation, ClickFlare will track them automatically.
> **Q4**: Does my Funnelish domain need to match my ClickFlare tracking domain?
**A4:** No. They can be completely different. Only your script + webhook URLs must use the same ClickFlare tracking domain.
> **Q5**: Can I use a custom domain for tracking?
**A5:** Yes — and it is recommended. Custom domains reduce the risk of blocklisting and ensure higher deliverability.
***
## 4. Pass the ClickFlare Click ID to Funnelish Offers
For conversion attribution to work, every offer URL you create in ClickFlare, must have the ClickFlare click ID appended as follows:
```javascript theme={null}
?click_id={cf_click_id}
```
Example:
```
https://myfunnelishfunnel.com/upsell?click_id={cf_click_id}
```
ClickFlare will automatically replace \{cf\_click\_id} with the unique ID for each visitor.
***
## Important Requirement
Your Funnelish **Checkout step name must include the word “Checkout”**.
Examples:
* “Checkout”
* “Checkout Page”
* “Step 2 – Checkout”
If the step name does *not* contain “Checkout”, the **checkout\_created** event will not fire.
***
## Summary
Once all steps are completed:
* **view\_content** and **checkout\_created** events fire through the Funnelish script
* **sale** and **product\_sale** events fire through the Funnelish webhook
* ClickFlare custom conversions classify each event correctly
* Passing \{cf\_click\_id} ensures accurate attribution
* Checkout tracking only works if the step name includes **“Checkout”**
***
**FREQUENTLY ASKED QUESTIONS**
Got questions? Find the answers below:
> **Q1:** Do I need both the script *and* the webhook?
**A1: Yes.** The script handles *view\_content* and *checkout\_created*. The webhook handles *sale* and *product\_sale*.
Both are required for full tracking.
> **Q2:** Does the ClickFlare script slow down Funnelish pages?
**A2:** No. The script loads asynchronously and has no impact on page load performance.
> **Q3**: Can I track upsells, downsells, and OTOs?
**A3:** Yes — as long as the click ID is passed (e.g., in the URL) and the purchase event triggers the Funnelish “On Purchase” automation, ClickFlare will track them automatically.
> **Q4**: Does my Funnelish domain need to match my ClickFlare tracking domain?
**A4:** No. They can be completely different. Only your script + webhook URLs must use the same ClickFlare tracking domain.
> **Q5**: Can I use a custom domain for tracking?
**A5:** Yes — and it is recommended. Custom domains reduce the risk of blocklisting and ensure higher deliverability.