> ## Documentation Index
> Fetch the complete documentation index at: https://clickflare.com/docs/llms.txt
> Use this file to discover all available pages before exploring further.
# GoDaddy
> Setting up a Custom Domain with GoDaddy
In order to use a custom tracking domain with GoDaddy, you'll firstly need to have one purchased and then start the configuration procedure as detailed below.
Before starting, it is important that you add the custom domain in ClickFlare, so that you have all the necessary DNS information to start the configuration on GoDaddy. For more details, see [how to add a custom domain](/docs/en/settings/custom-domains).
The following article describes the step-by-step process of how to set up the redirection from your custom domain ("**track.mydomain.com**" in this example) to the ClickFlare Dedicated Domain.
1. Go to [https://account.godaddy.com/products](https://account.godaddy.com/products) and scroll down to the **Domains** section. Here you’ll see a list of all the domains you own. Next to the domain name you want to use, click on **DNS**.
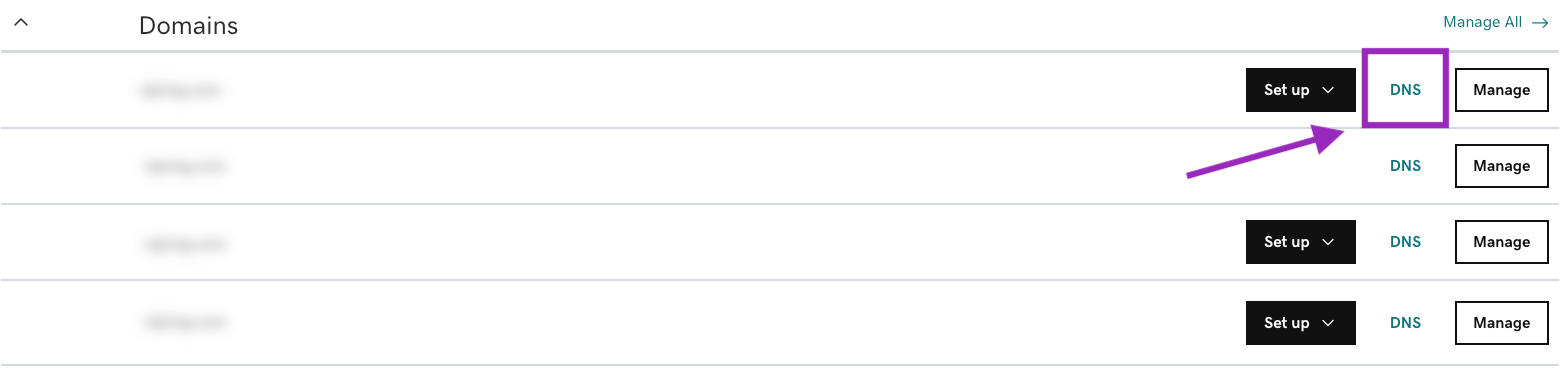 2. Scroll down to the DNS records. Here you’ll see all the DNS records associated with this domain. Click on the **Add** button to add a new record.
 3. **CNAME Setup**: The CNAME record is used to point your domain or subdomain to the ClickFlare dedicated domain. Select **CNAME** from the type dropdown menu. In the name field, instead of entering the whole domain, just add the subdomain proceeded by www, like this **[www.track](http://www.track)**. Then proceed by entering the **Value** you received from ClickFlare when adding the custom domain (see image below). For more details on this, see [how to add a custom domain](/docs/en/settings/custom-domains) in ClickFlare. Lastly, select ½ Hour for **TTL** and click on **Add Record**.
 Note: It is important to add www along with the subdomain for the CNAME in order to avoid conflict with other TXT records that have the same hostname.
4. **Domain Verification**: This step is important for verifying your domain ownership. Select **TXT** from the type dropdown menu, and then proceed by entering the exact **Name** and **Value** you received from ClickFlare when adding the custom domain. For more details on this, see [how to add a custom domain](/docs/en/settings/custom-domains) in ClickFlare. Lastly, select ½ Hour for **TTL** and click on **Add Record**.
> **Note:** The Domain Verification step (a TXT record) applies to domains added before the **29th of July 2026**. If you're adding a new custom domain now, this step isn't needed, verification is handled through the CNAME alone. You can skip this step completely.
Note: It is important to add www along with the subdomain for the CNAME in order to avoid conflict with other TXT records that have the same hostname.
4. **Domain Verification**: This step is important for verifying your domain ownership. Select **TXT** from the type dropdown menu, and then proceed by entering the exact **Name** and **Value** you received from ClickFlare when adding the custom domain. For more details on this, see [how to add a custom domain](/docs/en/settings/custom-domains) in ClickFlare. Lastly, select ½ Hour for **TTL** and click on **Add Record**.
> **Note:** The Domain Verification step (a TXT record) applies to domains added before the **29th of July 2026**. If you're adding a new custom domain now, this step isn't needed, verification is handled through the CNAME alone. You can skip this step completely.
 5. **SSL Verification**: Approximately 10 min after finishing the first 2 steps, a third step should appear in ClickFlare (see [how to add a custom domain](/docs/en/settings/custom-domains) in ClickFlare). Create a new **TXT** record in GoDaddy and in the host field insert just the first part, without the root domain (in this case **\_acme-challenge.track**). In the value field add the exact value you received from ClickFlare, when adding the custom domain. Lastly, select ½ Hour for **TTL** and click on **Add Record**.
> **Note:** The SSL Verification step below (a second TXT record) also applies to domains added before the **29th of July 2026**. For new domains, SSL is issued automatically once the CNAME record is in place, no separate step required.
5. **SSL Verification**: Approximately 10 min after finishing the first 2 steps, a third step should appear in ClickFlare (see [how to add a custom domain](/docs/en/settings/custom-domains) in ClickFlare). Create a new **TXT** record in GoDaddy and in the host field insert just the first part, without the root domain (in this case **\_acme-challenge.track**). In the value field add the exact value you received from ClickFlare, when adding the custom domain. Lastly, select ½ Hour for **TTL** and click on **Add Record**.
> **Note:** The SSL Verification step below (a second TXT record) also applies to domains added before the **29th of July 2026**. For new domains, SSL is issued automatically once the CNAME record is in place, no separate step required.
 Note: If you’re not sure where to get the **Name** and **Value** on ClickFlare, please see this article: [Adding a Custom Domain in ClickFlare](/docs/en/settings/custom-domains).
The final configuration should look like this:
Note: If you’re not sure where to get the **Name** and **Value** on ClickFlare, please see this article: [Adding a Custom Domain in ClickFlare](/docs/en/settings/custom-domains).
The final configuration should look like this:
 Note: Keep in mind that it may take up to 48 hours (sometimes even more) for the DNS to propagate. You’ll know that your domain is ready to use, when you see the green active tag in ClickFlare next to your domain name, as shown below.
For a quicker setup and lesser propagation time, consider using Cloudflare.
Note: Keep in mind that it may take up to 48 hours (sometimes even more) for the DNS to propagate. You’ll know that your domain is ready to use, when you see the green active tag in ClickFlare next to your domain name, as shown below.
For a quicker setup and lesser propagation time, consider using Cloudflare.
 Important Note: Even if you see a green active tag on ClickFlare, always check manually if your custom domain is working properly, before running any traffic. Do this by firing the campaign URL of one of your campaigns and checking if everything works fine.
**Root Domain as the Custom Tracking Domain**
The above guide shows how to set up a custom tracking subdomain in GoDaddy. In case you want to use the root domain (in our example **mydomian.com**), and not a subdomain as the tracking domain, then please use the configuration shown below.
Important Note: Even if you see a green active tag on ClickFlare, always check manually if your custom domain is working properly, before running any traffic. Do this by firing the campaign URL of one of your campaigns and checking if everything works fine.
**Root Domain as the Custom Tracking Domain**
The above guide shows how to set up a custom tracking subdomain in GoDaddy. In case you want to use the root domain (in our example **mydomian.com**), and not a subdomain as the tracking domain, then please use the configuration shown below.
 * *Having the domain on GoDaddy and managing it with Cloudflare*
Instead of using directly GoDaddy, you can opt to manage the DNS of your domain from Cloudflare. The procedure itself it’s easier and faster than using just Namecheap.
Start by:
1. Logging into your Cloudflare account and choosing the **account** you want to use (if you have more than one).
* *Having the domain on GoDaddy and managing it with Cloudflare*
Instead of using directly GoDaddy, you can opt to manage the DNS of your domain from Cloudflare. The procedure itself it’s easier and faster than using just Namecheap.
Start by:
1. Logging into your Cloudflare account and choosing the **account** you want to use (if you have more than one).
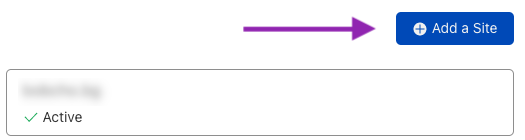
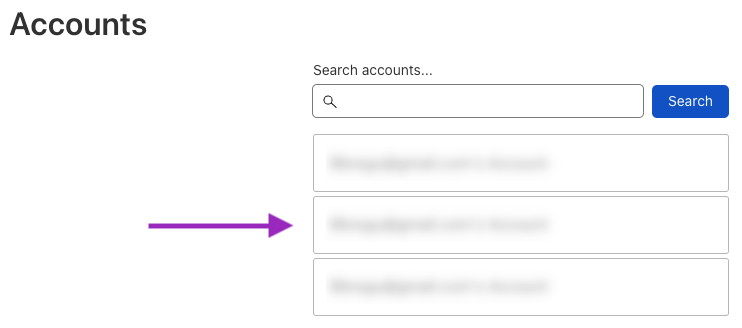 2. Inside your account, you’ll see a list of all your domains. Click on the **Add a Site** button and insert your domain (site).
 3. Select the plan for your CDN. For tracking, a free plan is enough. Click on **Continue**.
 Note: You may purchase one of the paid Cloudflare plans later if you wish to get more features.
4. After clicking on continue, you'll see the list of your existing **host records**. Be sure to double-check if the specified DNS records match the ones in your cPanel on Namecheap.
Note: It is not recommended to modify DNS records at this stage, as you will be able to do this after the setup is complete.
If the records shown in the list are correct, you can scroll down and click **Continue**:
5. On the next page, you will be asked to change nameservers to the Cloudflare ones. Copy the nameservers, you see in the purple rectangle.
Note: You may purchase one of the paid Cloudflare plans later if you wish to get more features.
4. After clicking on continue, you'll see the list of your existing **host records**. Be sure to double-check if the specified DNS records match the ones in your cPanel on Namecheap.
Note: It is not recommended to modify DNS records at this stage, as you will be able to do this after the setup is complete.
If the records shown in the list are correct, you can scroll down and click **Continue**:
5. On the next page, you will be asked to change nameservers to the Cloudflare ones. Copy the nameservers, you see in the purple rectangle.
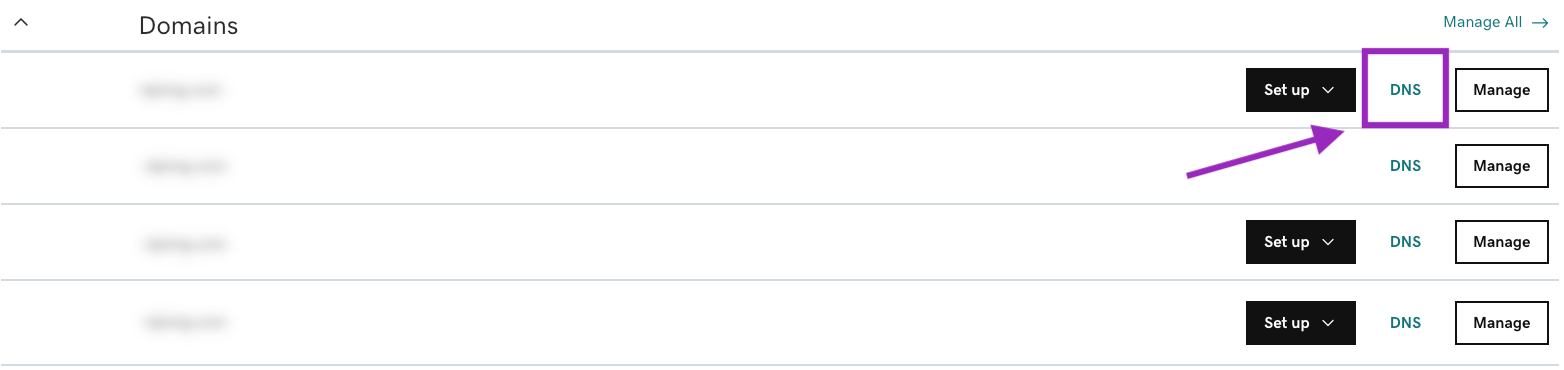
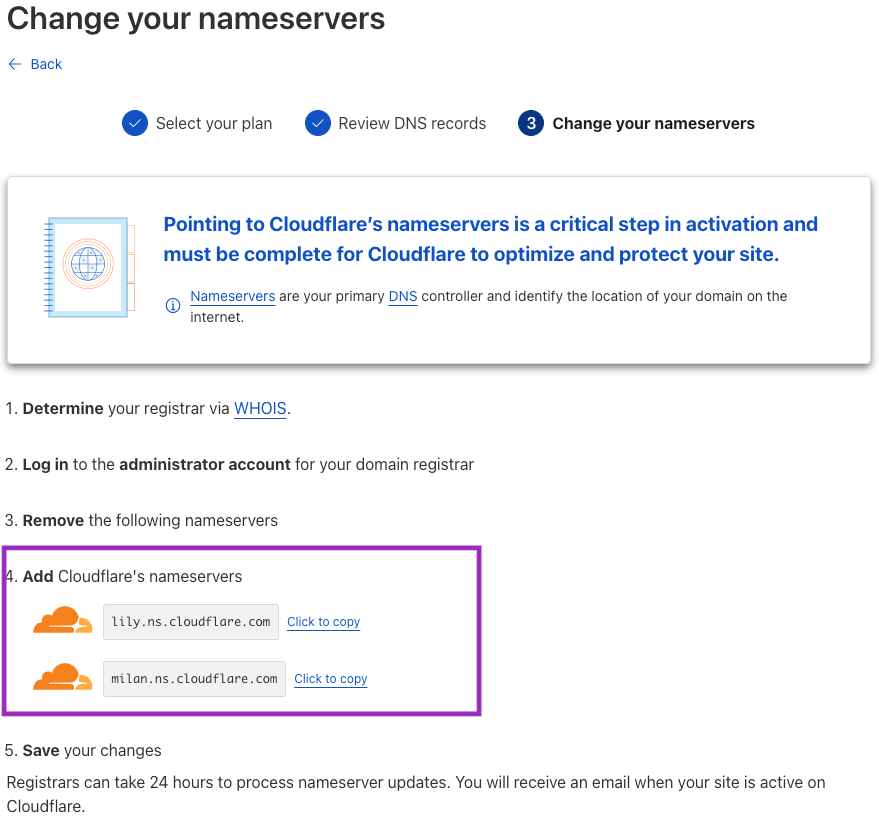 6. Log into your GoDaddy account in a separate tab if you are not logged in yet. Scroll down to the **domains** section. Here you’ll see a list of all the domains you own. Next to the domain name, you just added on Cloudflare, click on **DNS**.
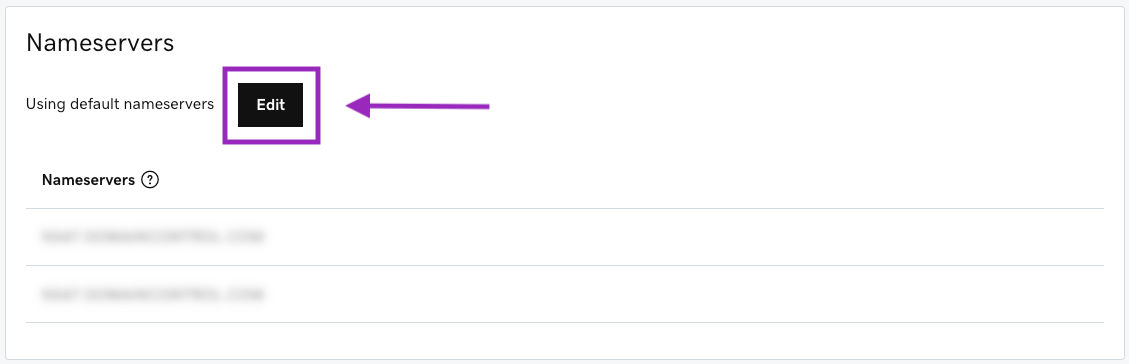
 7. Scroll down to the **Nameservers** section, right under the DNS records, and click on **Edit**.
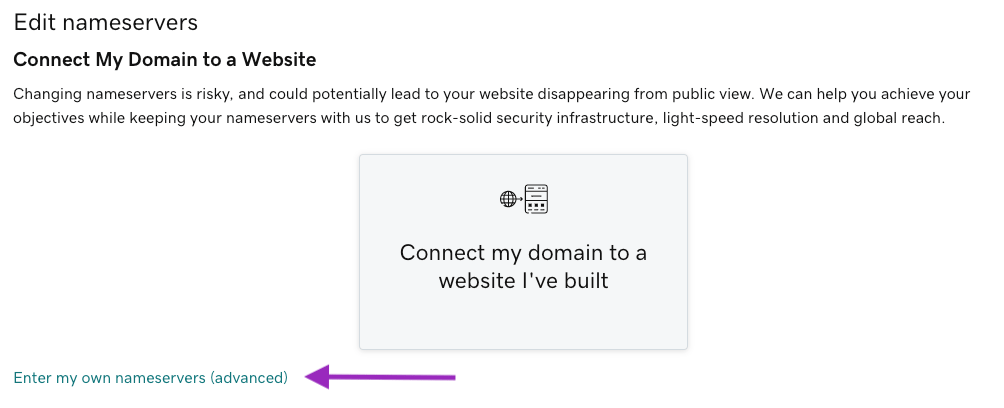
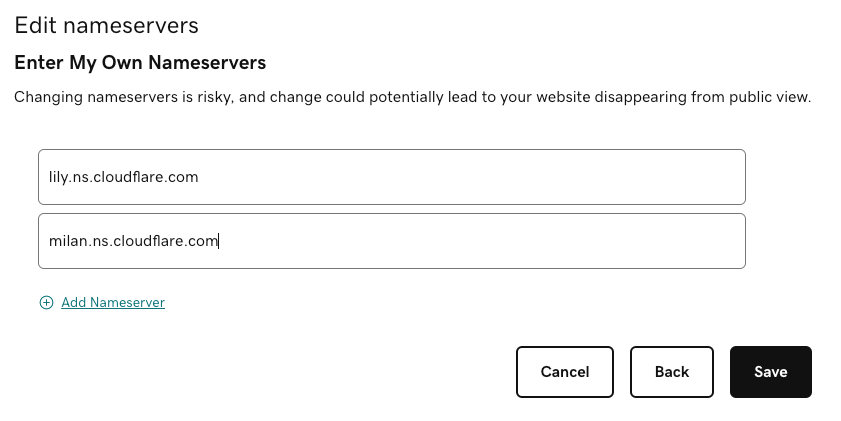
 8. A new window will appear. Click on **Enter my own nameservers (advanced)**, and paste the nameservers you copied earlier from Cloudflare. Lastly, click on **Save**. If asked, give consent to change the nameservers. *Now you can manage your DNS records directly from Cloudflare*.
 9. Once the domain is accepted from Cloudflare, if you go to overview in the left sidebar of Cloudflare, you’ll see the image below:
 Now you can start adding the **CNAME** record you got in ClickFlare when adding your custom domain. Just copy and paste the exact names and values you received from ClickFlare.
**Important Note:** If you're using this domain only for tracking with ClickFlare, then remove all DNS records that appear in Cloudflare by default (like A records), before proceeding with ClickFlare's DNS records.
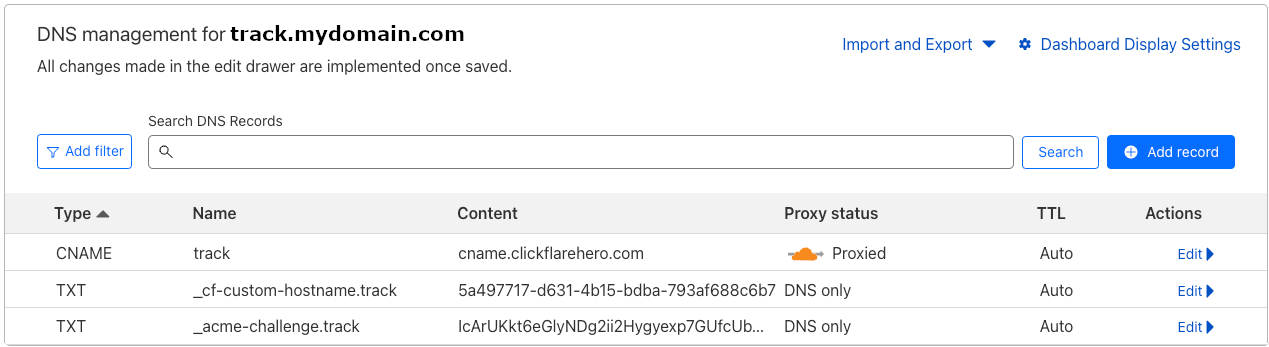
If you're adding a subdomain as your custom tracking domain, then the configuration should look like the one shown in the image below:
Note: If you are adding a custom domain after the 29th of July 2026, you do not need the TXT records shown below.
Now you can start adding the **CNAME** record you got in ClickFlare when adding your custom domain. Just copy and paste the exact names and values you received from ClickFlare.
**Important Note:** If you're using this domain only for tracking with ClickFlare, then remove all DNS records that appear in Cloudflare by default (like A records), before proceeding with ClickFlare's DNS records.
If you're adding a subdomain as your custom tracking domain, then the configuration should look like the one shown in the image below:
Note: If you are adding a custom domain after the 29th of July 2026, you do not need the TXT records shown below.
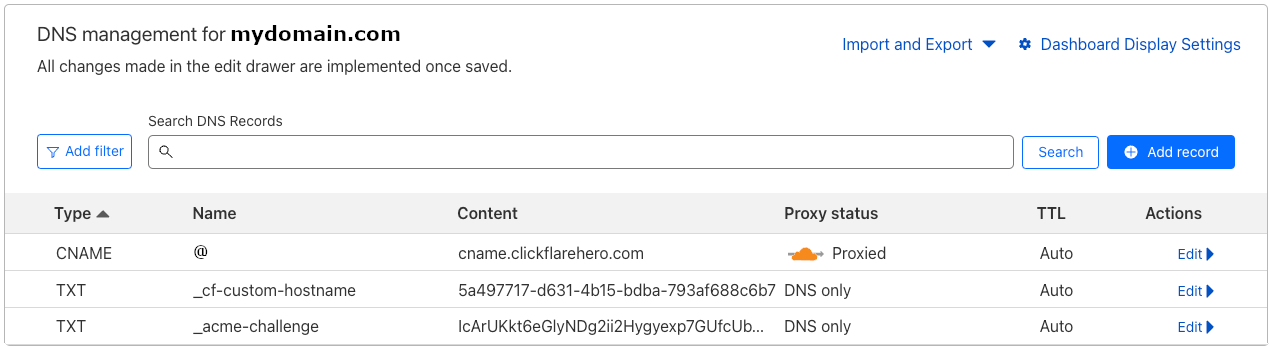
 If you're adding the root domain, the configuration should look like, this:
 **Done!**
When you see a green active tag next to your domain name in ClickFlare, it means that your domain is ready
**Done!**
When you see a green active tag next to your domain name in ClickFlare, it means that your domain is ready
