> ## Documentation Index
> Fetch the complete documentation index at: https://clickflare.com/docs/llms.txt
> Use this file to discover all available pages before exploring further.
# How to Configure a Traffic Source S2S Postback URL
> Send conversion data back to your traffic source automatically, using the postback URL and tokens it expects.
A Server-to-Server (S2S) postback URL allows ClickFlare to send conversion data directly to your traffic source whenever a conversion is successfully recorded within a campaign.
When a conversion occurs, ClickFlare makes an HTTP request to a unique URL provided by the traffic source and dynamically replaces tokens with the appropriate conversion data.
## Before You Begin
We recommend reviewing your traffic source's tracking documentation first to identify:
* Supported postback parameters
* Required click ID parameter
* Additional required parameters (such as campaign IDs or account IDs)
* Supported event types
Note: Some traffic sources do not provide or require a click ID parameter.
## Understanding Click IDs
Most traffic sources generate a unique click ID for each visitor. This value is used to attribute conversions back to the original click.
In ClickFlare:
* Traffic source click IDs are stored as External IDs.
* The \{external\_id} token is used to dynamically pass the traffic source click ID back in the postback URL.
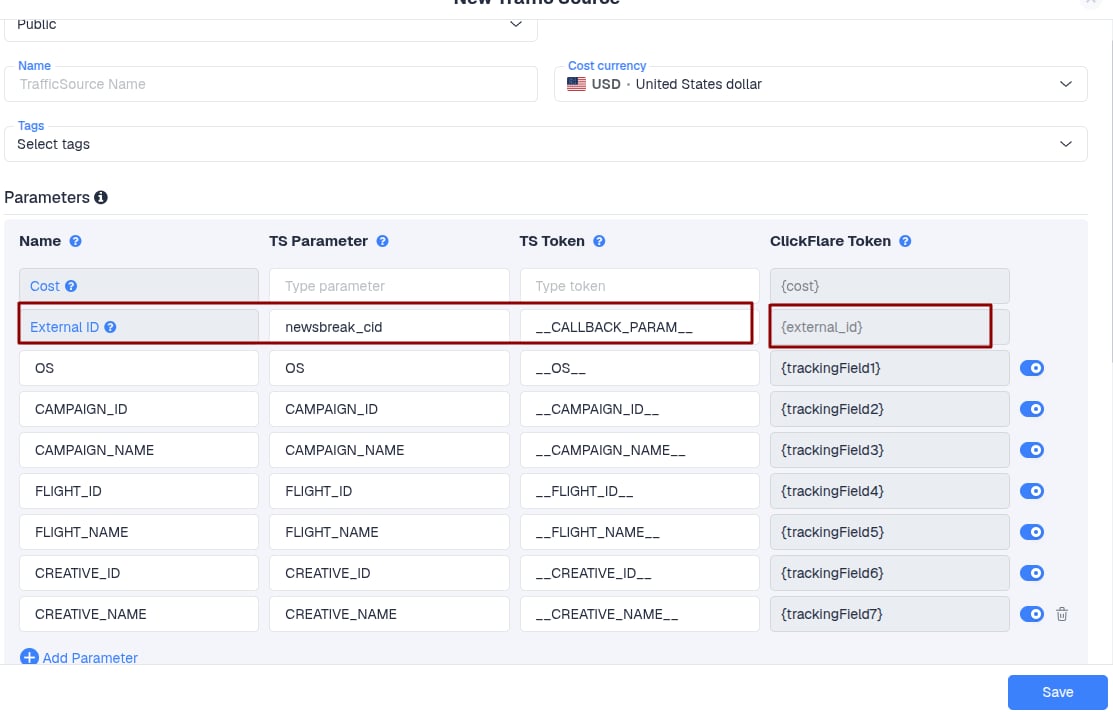 ### Example: How \{external\_id} Works
Suppose your traffic source sends the following click ID when a visitor clicks your ad:
```
click_id=abc123xyz
```
ClickFlare stores this value as the External ID for that visit.
When a conversion is recorded, and a postback is fired, the \{external\_id} token is automatically replaced with the original click ID value:
```
https://trafficsource.com/postback?click_id={external_id}&payout={payout}
```
Becomes:
```
https://trafficsource.com/postback?click_id=abc123xyz&payout=25.00
```
This allows the traffic source to match the conversion to the original click and attribute it correctly. Most traffic sources rely on this click ID parameter for accurate conversion tracking.
***
### Build your postback URL
Use ClickFlare's tokens to populate the URL dynamically. Here's a common example:
```
https://business.newsbreak.com/tracking/attribute?callback={external_id}&nb_value={payout}&event_type=REPLACE
```
### Example: How \{external\_id} Works
Suppose your traffic source sends the following click ID when a visitor clicks your ad:
```
click_id=abc123xyz
```
ClickFlare stores this value as the External ID for that visit.
When a conversion is recorded, and a postback is fired, the \{external\_id} token is automatically replaced with the original click ID value:
```
https://trafficsource.com/postback?click_id={external_id}&payout={payout}
```
Becomes:
```
https://trafficsource.com/postback?click_id=abc123xyz&payout=25.00
```
This allows the traffic source to match the conversion to the original click and attribute it correctly. Most traffic sources rely on this click ID parameter for accurate conversion tracking.
***
### Build your postback URL
Use ClickFlare's tokens to populate the URL dynamically. Here's a common example:
```
https://business.newsbreak.com/tracking/attribute?callback={external_id}&nb_value={payout}&event_type=REPLACE
```
 ***
## Configuration Steps
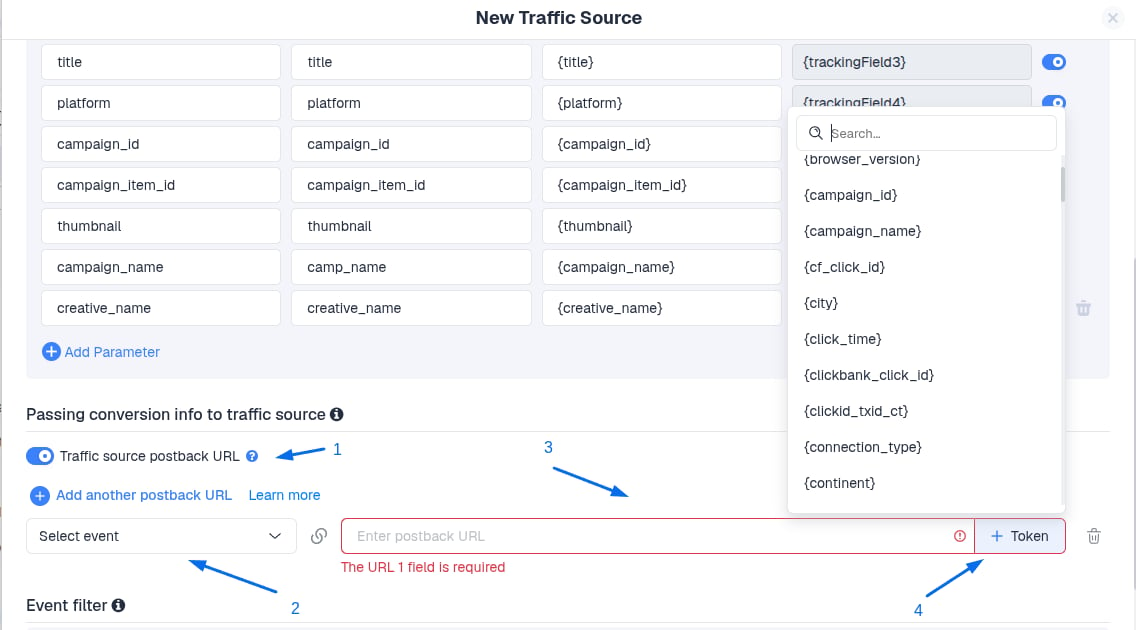
### Enable the Postback URL option.
Navigate to your Traffic Source settings and enable the Postback URL option.
### Select the Event to Send
Choose the ClickFlare event that should trigger the postback.
Before selecting an event, verify which events are being logged in your campaign by reviewing:
Logs → Event Logs
Common examples include:
* Conversions
* Custom conversions:
lead
sale
purchase
### Add the Traffic Source Postback URL
Paste the postback URL provided by your traffic source.
If your traffic source does not provide a ready-made postback URL, build one according to their documentation using the required parameters.
### Use ClickFlare Tokens
Use the Tokens section to insert dynamic values into the postback URL.
* Click IDs
* Payout values
* Transaction IDs
* Campaign IDs
* Custom tracking parameters
***
## Available ClickFlare Tokens
### Traffic Source Data
| Data | Token |
| ----------------------- | --------------------------------------- |
| Traffic source Click ID | \{external\_id} |
| Tracking Fields | \{trackingField1} to \{trackingField20} |
### Conversion Data
| Data | Token |
| ------------------------------------------- | --------------------------------------------------- |
| Transaction ID | \{txid} |
| ClickFlare Click ID | \{cf\_click\_id} |
| Payout | \{payout} |
| Additional Data passed by Affiliate Network | \{conversionParameter1} to \{conversionParameter20} |
### ClickFlare Element IDs
| Data | Token |
| ----------------- | ---------------------- |
| Campaign ID | \{campaign\_id} |
| Landing Page ID | \{landing\_id} |
| Offer ID | \{offer\_id} |
| Traffic Source ID | \{traffic\_source\_id} |
### Visitor Data
| Data | Token |
| --------------- | ------------------- |
| IP Address | \{ip} |
| Referrer Domain | \{referrer\_domain} |
### Geo Data
| Data | Token |
| ------------ | ---------------- |
| Country Code | \{country} |
| Country Name | \{country\_name} |
| Region | \{region} |
| City | \{city} |
### Device Data
| Data | Token |
| ----------- | ---------------- |
| Device Type | \{device} |
| Brand | \{device\_brand} |
| Model | \{device\_model} |
## Important Notes
* Always verify your traffic source documentation to ensure the required parameters are included.
* After configuring the postback URL, test a conversion and review the Postback Logs to confirm that the traffic source is receiving the data successfully.
***
## Configuration Steps
### Enable the Postback URL option.
Navigate to your Traffic Source settings and enable the Postback URL option.
### Select the Event to Send
Choose the ClickFlare event that should trigger the postback.
Before selecting an event, verify which events are being logged in your campaign by reviewing:
Logs → Event Logs
Common examples include:
* Conversions
* Custom conversions:
lead
sale
purchase
### Add the Traffic Source Postback URL
Paste the postback URL provided by your traffic source.
If your traffic source does not provide a ready-made postback URL, build one according to their documentation using the required parameters.
### Use ClickFlare Tokens
Use the Tokens section to insert dynamic values into the postback URL.
* Click IDs
* Payout values
* Transaction IDs
* Campaign IDs
* Custom tracking parameters
***
## Available ClickFlare Tokens
### Traffic Source Data
| Data | Token |
| ----------------------- | --------------------------------------- |
| Traffic source Click ID | \{external\_id} |
| Tracking Fields | \{trackingField1} to \{trackingField20} |
### Conversion Data
| Data | Token |
| ------------------------------------------- | --------------------------------------------------- |
| Transaction ID | \{txid} |
| ClickFlare Click ID | \{cf\_click\_id} |
| Payout | \{payout} |
| Additional Data passed by Affiliate Network | \{conversionParameter1} to \{conversionParameter20} |
### ClickFlare Element IDs
| Data | Token |
| ----------------- | ---------------------- |
| Campaign ID | \{campaign\_id} |
| Landing Page ID | \{landing\_id} |
| Offer ID | \{offer\_id} |
| Traffic Source ID | \{traffic\_source\_id} |
### Visitor Data
| Data | Token |
| --------------- | ------------------- |
| IP Address | \{ip} |
| Referrer Domain | \{referrer\_domain} |
### Geo Data
| Data | Token |
| ------------ | ---------------- |
| Country Code | \{country} |
| Country Name | \{country\_name} |
| Region | \{region} |
| City | \{city} |
### Device Data
| Data | Token |
| ----------- | ---------------- |
| Device Type | \{device} |
| Brand | \{device\_brand} |
| Model | \{device\_model} |
## Important Notes
* Always verify your traffic source documentation to ensure the required parameters are included.
* After configuring the postback URL, test a conversion and review the Postback Logs to confirm that the traffic source is receiving the data successfully.