> ## Documentation Index
> Fetch the complete documentation index at: https://clickflare.com/docs/llms.txt
> Use this file to discover all available pages before exploring further.
# Tracking Conversions Using a Conversion Tracking Pixel
> A Detailed Guide to Setting Up and Using a Conversion Tracking Pixel for Conversion Tracking
### **Understanding Conversion Tracking Pixels**
When **S2S postback tracking** is not available, an alternative method to track conversions is by using a **conversion tracking pixel**. This method is **cookie-based**, meaning that the click ID is stored in the visitor's browser and retrieved when the conversion occurs. Tracking pixels are usually placed on a **"Thank You" page** that users see after completing a conversion action.
Unlike **S2S postbacks**, conversion tracking pixels do not require passing a **click ID** in the offer URL. Instead, the click ID is stored in a cookie when the visitor clicks an ad and is later retrieved automatically when the pixel fires.
***
## **1. How Conversion Tracking Pixels Work**
### **Click ID Storage Process**
The click ID value is assigned to a visitor in one of the following ways:
* **If a landing page is used** → The click ID is assigned after clicking a CTA button on the landing page.
* **If direct linking is used** → The click ID is assigned after clicking the campaign URL.
Once assigned, ClickFlare stores the **click ID in a browser cookie**. If the visitor completes a conversion, they are redirected to a "Thank You" page, where the conversion tracking pixel is triggered. The pixel automatically fetches the **click ID from the cookie** and sends a request to ClickFlare to log the conversion.
**Note:** If cookies are disabled in the visitor's browser, the conversion tracking pixel will not function.
***
## **2. Setting Up the Conversion Tracking Pixel in ClickFlare**
To enable **pixel-based conversion tracking**, follow the steps below:
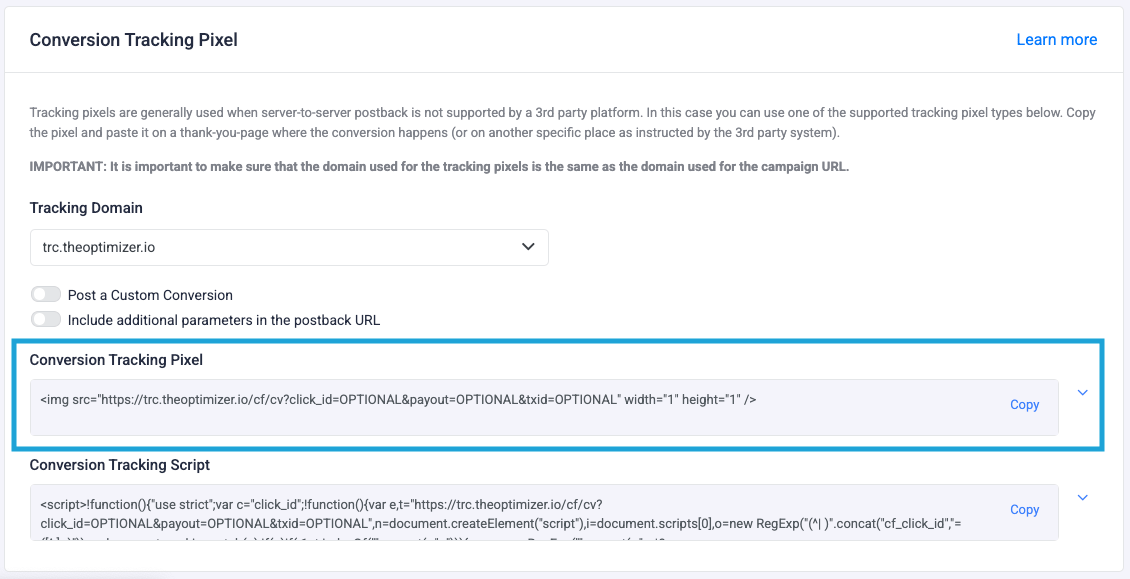
### **Step 1: Retrieve the Conversion Tracking Pixel**
1. Log in to your **ClickFlare** dashboard.
2. Navigate to **Settings > Tracking URLs**.
3. Scroll down to the **Tracking Pixel** section.
4. Click **Copy** to get the conversion tracking pixel URL or script.
 ### **Step 2: Configure the Tracking Pixel URL**
In its basic form, the conversion tracking pixel URL looks like this:
```
https://your_clickflare_domain.com/cf/cv?
```
However, ClickFlare allows adding optional parameters:
* **payout** → Passes the revenue per conversion.
* **txid** → Assigns a unique transaction ID.
**Example: Conversion Tracking Pixel with Parameters**
```
https://your_clickflare_domain.com/cf/cv?payout={payout_token}&txid={transaction_id}
```
* `payout_token` → Replaced with the affiliate network's payout value.
* `transaction_id` → Used for tracking **upsells** or **repeat conversions**.
### **Step 3: Place the Pixel on the "Thank You" Page**
Once the tracking pixel is configured, place it on the **conversion confirmation page (Thank-You Page)**.
**Three Available Pixel Formats:**
1. **Conversion Tracking Image Pixel** → A hidden image tag in HTML.
2. **Conversion Tracking Script** → A JavaScript-based tracking script.
**Example: Image Pixel**
```csharp theme={null}
### **Step 2: Configure the Tracking Pixel URL**
In its basic form, the conversion tracking pixel URL looks like this:
```
https://your_clickflare_domain.com/cf/cv?
```
However, ClickFlare allows adding optional parameters:
* **payout** → Passes the revenue per conversion.
* **txid** → Assigns a unique transaction ID.
**Example: Conversion Tracking Pixel with Parameters**
```
https://your_clickflare_domain.com/cf/cv?payout={payout_token}&txid={transaction_id}
```
* `payout_token` → Replaced with the affiliate network's payout value.
* `transaction_id` → Used for tracking **upsells** or **repeat conversions**.
### **Step 3: Place the Pixel on the "Thank You" Page**
Once the tracking pixel is configured, place it on the **conversion confirmation page (Thank-You Page)**.
**Three Available Pixel Formats:**
1. **Conversion Tracking Image Pixel** → A hidden image tag in HTML.
2. **Conversion Tracking Script** → A JavaScript-based tracking script.
**Example: Image Pixel**
```csharp theme={null}
 ```
> This pixel fires a **GET request** to ClickFlare when the "Thank You" page loads.
**Example: JavaScript Pixel**
```csharp theme={null}
< script > ! function() {
"use strict";
var c = "click_id";
! function() {
var e, t = "https://trc.theoptimizer.io/cf/cv?payout=OPTIONAL&txid=OPTIONAL",
n = document.createElement("script"),
i = document.scripts[0],
o = new RegExp("(^| )".concat("cf_click_id", "=([^;]+)")),
a = document.cookie.match(o);
if (a)
if (-1 < t.indexOf("".concat(c, "="))) {
var r = new RegExp("".concat(c, "=.*?(&|$)"));
t = t.replace(r, "".concat(c, "=") + a.pop() + "&")
} else {
var d = -1 < t.indexOf("?") ? "&" : "?";
t += d + "".concat(c, "=") + a.pop()
} n.src = t, null === (e = i.parentNode) || void 0 === e || e.insertBefore(n, i)
}()
}(); < /script>
```
> This script dynamically fires a conversion when the Thank-you page loads.
**Important:** When placing the conversion tracking pixel, or script, make sure to **remove** the click\_id=OPTIONAL placeholder from the URL. The click ID is automatically retrieved from the visitor’s browser cookie, so you don’t need to include it manually. For example, use:
```
```
If you leave click\_id=OPTIONAL in the pixel or script, ClickFlare will treat "OPTIONAL" as the actual click ID, which won't match any real visit and therefore won’t register a conversion.
***
## **4. Conversion Tracking Pixel vs. Conversion Tracking Script**
The main difference between the conversion tracking pixel and the conversion tracking script is that the script sets a first-party cookie on the domain of the page. This makes the script more reliable because the cookie is stored on the user's browser under the domain where the tracking is implemented, compared to the pixel, which may not always set the cookie correctly due to cross-domain restrictions.
**FREQUENTLY ASKED QUESTIONS**
Got questions? Find the answers below:
> **Q1**: What happens if the user blocks cookies?
**A1**: If cookies are disabled, the **conversion tracking pixel will not work**, as it relies on cookies to store the **click ID**.
> **Q2**: Can I use both Postback URLs and Conversion Tracking Pixels?
**A2**: Yes. However, it is recommended to use **S2S postbacks** whenever possible for more accurate tracking.
> **Q3**: How can I verify if my tracking pixel is working?
**A3**: Check the **Event Logs** in ClickFlare to see if conversions are being registered.
## Related Resources:
* [Tracking Conversions Using S2S Postback](/docs/en/tracking/troubleshooting-s2s-postback-url-in-clickflare)
* [Troubleshooting S2S Postback URL in ClickFlare](/docs/en/tracking/troubleshooting-s2s-postback-url-in-clickflare)
* [Overview of Conversion Tracking Methods in ClickFlare](/docs/en/tracking/conversion-tracking-methods-clickflare)
* [How Click and Conversion Data is Transferred in ClickFlare](/docs/en/tracking/click-conversion-data-transfer-clickflare)
```
> This pixel fires a **GET request** to ClickFlare when the "Thank You" page loads.
**Example: JavaScript Pixel**
```csharp theme={null}
< script > ! function() {
"use strict";
var c = "click_id";
! function() {
var e, t = "https://trc.theoptimizer.io/cf/cv?payout=OPTIONAL&txid=OPTIONAL",
n = document.createElement("script"),
i = document.scripts[0],
o = new RegExp("(^| )".concat("cf_click_id", "=([^;]+)")),
a = document.cookie.match(o);
if (a)
if (-1 < t.indexOf("".concat(c, "="))) {
var r = new RegExp("".concat(c, "=.*?(&|$)"));
t = t.replace(r, "".concat(c, "=") + a.pop() + "&")
} else {
var d = -1 < t.indexOf("?") ? "&" : "?";
t += d + "".concat(c, "=") + a.pop()
} n.src = t, null === (e = i.parentNode) || void 0 === e || e.insertBefore(n, i)
}()
}(); < /script>
```
> This script dynamically fires a conversion when the Thank-you page loads.
**Important:** When placing the conversion tracking pixel, or script, make sure to **remove** the click\_id=OPTIONAL placeholder from the URL. The click ID is automatically retrieved from the visitor’s browser cookie, so you don’t need to include it manually. For example, use:
```
```
If you leave click\_id=OPTIONAL in the pixel or script, ClickFlare will treat "OPTIONAL" as the actual click ID, which won't match any real visit and therefore won’t register a conversion.
***
## **4. Conversion Tracking Pixel vs. Conversion Tracking Script**
The main difference between the conversion tracking pixel and the conversion tracking script is that the script sets a first-party cookie on the domain of the page. This makes the script more reliable because the cookie is stored on the user's browser under the domain where the tracking is implemented, compared to the pixel, which may not always set the cookie correctly due to cross-domain restrictions.
**FREQUENTLY ASKED QUESTIONS**
Got questions? Find the answers below:
> **Q1**: What happens if the user blocks cookies?
**A1**: If cookies are disabled, the **conversion tracking pixel will not work**, as it relies on cookies to store the **click ID**.
> **Q2**: Can I use both Postback URLs and Conversion Tracking Pixels?
**A2**: Yes. However, it is recommended to use **S2S postbacks** whenever possible for more accurate tracking.
> **Q3**: How can I verify if my tracking pixel is working?
**A3**: Check the **Event Logs** in ClickFlare to see if conversions are being registered.
## Related Resources:
* [Tracking Conversions Using S2S Postback](/docs/en/tracking/troubleshooting-s2s-postback-url-in-clickflare)
* [Troubleshooting S2S Postback URL in ClickFlare](/docs/en/tracking/troubleshooting-s2s-postback-url-in-clickflare)
* [Overview of Conversion Tracking Methods in ClickFlare](/docs/en/tracking/conversion-tracking-methods-clickflare)
* [How Click and Conversion Data is Transferred in ClickFlare](/docs/en/tracking/click-conversion-data-transfer-clickflare)