With redirect tracking, rotating landing pages is built in: you add several landers to a campaign path, set their weights, and ClickFlare picks a lander for every click before sending the visitor on. Some traffic sources don’t allow that redirect. Google Ads is the best-known example, and many other ad platforms (Facebook, Newsbreak, Snapchat and more) prefer or require the ad to point straight at the page. For those you use direct tracking: the ad links directly to your landing page and the ClickFlare script on the page records the visit. The catch is that with direct tracking the destination is fixed. The visitor lands on the URL in your ad, and ClickFlare never gets a chance to choose a different lander. So ClickFlare’s own lander rotation does not work in a direct tracking campaign. This guide covers two ways to test several landing pages anyway:
If your landing pages are on LanderLab, use Method 2. It is the only one that gives you a true, controlled split on a single ad URL while keeping direct tracking.

Before you start

  • Your own tracking domain. Set up a custom tracking domain before anything else. Shared domains get flagged by ad platforms and blocked by browsers. See Tracking domains.
  • A direct tracking campaign. The campaign’s Transition between ad and campaign funnel is set to Direct. If you have not built one yet, follow Direct campaign tracking first.
  • The ClickFlare direct tracking script on every landing page (or every LanderLab variant) you want to test, and CTAs that use the ClickFlare Click URL.

Why rotation needs a redirect

In a redirect campaign the click goes through ClickFlare first:
In a direct campaign there is no step in between:
The ad URL is the lander URL. Whatever page is in the ad is the page every visitor sees. To test more than one page you either need more than one URL (Method 1), or a landing page host that can show different content on the same URL (Method 2).

Method 1: Duplicate the ad, one lander per ad

This is a workaround, not true rotation. It works with any landing page, wherever it is hosted.

How it works

When you add two or more landers to a path in a direct tracking campaign, ClickFlare gives you a separate direct tracking URL for each lander. Each URL is the lander’s own URL plus the campaign ID (cpid) and your traffic source parameters. You then duplicate the ad in your traffic source and give each copy a different lander URL:
Both ads belong to the same ClickFlare campaign, so all visits, clicks and conversions land in one campaign, broken down by lander.

Setup

1

Add the direct tracking script to every lander

Each landing page you want to test needs the ClickFlare direct tracking script, placed right before the closing </body> tag, and its CTA must use the ClickFlare Click URL. See Direct campaign tracking.
2

Create or open the direct tracking campaign

Go to Campaigns, open your campaign (or create one with New), and on the General tab set Transition between ad and campaign funnel to Direct.
3

Add all landers to the path

On the Destination tab, open the path, choose Landers & Offers as the Path Destination, and add every lander you want to test under Landers. Add your offer(s) under Offers. Save the campaign.
The lander weights in the path have no effect here. With direct tracking ClickFlare does not choose the lander; the ad does.
4

Copy one direct tracking URL per lander

Open the campaign’s tracking links. ClickFlare lists a direct tracking URL for each lander in the path. Copy all of them.
5

Duplicate the ad in your traffic source

In Google Ads (or your other platform), create one copy of the ad per lander. Keep the creative, targeting and bid identical so the only difference between the ads is the landing page. Paste a different lander URL as the Final URL of each ad.
6

Compare landers in ClickFlare

In the campaign report, group by Lander to compare visits, CTR, conversions and ROI for each page.

Limitations

Ad platforms optimise delivery. Google Ads, Meta and most others quickly shift impressions to the ad they predict will perform best, so one lander can end up with most of the traffic after a few hundred impressions. You can reduce this with even-rotation settings where the platform offers them (for example, ad rotation set to Do not optimize in Google Ads, where still available), but there is no guarantee of an even split.
Each lander sits behind a different ad, so differences in CTR, quality score or approval status between the ads also affect the result. Keep the ads as identical as you can.
Every new lander means another ad copy in every ad group. With several ad groups and campaigns this grows quickly, and every ad goes through review separately.
To stop a losing lander you pause its ad in the traffic source. Changing weights in ClickFlare does nothing in a direct campaign.

LanderLab is a landing page builder with built-in A/B testing. Its A/B testing is server-side: the page keeps one URL, and LanderLab serves a different version of the page, called a variant, to each visitor according to the weights you set. That is exactly what direct tracking needs. The ad keeps a single, fixed URL, there is no redirect, and the rotation still happens.

How ClickFlare knows which variant was shown

When A/B testing is on and more than one variant is active, LanderLab automatically appends a variantId parameter to the page URL, identifying the variant the visitor is seeing. The ClickFlare direct tracking script reads the full landing page URL on every visit. If your ClickFlare traffic source has a parameter called variantId, ClickFlare captures its value like any other traffic source parameter (campaign ID, ad ID, keyword and so on) and stores it in a ClickFlare tracking field. You can then break down any report by variant.
You get visits, clicks, conversions, revenue and ROI per lander variant, on a direct tracking campaign, from a single ad.

Setup

1

Build your variants in LanderLab

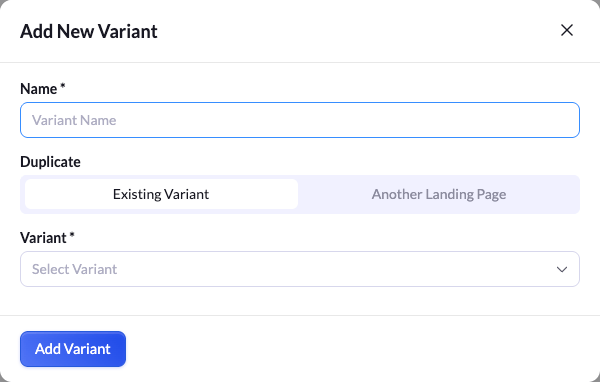
Open your landing page in the LanderLab editor and click A/B Test in the top bar. In Add New Variant, give the variant a name and choose what to duplicate:
  • Existing Variant copies a variant of the same page, so you only change what you want to test (headline, hero image, layout).
  • Another Landing Page brings in a different LanderLab page as a variant, so you can test two completely different landers on the same URL. The Add New Variant dialog in LanderLab: name the variant and duplicate an existing variant or another landing page
Repeat for every variant you want to test.
2

Add the ClickFlare script and Click URL to every variant

Each variant is its own page content, so each one needs the ClickFlare direct tracking script and CTAs that use the ClickFlare Click URL. If you created a variant by duplicating one that is already set up, it inherits the script and CTAs. If you brought in another landing page, check it.See Direct campaign tracking for the script.
3

Set the variant weights and publish

In the A/B test, use Manage Weights to set how traffic is split, or Spread Equally for an even split. Weights are relative: for example A = 300, B = 100, C = 100 sends 60% / 20% / 20% of visitors. Publish the page.
LanderLab only appends variantId when A/B testing is enabled and more than one variant is active.
4

Add variantId to your ClickFlare traffic source

Go to Traffic Sources and open the traffic source you use for this campaign (for example, Google Ads). In the Parameters section, click Add Parameter and fill in:ClickFlare assigns the next free ClickFlare Token ({trackingFieldN}) automatically. Make sure the parameter is switched on, then save.A ClickFlare traffic source with a variantId parameter added at the bottom: Name and TS Parameter are variantId, TS Token is empty, and ClickFlare Token is trackingField9
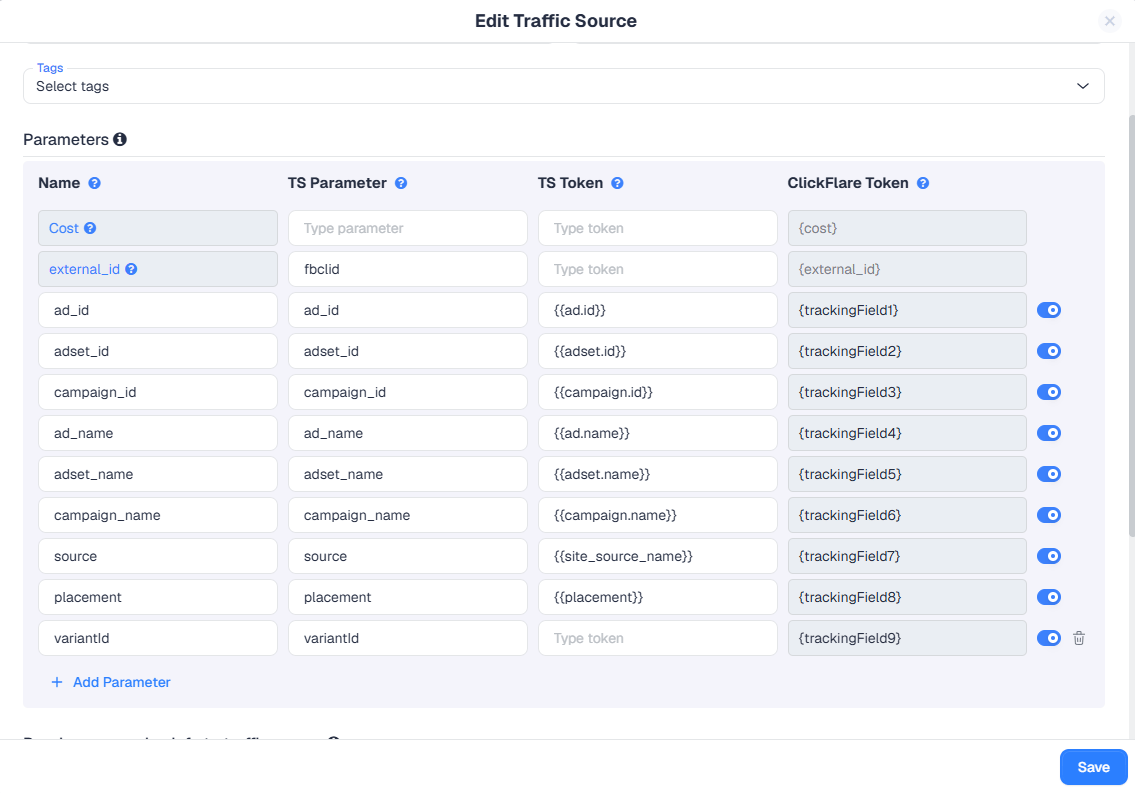
Leave the TS Token empty. The value doesn’t come from the traffic source, so there is no macro to fill in. ClickFlare only needs the TS Parameter name to read variantId from the landing page URL. An empty token also keeps variantId out of your campaign and lander tracking URLs, so the only variantId in the URL is the one LanderLab adds.
The TS Parameter must be exactly variantId. Parameter names are case-sensitive: variantid or variant_id will not match what LanderLab adds to the URL.
You only do this once per traffic source. Every campaign that uses it can then report by variant. See How to add a custom traffic source for the full parameter reference.
5

Set up the direct tracking campaign with the LanderLab page

In the campaign, set Transition between ad and campaign funnel to Direct. On the Destination tab, add the LanderLab page as the single lander in the path (its main URL, the same for all variants) and add your offer(s).
6

Use one direct tracking URL in the ad

Copy the campaign’s direct tracking URL for the lander and use it as the ad’s Final URL. One ad, one URL. LanderLab does the rotation behind it.
7

Test before sending traffic

Open the direct tracking URL in a private window a few times. Check that:
  • Different variants load across visits.
  • The address bar shows variantId= with a value.
  • The visits appear in ClickFlare with a value in the variantId column.
See How to test a campaign before sending traffic.

Reading the results

In ClickFlare, open the campaign report and group by the variantId traffic source parameter (the name you gave it in the traffic source). Each row is one LanderLab variant, with its own visits, lander clicks, CTR, conversions, revenue, cost and ROI. Because variantId is stored like any other traffic source parameter, you can combine it with other groupings, for example variantId → Country or variantId → Device, to see whether a variant wins only for part of your audience. When you have a winner, go back to LanderLab, use Set as Main on the winning variant and switch the page from A/B Test mode back to Standard mode. The main variant then receives 100% of the traffic. Nothing needs to change in ClickFlare or in the ad.

Things to know

ClickFlare sees one landing page URL, so the Lander report shows a single lander for the whole test. The split between variants is in the variantId breakdown, not in the Lander breakdown.
Lander weights and AI Smart Traffic in the ClickFlare path do not affect the variant split. Change the split in LanderLab with Manage Weights.
If some visits have no variantId, check that A/B testing is still enabled with at least two active variants, and that the parameter name in the traffic source is spelled exactly variantId. Visits recorded before you added the parameter to the traffic source will not have a value.
Yes. It works with any traffic source and any campaign that uses direct tracking, because the parameter comes from LanderLab, not from the ad platform. Add variantId to each traffic source you run LanderLab tests on.
You can, but with redirect tracking you normally don’t need it: add the landers to the path and let ClickFlare rotate them. The LanderLab method is meant for campaigns where a redirect is not allowed.

Which method should I use?

  • Your landers are on LanderLab: use Method 2. True rotation on one URL, controlled weights, one ad to manage, and a per-variant breakdown in ClickFlare.
  • Your landers are hosted elsewhere and you can’t move them: use Method 1, and keep the ads identical so the lander is the only difference.
  • Your traffic source allows redirects: you don’t need either method. Use a redirect campaign and rotate landers in the path. See Redirect vs. direct tracking.

Direct campaign tracking

Set up a campaign without a redirect.

Direct tracking explained

Benefits, limits and best practices.

Custom traffic source

Add parameters such as variantId.

Google Ads

Connect Google Ads to ClickFlare.