

Prerequisites
Before you begin, make sure you have:- An active CallGrid account with at least one campaign, source, and destination created
- A landing page that displays a phone number → Check out LanderLab.io for ready-made PPC templates
- A decision on which call event should count as a conversion (for example, a paid call)
New to CallGrid? Set up your account in this order
New to CallGrid? Set up your account in this order
CallGrid entities depend on each other, so CallGrid recommends creating them in a fixed order:
- Numbers – buy individual numbers, or create a Number Pool for visitor-level attribution (10–25 numbers is a good starting size for testing).
- Buyers – the companies purchasing your calls. Create one even if you route calls to yourself.
- Destinations – where calls ring. Each destination belongs to a buyer and holds routing, revenue, conversion duration, and capacity settings.
- Vendors – your traffic suppliers (use something like “Internal Media” for your own media buying).
- Sources – where the calls come from, such as “Facebook – Insurance”. Each source belongs to a vendor.
- Campaigns – tie it all together. For a first setup, CallGrid suggests a Non-Real-Time Call Bidding campaign with call recording turned on.
Why Track CallGrid with ClickFlare?
CallGrid tells you which calls happened and what they were worth. ClickFlare tells you which ad, creative, lander, and audience produced them. Connecting the two lets you:- Attribute each call to the original ad click, source, and creative
- Combine cost, call, and revenue data in one report and optimize toward profit
- Split-test landing pages and auto-optimize based on call performance
- Send call conversions server-side to ad platforms using ClickFlare’s Conversion API integrations
- Track funnel steps before the call (quiz answers, button clicks, drop-offs)
How It Works
1
User clicks your ad
The visitor clicks your ad and passes through ClickFlare, which generates a unique click ID.
2
Lander receives the click ID
ClickFlare appends the click ID to your landing page URL (for example
?clickid=abc123).3
CallGrid captures it
The CallGrid SDK on the page swaps in a tracking number and stores the
clickid URL parameter as a Tag on the call.4
User calls
CallGrid routes the call to your buyer’s destination and evaluates it against your conversion rules.
5
Conversion is posted back
When the selected event fires (for example Call Paid), a CallGrid webhook sends the click ID, payout, and call ID to your ClickFlare postback URL.
Step 1: Pass the Click ID from ClickFlare to Your Landing Page
This is the standard setup for redirect-based campaigns (Facebook, TikTok, Taboola, NewsBreak, etc.).1. Create the Lander as an Offer in ClickFlare
Add your call landing page as an Offer in ClickFlare. This lets ClickFlare pass the click ID to the page and attribute conversions to it.2. Append the ClickFlare Click ID to the Offer URL
Step 2: Add clickid as a Tag in CallGrid
CallGrid’s SDK automatically reads URL parameters from the visitor’s session, but it only stores the ones that exist as Tags in your account.
- In CallGrid, go to Integrations → Tags
- Add a tag named
clickid - Save
[[tag:clickid]].
Step 3: Install the CallGrid SDK on Your Landing Page
1. Get Your Script from CallGrid
- Open your CallGrid campaign and go to the Sources tab
- Click the SDK Instructions button (the
<>icon) next to your source - Choose Normal for a standard implementation
- Copy the code
2. Add It to Your Page
Paste the script on your landing page, ideally just before the closing</body> tag:
The
organizationId is the same across your CallGrid account. Each source has its own campaignSourceId, so use the script from the source that matches this ClickFlare campaign.This script is for Non-Real-Time Call Bidding campaigns. Real-Time Call Bidding (RTB) campaigns in CallGrid use posting instructions instead of the on-page SDK.
Alternative Implementation Scenarios
Use Case 1: Redirect Tracking + Script on Page Load
✅ This is the default setup covered above. The click ID arrives in the URL, and the CallGrid SDK picks it up as soon as the page loads.Use Case 2: Redirect Tracking + Delayed Number Loading
When to use: You only want to show the phone number to engaged visitors (for example, after they answer a quiz question or click a “Show Number” button). Every time the SDK loads, it reserves a number from your pool. Loading it only when needed keeps more numbers free and protects attribution. CallGrid recommends loading the script dynamically:Use Case 3: Direct Tracking (Google Ads, Bing, YouTube)
When to use: Your traffic source doesn’t allow redirects, so the click ID is not in the URL. With Direct Campaign Tracking, ClickFlare stores the click ID in a cookie, readable viawindow.clickflare.tracking_params.click_id. Push it to CallGrid with the SDK’s addTags() method:
Retrieving the click ID from the cookie takes about 1–2 seconds. If
addTags() runs after a tracking number has already been assigned, CallGrid automatically updates the existing session with the new tag, so the click ID is still attached to the call.Step 4: Create a Custom Conversion in ClickFlare
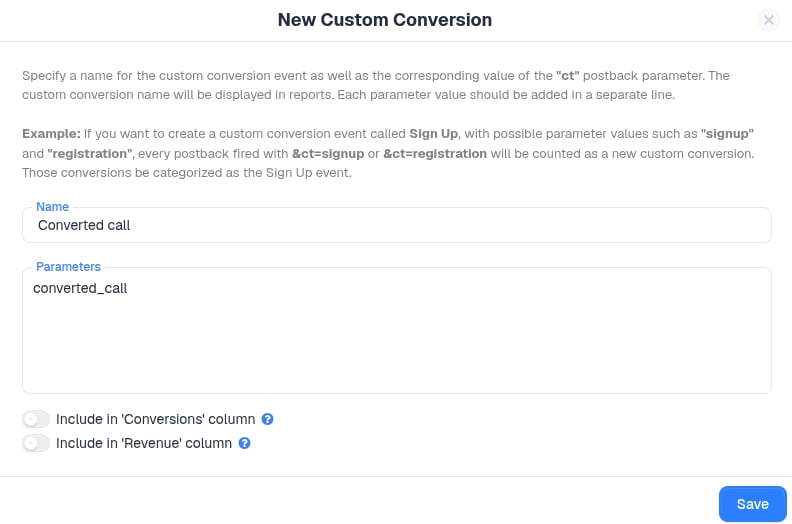
Create a custom conversion for your calls (for exampleconverted_call). You’ll use its name as the ct value in the postback so call conversions are reported separately from other events.
Step 5: Send Call Conversions from CallGrid to ClickFlare
CallGrid has a built-in ClickFlare webhook template. Use it unless you need full control over the URL.- Template mode (recommended)
- Manual mode (advanced)
- In CallGrid, go to Webhooks in the left menu
- Click + New Webhook
- Turn Template Mode on
- Under Filter by Template Type, choose Conversion Pixel
- Select ClickFlare from the template list
- Enter a Name (for example “ClickFlare Conversions”)
- Pick the Event that should count as a conversion (for example Call Ended or Call Paid, see the table below)
- Click Save Webhook
✅ Example Postback URL
🧠 Replaceyour_tracking_domain.comwith your ClickFlare tracking domain andconverted_callwith your custom conversion name.
Choosing the Right Event
Testing & Validation
1. Test the Webhook in CallGrid
After saving, CallGrid shows a testing panel:- Enter a real click ID from ClickFlare for
tag:clickid(copy one from a test click in your reports) - Enter a test payout for
tag:CallPayout(e.g.25.00), a uniquetag:CallId, and a testtag:InboundNumber - Click Run Webhook
- Confirm the conversion appears in ClickFlare
2. Run a Live Test
- Open your ClickFlare campaign URL in a browser
- Check that
clickidis present in the landing page URL (redirect setups) - Check that the phone number on the page was replaced with a tracking number
- Place a test call and stay on long enough to meet your conversion criteria
🔍 Verify Tracking
- The call appears in your CallGrid dashboard with the
clickidtag filled in - The conversion appears in ClickFlare under the right campaign, with the correct payout
Troubleshooting
Click ID is missing on CallGrid call records
Click ID is missing on CallGrid call records
- Confirm
clickidexists as a Tag in CallGrid → Integrations → Tags - Make sure the name matches the URL parameter exactly (it’s case-sensitive)
- Check that the offer URL in ClickFlare includes
clickid={cf_click_id} - For direct tracking, confirm
window.clickflare.tracking_params.click_idreturns a value in the browser console
Webhook fires but no conversion shows in ClickFlare
Webhook fires but no conversion shows in ClickFlare
- Verify the tracking domain in the webhook is your ClickFlare tracking domain
- Make sure the click ID sent is a real, existing ClickFlare click
- Check that the
ctvalue matches a custom conversion in ClickFlare - Review the CallGrid webhook logs for error responses
Duplicate conversions
Duplicate conversions
Map
txid to [[tag:CallId]]. ClickFlare uses the transaction ID to deduplicate conversions for the same call.Revenue doesn't match between platforms
Revenue doesn't match between platforms
- Confirm
payoutis mapped to[[tag:CallPayout]] - Remember the payout is taken at the moment the webhook fires, so early events like Call Inbound may carry no revenue yet. Use Call Paid for revenue reporting
- Make sure both platforms use the same currency
Phone number is not being replaced
Phone number is not being replaced
- Verify the
organizationIdandcampaignSourceIdin the script - Make sure the number on the page uses a standard format, such as (555) 123-4567
- Check the browser console for script errors, and that the SDK isn’t loaded twice
Best Practices
- Always send a transaction ID (
txid) to avoid duplicate conversions - Prefer redirect tracking when the traffic source allows it, since the click ID is available immediately in the URL
- Use “Call Paid” as your main optimization event, so ad platforms learn from calls that actually earned revenue
- Conserve your number pool by loading the CallGrid SDK only for engaged visitors
- Test before going live with CallGrid’s webhook tester and at least one real call
- Match domains: the domain in your CallGrid webhook must be the same ClickFlare tracking domain your campaign uses
- Reconcile weekly: compare conversion counts in CallGrid and ClickFlare to catch issues early
Frequently Asked Questions (FAQ)
Q1: Do I need a number pool, or can I use a single number?A1: A single static number works, but CallGrid can then only attribute calls at the campaign level. To tie each call to a specific ClickFlare click, use a number pool so every visitor sees a unique number.
Q2: What happens if my number pool runs out?A2: CallGrid falls back to your static number and still records the call, but it may not be linked to the right click. Increase the pool size or delay loading the SDK (Use Case 2).
Q3: Can I pass more data to ClickFlare, such as the caller’s ZIP code?A3: Yes. Add more
param fields (param1–param20) to the postback and map them to CallGrid tokens for the data you want to analyze.
Q4: Does this work with CallGrid Real-Time Call Bidding (RTB) campaigns?A4: The postback part (Step 5) works the same way. RTB campaigns don’t use the on-page SDK, though, so make sure the click ID is passed to CallGrid as a tag through your RTB posting setup.
Q5: Can I send these call conversions to Facebook, TikTok, or Google?A5: Yes. Once the conversion is in ClickFlare, use ClickFlare’s Conversion API integrations to forward it server-side to your ad platform.