

- ClickFlare → Make. ClickFlare’s Custom Webhook sends an event (a conversion, a purchase, a click) to a Make Custom webhook. The scenario takes it from there: a sheet, a CRM, a partner endpoint, a Slack alert.
- Make → ClickFlare. An HTTP Make a request module posts a conversion to ClickFlare’s postback endpoint as JSON, so any app Make connects to can report conversions. The same module can call the ClickFlare REST API with your API key stored in a keychain.
At a glance
To set up Make with ClickFlare:- Create a custom webhook in Make.
- Map the event in ClickFlare.
- Teach Make the data structure.
- Post conversions to ClickFlare.
How the data flows
What you’ll need
- A ClickFlare account with your own tracking domain for postbacks. See Tracking domains.
- A Make account. Each module run uses credits from your Make plan, so check your plan’s allowance against your event volume.
- For Make → ClickFlare: the click ID stored somewhere the trigger app can return it, for example a hidden form field or a CRM field.
- For API calls: an API key from Settings → API Keys.
Send ClickFlare events to Make
1
Create a custom webhook in Make
Create a scenario and add the Webhooks app’s Custom webhook module as the trigger. Click Add to create a new webhook, give it a name such as “ClickFlare conversions” and save. Make shows the webhook URL: copy it.
2
Add a Webhooks integration in ClickFlare
Go to Integrations, click Conversion API → New integration and choose Webhooks. Pick the Workspace and give it a Name.
3
Map the event
Under Event Type Mapping, pick the ClickFlare Event, set Request Method to POST, paste the Make URL as the Webhook URL and add the values you need with macros, for example:Macros work in the URL, headers and body. With a JSON body, ClickFlare sets 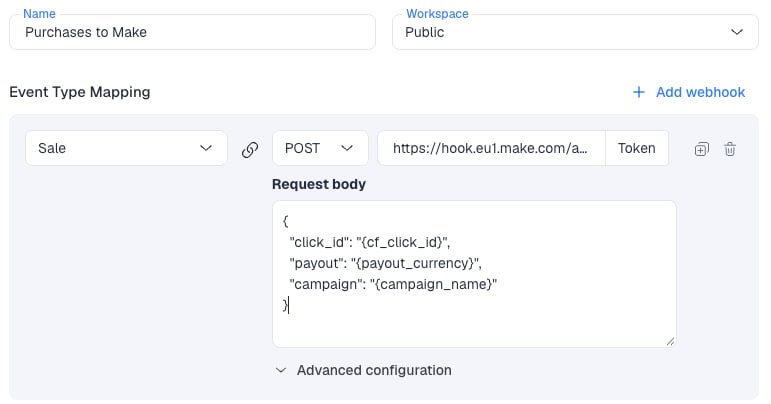
Content-Type: application/json for you. To send only some events, click Add Conditions and set a filter, such as payout greater than 0 or one campaign. Click Next, then Save.4
Teach Make the data structure
Make learns the fields of a custom webhook from the first request it receives. With the Custom webhook module open and listening, fire a real event from ClickFlare. Make then lists the fields so you can map them in later modules. If you add macros later, use Redetermine data structure on the module and send a new event.
5
Build the rest and turn it on
Add your modules, then switch the scenario on. With an instant webhook, each ClickFlare event starts a run right away.
How Make handles incoming events
- Queue. Every request first lands in the webhook’s own queue. Open Webhooks in Make’s left sidebar, pick the webhook and switch to the Queue tab to see what’s waiting.
- Instant or scheduled. By default the scenario runs as each request arrives. If you schedule it instead, requests wait in the queue and are processed when the schedule triggers, up to the Maximum number of results per run (default 2). Raise it if the queue grows.
- Parallel runs. Instant webhooks run in parallel. Turn on Process data in order in the scenario settings if order matters.
- Queue limits. Make allows up to 667 queued items per webhook for every 10,000 credits licensed per month, with a maximum of 10,000. When the queue is full, Make rejects new requests with
400 Queue is full. - Inactive webhooks. A webhook that isn’t attached to any scenario for more than 5 days is deactivated and returns
410 Gone. - Logs. Make keeps webhook logs for 3 days (30 days on Enterprise), on the webhook’s Logs tab.
Report conversions from Make to ClickFlare
ClickFlare accepts conversions as a JSON POST on the same endpoint as its postback:cf_click_id (required), payout, ct, txid and param1 to param20. ct must match a custom conversion created under Settings → Custom Conversions. See Custom conversions.
1
Make sure the click ID reaches the other app
The app that starts the scenario must know the ClickFlare click ID. Pass
{cf_click_id} in the offer or lander URL and store it, for example in a hidden form field, a CRM field or a partner platform’s sub ID.2
Set up the trigger
Use the app’s own trigger module, or a Custom webhook if the platform sends webhooks, as in the Hotmart and PartnerStack guides.
3
Add HTTP > Make a request
Add the HTTP app’s Make a request module and fill in:
With JSON string, map the values into the body:
{{1.click_id}} stands for whatever field holds the click ID in your trigger, and {{1.order_id}} for its order or transaction ID. With JSON string you must escape reserved characters yourself. Data structure escapes them for you, so prefer it when values come from user input.4
Run once and check
Click Run once with a real click ID from a recent ClickFlare click. The conversion should appear on that campaign and in Logs → Event Logs.
Map nested fields from other platforms
Make reads nested JSON and arrays natively, so it can map a platform’s own payload straight into ClickFlare’s keys. For example, for a PartnerStack reward,cf_click_id is the first item of data.customer.sub_ids and payout is data.amount divided by 100. Make’s get() function and arithmetic in the mapping panel handle both without extra modules.
Call the ClickFlare API from Make
1
Create an API key keychain
In HTTP > Make a request, set Authentication type to API key and click Credentials (or Add) to create a keychain:
Make stores the key once and adds it to every module that uses the keychain. You can edit it later under Keys in the left sidebar. See API overview.
2
Make the request
Set the URL to the endpoint, for example Every breakdown in
https://public-api.clickflare.io/api/report with Method POST and Body content type application/JSON. A daily campaign report:groupBy must also be in metrics. For long reports, raise page until no rows come back, or use the module’s Pagination settings with a page-based type.Verify the setup
1
ClickFlare → Make
Fire a test event and open the scenario’s history. The run should show real values for the click ID and payout, not the macro text.
2
Make → ClickFlare
Run the HTTP module once with a recent click ID. The conversion should appear under the right custom conversion with the right payout.
Troubleshooting
ClickFlare events don't start the scenario
ClickFlare events don't start the scenario
- The scenario is off, or the webhook was deactivated after 5 days without a scenario. Check its status under Webhooks.
- The queue is full. Check the Queue tab and raise Maximum number of results or run more often.
- An event filter in ClickFlare blocks the event.
New fields from ClickFlare don't show up in Make
New fields from ClickFlare don't show up in Make
Make still uses the old data structure. Click Redetermine data structure on the Custom webhook module and fire a new event.
The POST to ClickFlare runs but no conversion appears
The POST to ClickFlare runs but no conversion appears
cf_click_idis empty or isn’t a ClickFlare click ID.ctdoesn’t match a custom conversion exactly.- The URL isn’t your tracking domain with
/cf/cv, or the body type isn’t application/JSON. - With JSON string, the body is invalid: a quote inside a value broke it. Switch to Data structure.
The API returns 401
The API returns 401
The
api-key header is missing or wrong. Check the keychain’s placement and parameter name, and that the key still exists in ClickFlare.FAQ
Does ClickFlare integrate with Make?
Does ClickFlare integrate with Make?
Yes, both ways. ClickFlare’s Custom Webhook starts Make scenarios, and Make’s HTTP app posts conversions to ClickFlare’s /cf/cv as JSON or calls the REST API.
Do ClickFlare events run the scenario right away?
Do ClickFlare events run the scenario right away?
Yes, by default. If you schedule the scenario, events wait in the webhook’s queue until the next run.
Can each campaign go to a different scenario?
Can each campaign go to a different scenario?
Yes. Set up the webhook on the campaign itself so each campaign fires to its own Make URL. See Custom Webhook.
GET or POST?
GET or POST?
POST with JSON for most cases. Both carry the same values,
txid included. Use GET if the target app only offers a URL.Related
Custom Webhook
Send any event out
n8n
The same with n8n
API overview
Keys and endpoints