

- ClickFlare → n8n. ClickFlare’s Custom Webhook sends an event (a conversion, a purchase, a click) to an n8n Webhook node. The workflow stores it, enriches it or passes it on.
- n8n → ClickFlare. An HTTP Request node posts a conversion to ClickFlare’s postback endpoint as JSON, so any app or webhook n8n receives can report conversions. The same node calls the ClickFlare REST API, so one workflow can catch an event, check a report and act on it.
At a glance
To set up n8n with ClickFlare:- Add a Webhook node.
- Map the event in ClickFlare.
- Test, then publish.
- Post conversions to ClickFlare.
- Call the ClickFlare API.
How the data flows
What you’ll need
- A ClickFlare account with your own tracking domain for postbacks. See Tracking domains.
- An n8n instance, cloud or self-hosted. A self-hosted instance must be reachable from the internet over HTTPS for ClickFlare to call it.
- For n8n → ClickFlare: the click ID stored somewhere the trigger can return it.
- For API calls: an API key from Settings → API Keys.
Send ClickFlare events to n8n
1
Add a Webhook node
Create a workflow and add a Webhook node as the trigger. Set:
- HTTP Method: POST, to match the ClickFlare mapping. GET works too if you send values in the URL only.
- Path: n8n fills in a random path. You can replace it with something readable, such as
clickflare-conversions. - Authentication: Header auth is a good choice. Create a credential with a header name and a secret value. You’ll add the same header in ClickFlare.
- Respond: Immediately is enough. ClickFlare only needs to know the request arrived.
2
Add a Webhooks integration in ClickFlare
Go to Integrations, click Conversion API → New integration and choose Webhooks. Pick the Workspace and give it a Name.
3
Map the event
Under Event Type Mapping, pick the ClickFlare Event, set Request Method to POST and paste the n8n URL as the Webhook URL. Add the values you need with macros, in the URL or the body, for example:Open Advanced configuration and add the header you set on the Webhook node. To send only some events, click Add Conditions. Click Next, then Save.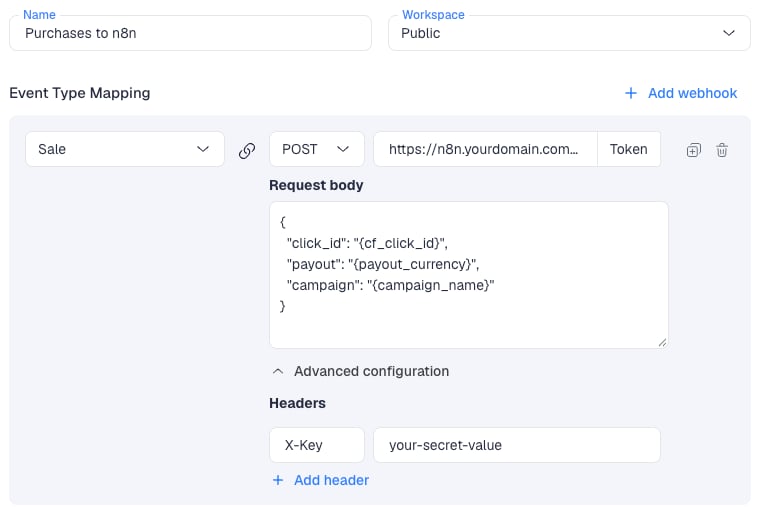
4
Test with the test URL
n8n shows two URLs at the top of the Webhook node: Test URL and Production URL. For a first test, put the test URL in ClickFlare, click Listen for Test Event in n8n and fire an event. The data appears in the node, and you can build the rest of the workflow from it. Values sent in the URL arrive under
query, values sent in the body under body.5
Publish and switch to the production URL
n8n registers the production URL only when you publish the workflow. Publish it, then replace the test URL in ClickFlare with the Production URL. Production runs don’t show data in the editor: open the workflow’s Executions tab to see them.
N8N_PAYLOAD_SIZE_MAX.
Report conversions from n8n to ClickFlare
ClickFlare accepts conversions as a JSON POST on the same endpoint as its postback:cf_click_id (required), payout, ct, txid and param1 to param20. ct must match a custom conversion created under Settings → Custom Conversions. See Custom conversions.
1
Set up the trigger
Use an app trigger node, or a Webhook node if the platform sends its own webhooks, as in the Hotmart and PartnerStack guides. The click ID must be in the data: pass
{cf_click_id} in the offer or lander URL and have the platform store it.2
Add an HTTP Request node
Set:This example maps a PartnerStack reward. n8n reads nested fields and does the math inline, so a platform’s own payload needs no extra nodes.
Then write the body with expressions that point at the trigger’s fields:
3
Skip events you don't want
Put an If or Filter node before the HTTP Request node, for example to skip test events or statuses you don’t track.
4
Test the node
Run the node with a real click ID from a recent ClickFlare click. The conversion should appear on that campaign and in Logs → Event Logs.
Call the ClickFlare API from n8n
1
Create a Header Auth credential
In an HTTP Request node, set Authentication to Generic Credential Type, then Header Auth. Create a credential with Name
api-key and Value your key from Settings → API Keys. n8n adds the header to every request that uses the credential. See API overview.2
Import the request
The HTTP Request node can import a curl command. Click Import cURL and paste:Then remove the pasted header and select the Header Auth credential instead, so the key isn’t stored in the node.
3
Pull a report
For report data, POST to Every breakdown in
https://public-api.clickflare.io/api/report with a JSON body:groupBy must also be in metrics. conversionTimestamp (visit or postback) and currency are optional. For long reports, turn on the node’s Pagination option and raise page until no rows come back.roi below your floor and a Slack or email node sends the list. A request without the api-key header returns 401.
Verify the setup
1
ClickFlare → n8n
Fire an event and open Executions. The run should show the click ID and payout as real values, not the macro text.
2
n8n → ClickFlare
Run the HTTP Request node with a recent click ID. The conversion should appear under the right custom conversion with the right payout.
Troubleshooting
ClickFlare events don't reach n8n
ClickFlare events don't reach n8n
- ClickFlare points at the test URL. Use the production URL after you publish.
- The workflow isn’t published, so the production URL isn’t registered.
- The header in ClickFlare’s Advanced configuration doesn’t match the Webhook node’s Header Auth credential. n8n rejects the request.
- An IP allowlist on the node blocks ClickFlare.
- A self-hosted instance isn’t reachable from the internet, or has no valid HTTPS certificate.
The POST to ClickFlare runs but no conversion appears
The POST to ClickFlare runs but no conversion appears
- The expression for
cf_click_idreturns nothing. Check the path in the input panel: webhook data sits underbody. ctdoesn’t match a custom conversion exactly.- The URL isn’t your tracking domain with
/cf/cv.
The API returns 401
The API returns 401
The
api-key header is missing or wrong. Check the credential’s name and value, and that the node uses it.FAQ
Does ClickFlare integrate with n8n?
Does ClickFlare integrate with n8n?
Yes, both ways. ClickFlare’s Custom Webhook sends events to an n8n Webhook node, and the HTTP Request node posts conversions to /cf/cv or calls the ClickFlare REST API.
Which n8n URL do I paste into ClickFlare?
Which n8n URL do I paste into ClickFlare?
The Production URL, after you publish the workflow. Use the test URL only while you build.
Can I send each campaign to its own workflow?
Can I send each campaign to its own workflow?
Yes. Set up the webhook on the campaign itself, or use one workflow and a Switch node on the campaign ID you send in a macro. See Custom Webhook.
Can n8n use the ClickFlare MCP server instead of the API?
Can n8n use the ClickFlare MCP server instead of the API?
The MCP server is meant for AI assistants. For fixed automations, the REST API is the simpler route. See ClickFlare MCP.
Related
Custom Webhook
Send any event out
API overview
Keys and endpoints
Zapier
The same with Zapier