

- ClickFlare → Zapier. ClickFlare’s Custom Webhook sends an event (a conversion, a purchase, a click) to a Zapier Catch Hook. The Zap passes it on to Google Sheets, your CRM, Slack or any other app.
- Zapier → ClickFlare. A Webhooks by Zapier POST step sends a conversion to ClickFlare’s postback endpoint as JSON. Any app Zapier connects to (a form tool, a CRM, a payment platform, a partner program) can then report conversions to ClickFlare, as long as it has the click ID.
At a glance
To set up Zapier with ClickFlare:- Create a Catch Hook in Zapier.
- Map the event in ClickFlare.
- Set up the conversion trigger.
- Add the POST to ClickFlare.
How the data flows
What you’ll need
- A ClickFlare account with your own tracking domain for postbacks. See Tracking domains.
- A Zapier account. Zapier’s help pages list Webhooks by Zapier as available on its Free, Professional, Team and Enterprise plans. Check your own account for what your plan includes, and for task limits.
- For Zapier → ClickFlare: the click ID stored somewhere the trigger app can return it, for example a hidden form field or a CRM field.
- For API calls: an API key from Settings → API Keys.
Send ClickFlare events to Zapier
1
Create a Catch Hook in Zapier
In the Zap editor, click the trigger step, search for Webhooks by Zapier and pick the Catch Hook event. Click Continue. Leave Pick Off A Child Key empty to use the whole body. In the Test tab, click Copy to copy the webhook URL.Use Catch Raw Hook instead only if you need the request headers or the unparsed body. Its limit is 2MB, against 10MB for Catch Hook.
2
Add a Webhooks integration in ClickFlare
Go to Integrations, click Conversion API → New integration and choose Webhooks. Pick the Workspace and give it a Name, for example “Purchases to Zapier”.
3
Map the event
Under Event Type Mapping:ClickFlare replaces each macro with the real value when the event fires. With a POST and a JSON body, it sets 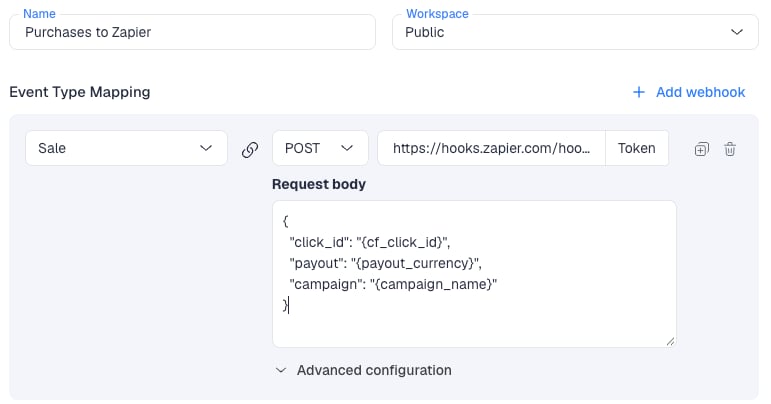
- Pick the ClickFlare Event, for example the conversion or a custom conversion such as Purchase.
- Set the Request Method to POST.
- Paste the Zapier URL as the Webhook URL.
- Add the values you need with ClickFlare macros, in the URL or the body. For example:
Content-Type: application/json for you.4
Filter, save and test
To fire only on some events, click Add Conditions: for example payout greater than 0, one campaign or offer, or one country. Click Next, then Save.Trigger a real event, go back to the Zap’s Test tab and click Test trigger. Zapier splits the request into fields you can map in the next steps. Then add your actions and turn the Zap on.
Report conversions from Zapier to ClickFlare
ClickFlare accepts conversions as a JSON POST on the same endpoint as its postback:cf_click_id (required), payout, ct, txid and param1 to param20. ct must match a custom conversion created under Settings → Custom Conversions. See Custom conversions.
1
Make sure the click ID reaches the other app
The app that triggers the Zap must know the ClickFlare click ID. Pass
{cf_click_id} in the offer or lander URL and store it, for example in a hidden form field, a CRM field or a partner platform’s sub ID. Without it, ClickFlare has nothing to match.2
Set up the trigger
Pick the trigger that means “conversion” in that app: a new form entry, a deal moved to Won, a new payment. For a platform that sends its own webhook, use a Catch Hook trigger and paste its URL into that platform, as in the Hotmart and PartnerStack guides.
3
Add a Webhooks by Zapier POST action
Click +, search for Webhooks by Zapier and choose the POST event. Fill in:
Leave nothing else in Data. If Data is empty, Zapier sends every field from the previous step.
4
Test the step
Run the step test with a real click ID from a recent ClickFlare click. The conversion should appear on that campaign and in Logs → Event Logs.
Read ClickFlare data in a Zap
A Zap can also call the ClickFlare REST API. Authentication is one header,api-key, with a key from Settings → API Keys. See API overview.
- For a simple read, use a Webhooks by Zapier GET step to
https://public-api.clickflare.io/api/campaigns/listwith theapi-keyheader in Headers. - For the report endpoint,
POST /api/report, use Custom Request. Its body has nested arrays (groupBy,metrics), and Custom Request sends raw JSON exactly as you type it. Check it with a JSON validator first: Zapier doesn’t format it for you.
Limits and behavior worth knowing
- Turned-off Zaps. When a Zap is off or deleted, Zapier answers its Catch Hook URL with a 404, after a delay of up to several hours. Turn it back on and it returns 200 again.
- Ownership. The hook URL contains the owner’s Zapier ID. It only changes if the Zap moves to another user, and then you must paste the new URL into ClickFlare.
- Arrays. If a request body is a JSON array of objects, Zapier runs the Zap once per object.
- Payload size. 10MB for Catch Hook, 2MB for Catch Raw Hook, 5MB for webhook actions. Rate limits apply to Webhooks by Zapier.
- Several Zaps from one event. Zapier can combine hook URLs owned by the same user, but it’s simpler to map the event several times in ClickFlare.
Verify the setup
1
ClickFlare → Zapier
Fire a test event in ClickFlare, then open the Zap’s history. The run should show the click ID and payout as real values, not as
{cf_click_id}.2
Zapier → ClickFlare
Run the POST step with a recent click ID. Check that the conversion appears in ClickFlare under the right custom conversion and payout.
Troubleshooting
The Zap doesn't run when ClickFlare fires
The Zap doesn't run when ClickFlare fires
- The Zap is off. Turned-off Zaps return 404 to ClickFlare.
- An event filter in ClickFlare blocks the event. Check the conditions.
- The Zap was transferred to another user and the URL changed.
The Zap shows the macro text instead of a value
The Zap shows the macro text instead of a value
The macro is misspelled, or the event you mapped doesn’t have that value. Check the macro name in the ClickFlare event mapping.
The POST to ClickFlare runs but no conversion appears
The POST to ClickFlare runs but no conversion appears
cf_click_idis empty or isn’t a ClickFlare click ID. Check the field you mapped.ctdoesn’t match a custom conversion exactly.- The URL isn’t your tracking domain with
/cf/cv. - Payload Type isn’t JSON.
The payout arrives as 0
The payout arrives as 0
The amount field from the trigger is empty or has a currency symbol. Send the amount without a currency symbol, for example
25.00. A Formatter by Zapier step can clean it up.FAQ
Does ClickFlare integrate with Zapier?
Does ClickFlare integrate with Zapier?
Yes, both ways. ClickFlare’s Custom Webhook sends events to a Zapier Catch Hook, and a Webhooks by Zapier POST step sends conversions to ClickFlare’s /cf/cv as JSON.
Which ClickFlare events can trigger a Zap?
Which ClickFlare events can trigger a Zap?
Any event you can map in the Webhooks integration: visits, clicks, conversions and custom conversions. Up to 10 mappings per integration.
Can Zapier send ClickFlare conversions without a click ID?
Can Zapier send ClickFlare conversions without a click ID?
No. ClickFlare matches every conversion to a click by its click ID. Make sure the trigger app stores it.
Should I use GET or POST to send conversions?
Should I use GET or POST to send conversions?
POST with JSON for most cases. Both carry the same values,
txid included. Use the GET postback if you prefer a URL.Related
Custom Webhook
Send any event out
Make
The same with Make
API overview
Keys and endpoints