

- The offer URL sends the ClickFlare click ID to Marketcall in
subid. For lead offers that’s Marketcall’s tracking link. For call offers it’s your own landing page, where Marketcall’s call tracking code shows a tracked phone number. - The postback URL sends it back to ClickFlare with every call or lead, together with your payout. You create it in Marketcall under Automation → Postbacks.
At a glance
To set up Marketcall with ClickFlare:- Set the domain and reporting time.
- Create the Marketcall network.
- Calls: add dynamic call tracking.
- Create the offer with subid.
- Add the postback in Marketcall.
How the data flows
subid on the way in and reads it back with the {subid} macro on the way out. {earn} is your payout.What you’ll need
- An active ClickFlare account with your own tracking domain set up. Shared domains get flagged by networks and blocked by browsers. See Tracking domains.
- A Marketcall affiliate account with an approved campaign for the offer you want to run.
- For call offers: a landing page you control, approved for the campaign, where you can add Marketcall’s code before
</head>.
What the Marketcall template contains
ClickFlare has a Marketcall affiliate network template. It fills in the Marketcall macros ClickFlare needs.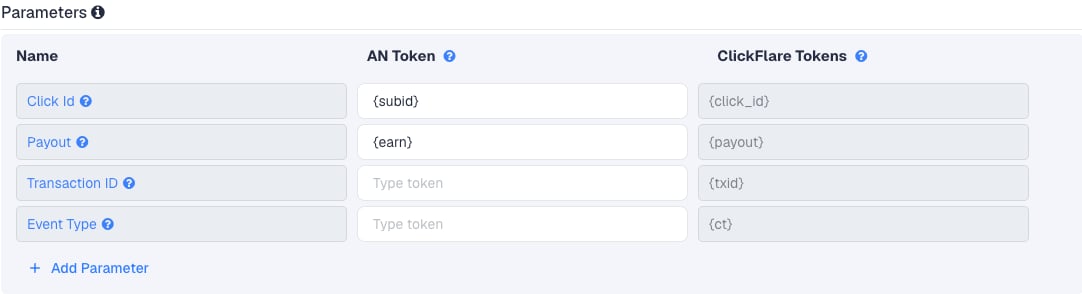
Setup
Everything in ClickFlare is done from inside the campaign editor. Create the offer and the affiliate network inline as you go.Set up your own tracking domain
trk.yourdomain.com. The postback URL is built on this domain, so changing it later means updating the postback in Marketcall too. See Tracking domains.Report conversions by postback time
Create the campaign
Create the Marketcall affiliate network
- Search for Marketcall and pick the template.
- Name it after the offer type, for example “Marketcall - Calls”. If you run both call and lead offers, create a second one, “Marketcall - Leads”, so each has its own transaction ID.
- Set Transaction ID to
{call_id}for calls, or{lead_id}for leads. - Leave Event Type empty.
- Under Conversion tracking, select your own Tracking Domain and keep S2S Postback URL as the tracking method.
- Set Payout currency to the currency Marketcall pays you in. Marketcall’s own examples use USD.

Calls: set up dynamic call tracking on your landing page
subid.- In Marketcall, go to Call Tracking → Sites and click Add a site.
- Fill in your landing page URL and a Tracking session duration. Marketcall usually uses 30 minutes.
- For Number Substitution, choose DOM Selector with
a[href^="tel:"], or another selector that matches the phone links on your page. - Set the Phone Number Format, for example
(XXX) XXX-XXXX, and click Add. - Click Get the code, choose the approved campaign, and paste both codes into your landing page before
</head>.
subid from the page URL. ClickFlare puts it there in the next step.Create the offer in ClickFlare
- Name the offer.
- Select the Marketcall affiliate network you just created.
- Paste the URL into Offer URL with
subid={cf_click_id}at the end:

subid, you can turn on Append Click ID to Offer Url instead. ClickFlare then adds subid={cf_click_id} from the template. Use one or the other, not both.Set the payout to Auto so ClickFlare uses the payout value from the postback.Add the postback in Marketcall
{call_id}, {action} and {duration}, are listed under Parameters on the same page. Save the postback.If you run lead offers too, add a second postback for leads with the lead network’s URL, which ends in txid={lead_id}.Add a lander (optional)
Save the campaign and launch
Stop one call counting twice
By default ClickFlare keeps one conversion per click ID. If several postbacks arrive with the same click ID and no transaction ID, ClickFlare treats them as the same conversion and keeps the last one received. When they carry atxid, ClickFlare compares it: the same txid replaces the earlier conversion, a different txid adds a new one.
Marketcall can send more than one postback for the same call or lead:
- A postback with Status: All can fire when the call is created and again when its status changes. The
{action}macro shows which one it was (create or update). - Marketcall’s own lead guide for its Keitaro tracker adds two postbacks with the same URL: one on a Created trigger and one on an Updated trigger. If your panel offers these triggers, the same lead fires twice.
txid is Marketcall’s ID for the call or lead:
{lead_id} in its lead postback examples, and lists {call_id} as the Marketcall call identifier on the postback page. Check that both appear under Parameters in your panel before you rely on them.Call statuses and what ClickFlare counts
Every Marketcall call gets a status. The ones that matter for your numbers:- Status: All gets calls into ClickFlare fast. With
txid={call_id}, each status change replaces the conversion with the latest payout. Ask your manager what{earn}holds for a refused call, because a call that ends refused may keep a payout in ClickFlare if the update doesn’t change it. - One status, such as Approved, makes ClickFlare count only paid calls, but they arrive after the hold time.
¶m1={state_title} to the end of the postback in Marketcall. ClickFlare stores it as an extra parameter you can report on. See Postback parameters.
Calls and leads as separate columns
If one campaign gets both calls and leads, you can report them as their own conversion types:- Create two custom conversions in ClickFlare, for example with the parameters
callandlead. - Add
&ct=callto the end of the call postback in Marketcall, and&ct=leadto the lead postback:
Verify the setup
Click through the campaign
subid= and a real ClickFlare click ID in the address bar, not the literal text {cf_click_id}, and that the phone number on the page changes to a Marketcall number. For leads, check the same on the first request to the Marketcall link.Generate a test call or lead
Check the conversion in ClickFlare
txid (the call or lead ID). A short test call may be parsed or refused and pay 0.Troubleshooting
Calls show in Marketcall but not in ClickFlare
Calls show in Marketcall but not in ClickFlare
- subid is empty in Marketcall. The landing page URL in the ClickFlare offer is missing
subid={cf_click_id}, or the call tracking code isn’t on the page that receives it. - The call tracking code is incomplete. Both codes from Get the code must be in the page before
</head>, and the page must be the one you added under Call Tracking → Sites. - The caller used a number outside the tracking session. A call after the session ends, or to a number copied from elsewhere, can’t be tied to the visit.
- The postback doesn’t cover the call. Check Object, Status and Campaign on the postback in Automation → Postbacks.
The same call shows twice in ClickFlare
The same call shows twice in ClickFlare
txid that changes on every send, or you have two postbacks with different URLs for the same calls. Use txid={call_id} (or {lead_id} for leads) on every postback for the same calls.Two different calls from one click show as one
Two different calls from one click show as one
txid. Add {call_id} as the transaction ID in the ClickFlare network and in the postback in Marketcall.The payout is 0 or in the wrong currency
The payout is 0 or in the wrong currency
- Check that the postback has
payout={earn}and the offer’s payout is set to Auto in ClickFlare. - A call that’s parsed, refused or not connected pays 0.
- Set the affiliate network’s Payout currency in ClickFlare to the currency Marketcall pays you in.
FAQ
Does ClickFlare integrate with Marketcall?
Does ClickFlare integrate with Marketcall?
{subid}, {earn} and the call or lead ID.Can Marketcall send the postback as JSON?
Can Marketcall send the postback as JSON?
cf_click_id, payout, txid, ct and param1 to param20. Either works. GET is simpler to set up here. With JSON, map {call_id} (or {lead_id}) to txid so calls don’t count twice.Marketcall offers me a Keitaro tracker. Do I need it?
Marketcall offers me a Keitaro tracker. Do I need it?
Can I pass more data to Marketcall?
Can I pass more data to Marketcall?
subid1, subid2 and subid3 as extra tracking values on its own landing pages. Ask your manager whether your tracking links and call tracking code accept them too. Either way, keep subid for the click ID.Can I send the conversion back to my traffic source?
Can I send the conversion back to my traffic source?