


You can pour thousands into ads, watch orders roll in, and still have no real idea which campaign actually paid for itself. That gap is exactly what ecommerce conversion tracking closes. It connects every sale back to the click, ad, and channel that produced it, so you know where your revenue truly comes from instead of trusting whatever each ad platform reports on its own.
When done well, it can help you make smarter decisions regarding your campaigns and growing your revenue. In this guide, we’ll break down how ecommerce conversion tracking works, the metrics that matter, and how to set it up accurately across stores like Shopify, WooCommerce, Funnelish, CartPanda, and Digistore24.
Quick Summary
Ecommerce conversion tracking is the process of recording the actions shoppers take on your store, such as purchases, add-to-carts, checkout starts, and signups, and tying each one back to the traffic source that drove it. Instead of measuring raw visits, it measures outcomes: who bought, what they bought, how much they spent, and which ad or channel sent them.
That’s the key difference between conversion tracking and standard web analytics. General analytics celebrates traffic and time on page. Ecommerce conversion tracking zeroes in on the actions that move revenue, then assigns credit for them. A store might learn that search traffic converts more often while social traffic spends more per order, and that single insight can reshape where the budget goes.
If you only trust the numbers each ad platform hands you, you’re working from an incomplete and often inflated picture. Accurate ecommerce conversion tracking matters for a few concrete reasons:
This is also why platforms rarely agree with each other. If you’ve ever seen 40 sales in Meta, 55 in your store, and 52 in your tracker for the same campaign, our breakdown of why your conversions don’t match across platforms explains what’s usually behind it.
Tracking everything and understanding nothing is a common trap. These are the metrics that actually reflect performance and profit:
With a tracking software like ClickFlare, you can measure all these metrics in one place, either through the default events or by creating your own custom calculations.
In the main Campaign view, you simply need to go to Column Settings at the bottom left of the screen, and select all the default metrics you wish to display in your reports.
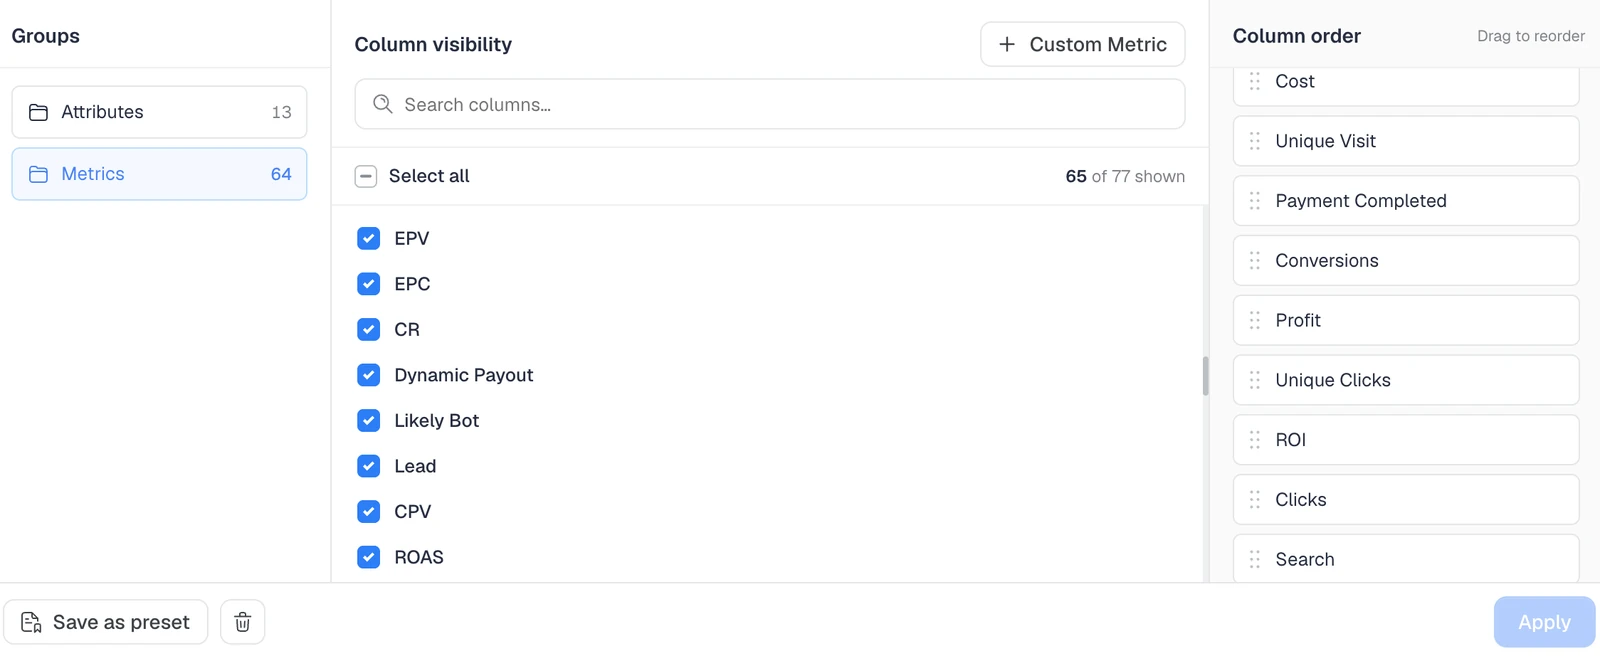
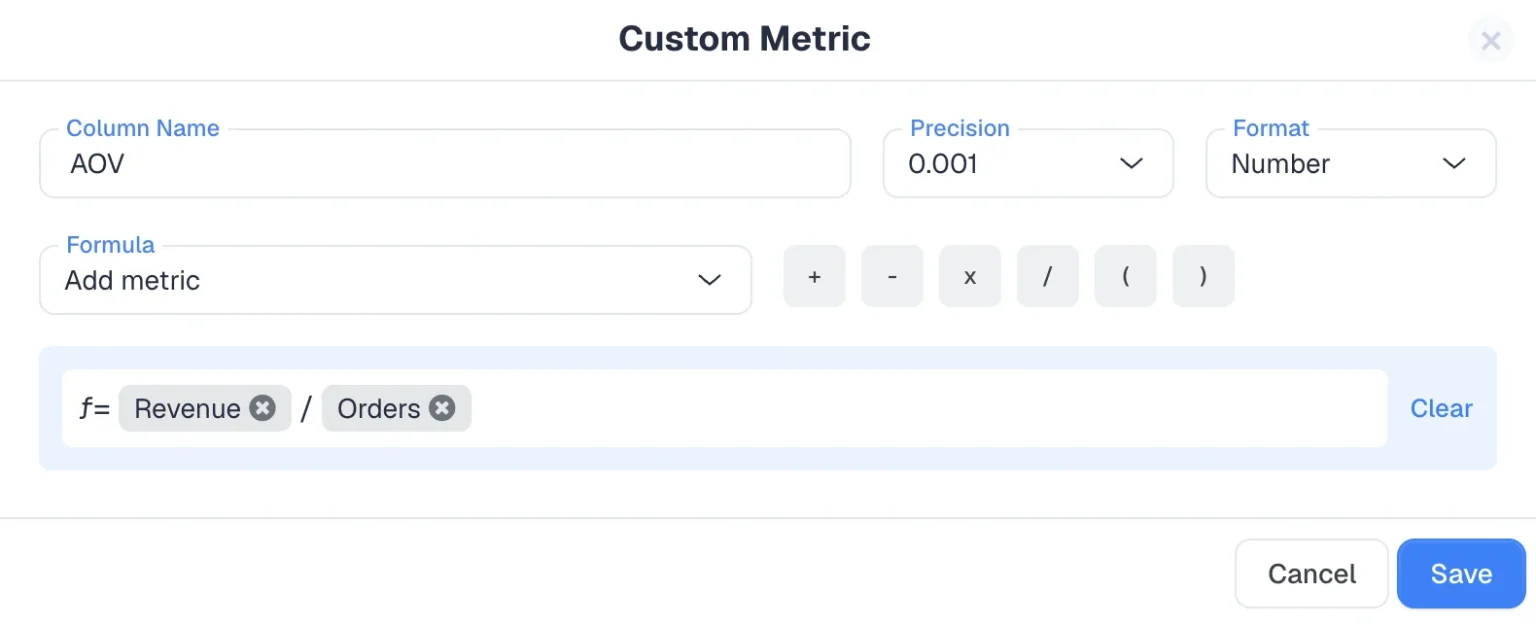
If you need to include a metric that is not available on this list, you can create your own custom metrics on ClickFlare using a formula. For example, this is how you would create AOV:
Under the hood, every method follows the same logic. A unique identifier, usually a click ID, is attached when someone clicks your ad. When that person later converts, the conversion is matched back to the click ID, and credit flows to the right campaign. What differs is how that conversion signal is captured and sent.
Here are the main mechanisms you’ll work with, and where each one fits:
The pattern across the industry is clear: browser-based methods keep losing accuracy, so server-side methods like postbacks, webhooks, and Conversion APIs have become the backbone of any serious ecommerce conversion tracking setup.
ClickFlare’s ecommerce conversion tracking usually involves a handful of steps inside ClickFlare, plus a few on your store’s side to connect everything into one dashboard. The flow is simple, repeatable, and works the same way for the most part whether you’re on Shopify, WooCommerce, Funnelish, CartPanda, or Digistore24.
No matter which platform you sell on, the ClickFlare side of the setup follows the same steps:
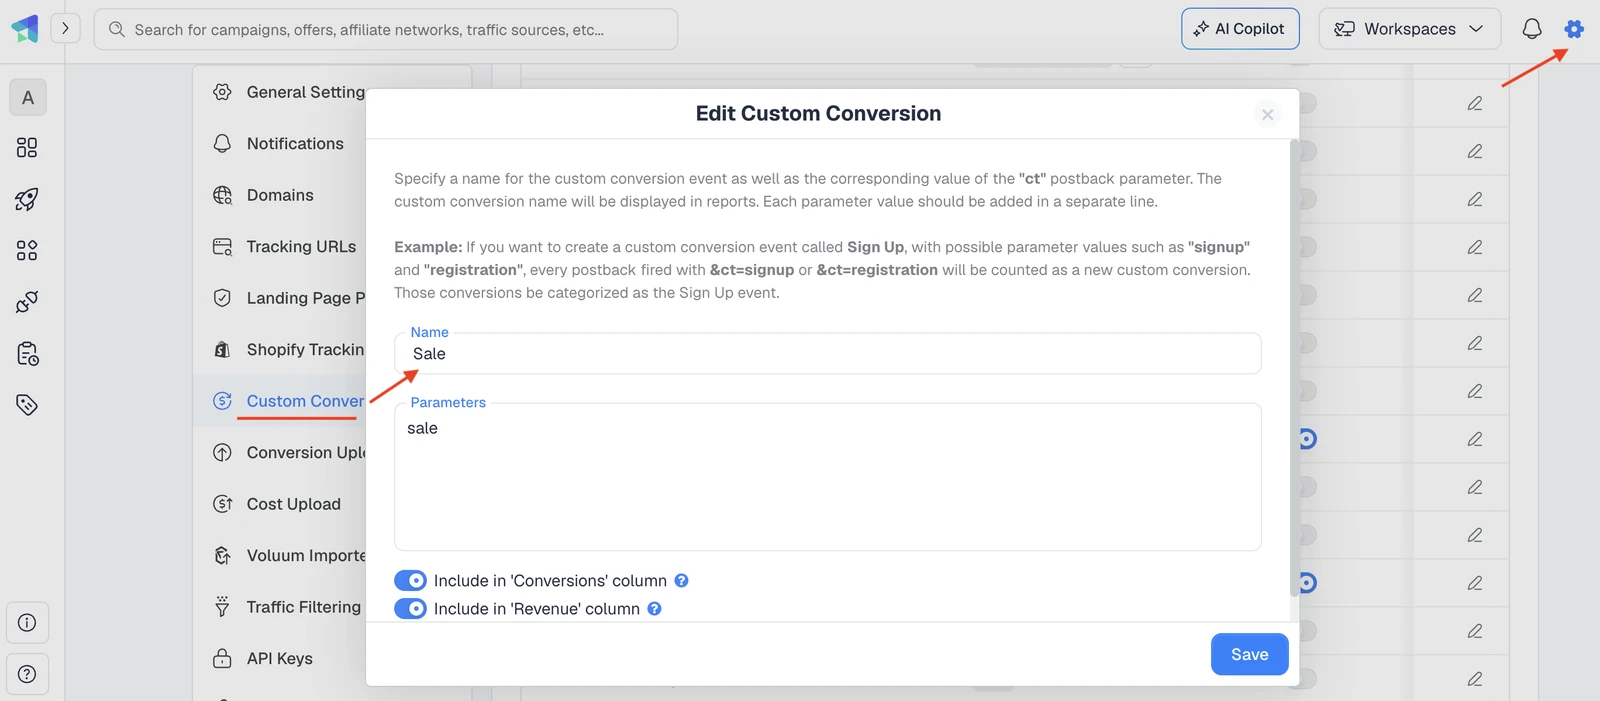
Step 1: Create your custom conversions. Define the events you want to track, such as sale, checkout, upsell, order bump, or refund, using ClickFlare’s exact parameter names so each event is classified correctly. This can be done under Settings > Custom Conversions.
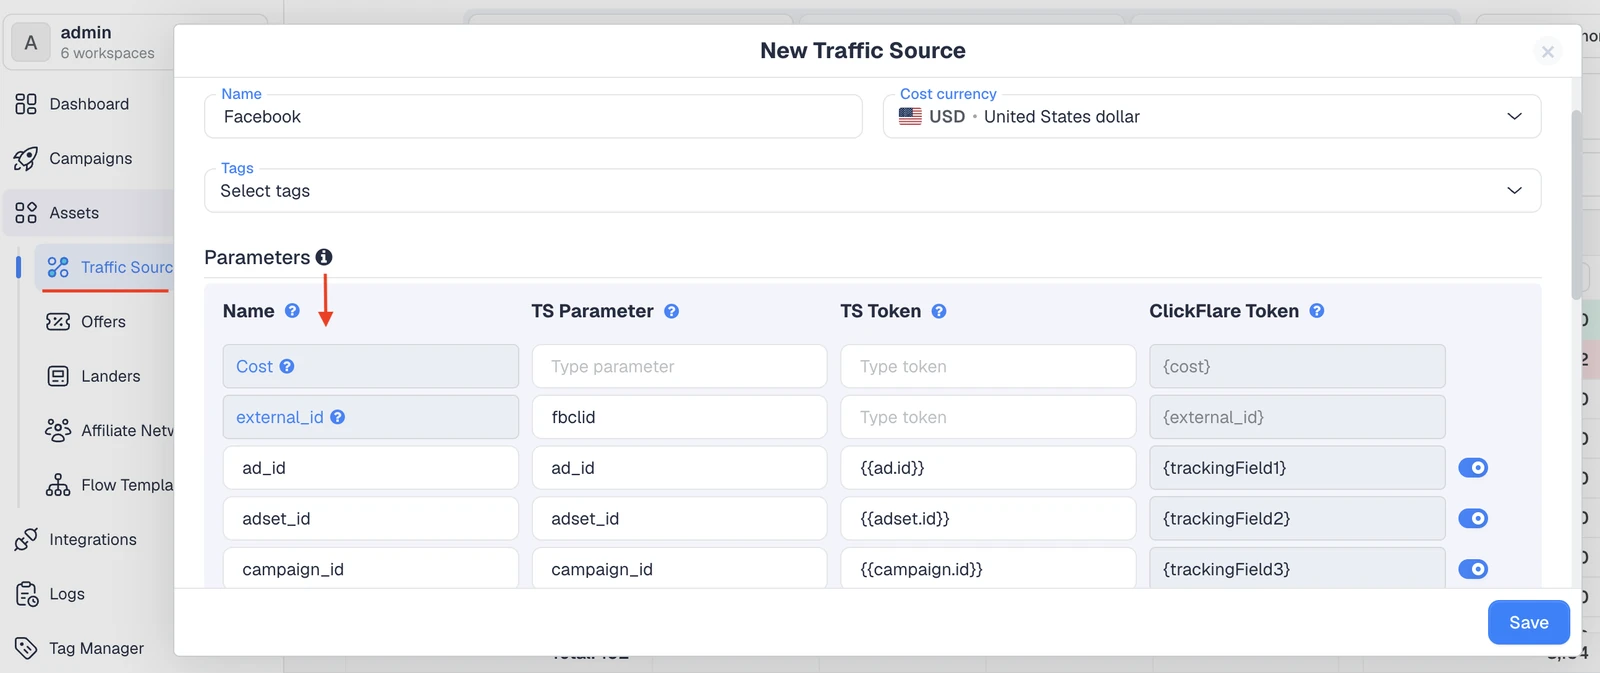
Step 2: Add your traffic source. Pick a template (Meta, Google Ads, TikTok, and so on) so click IDs and ad cost map in automatically. This can be found under Assets > Traffic Sources.
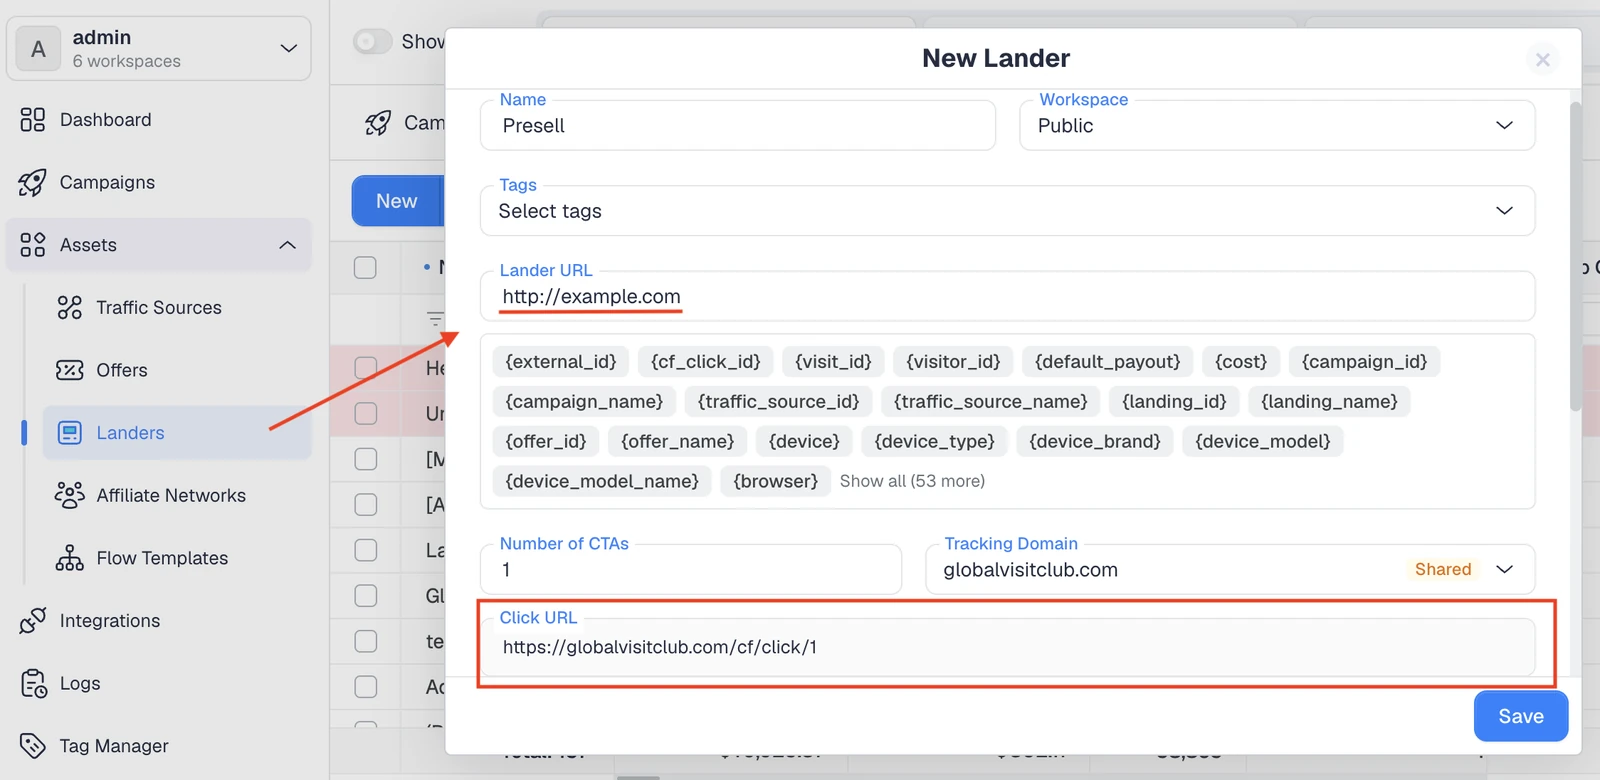
Step 3: Add a lander (optional). If you run a presell, quiz, or advertorial before the store, add it here. You can also send traffic straight to your store and skip this. You simply need to add your lander URL here, and copy the click URL. This click URL has to be appended on the CTA buttons on your landing page. This serves as the hop link between your lander and offer, and it’s necessary for tracking. If you have multiple CTA buttons that send traffic to different pages, you can generate multiple click URLs.
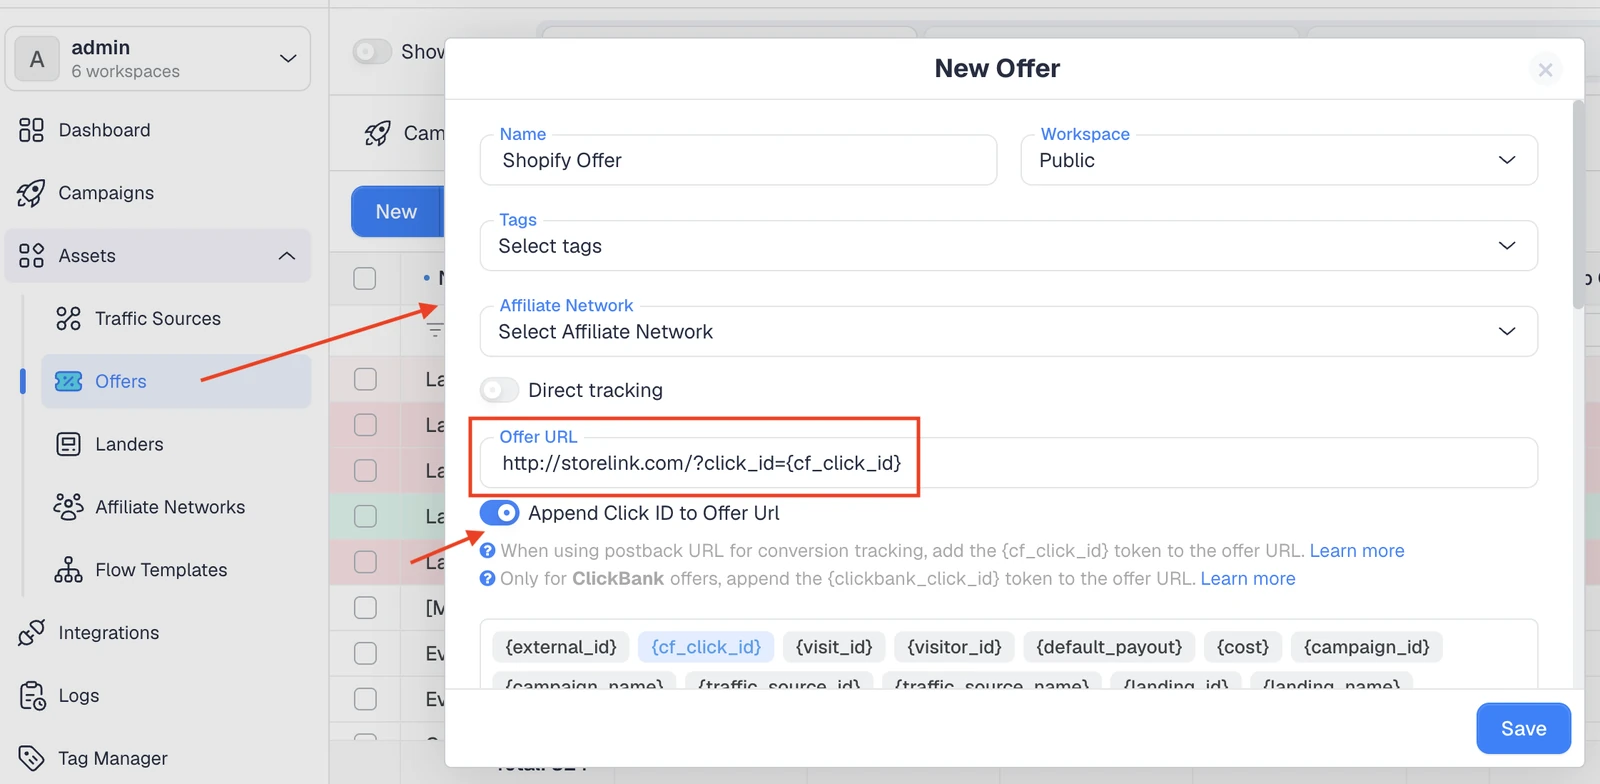
Step 4: Create your offer. Paste your store or checkout URL and append the ClickFlare click ID (for example, ?click_id={cf_click_id}). This is the thread that lets ClickFlare match a later sale back to the original click. Note: Some ecommerce platforms may require different formats for appending the click ID. Make sure to check our guides below for this.
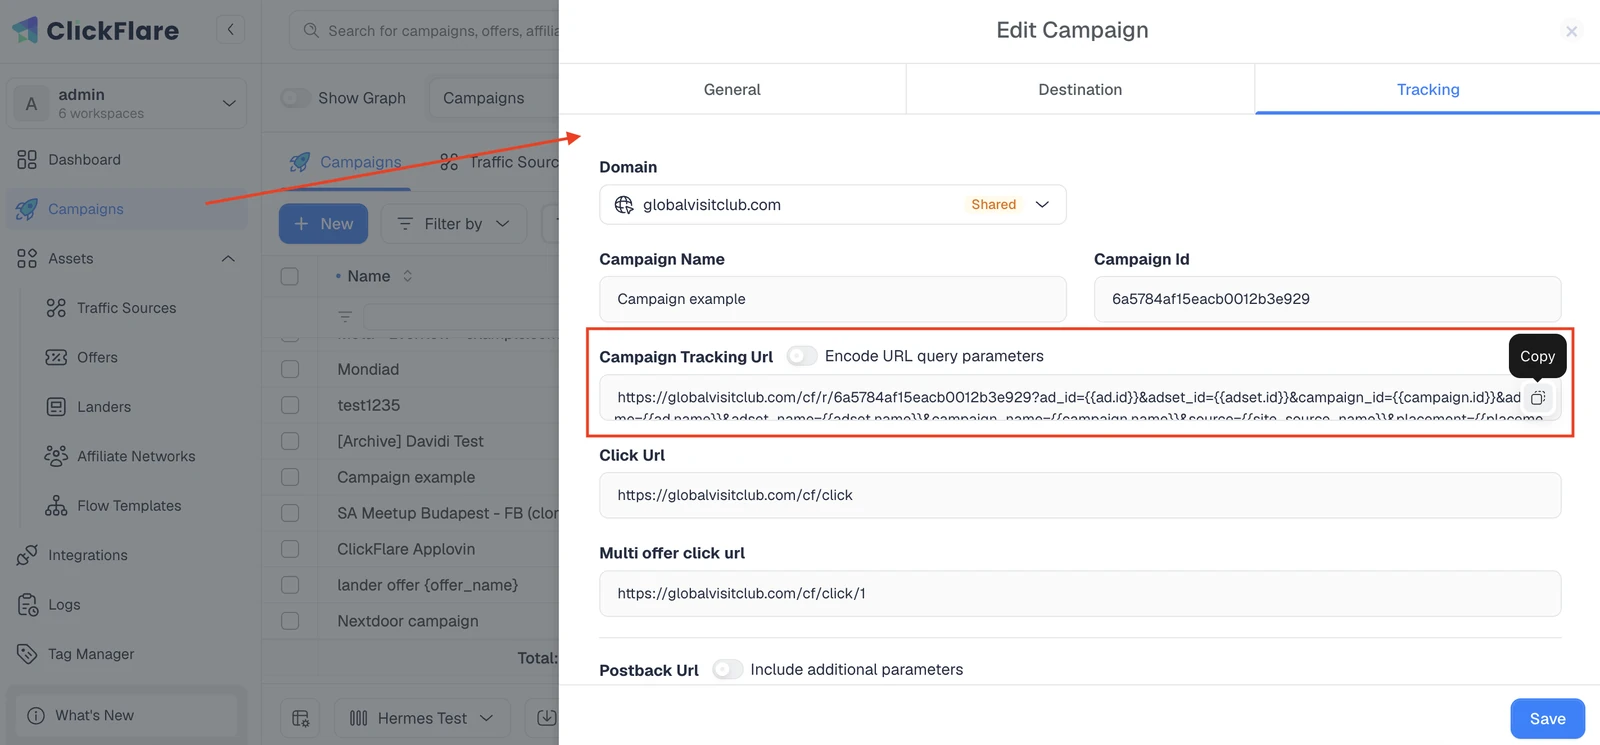
Step 5: Build your campaign. Choose redirect tracking or direct tracking (direct is required for Google Ads and organic flows), then use the generated ClickFlare campaign URL in your ads.
Step 6: Send ecommerce conversion events to ad platforms. You can fire conversions such as sales or add to cart back to your ad platforms, so their pixels can optimize your campaigns with accurate data. If you’re advertising on Facebook, TikTok, Google Ads, Snapchat, Reddit, LinkedIn, Pinterest, SmartNews or Microsoft Bing, you can fire conversions back through ClickFlare’s CAPI. If you are advertising on native platforms like NewsBreak, Taboola, Outbrain, or similar networks, you can still fire back accurate conversions through S2S postbacks.
Step 7: Track organic traffic (optional). Add the ClickFlare script to your store so unpaid sales from SEO, email, and direct visits get attributed too.
The one part that changes per platform is what you add on your store’s side so it can report events back to ClickFlare. Here’s the quick version for each:
Across all of them, the click ID is what ties everything together. If it never reaches your store, the sale can’t be matched back to the click, so appending it to your offer URL is the one step you never want to skip. For a deeper look at the server-side method behind the postback setups, our guide on what a postback URL is walks through it from scratch.
In recent years, ecommerce conversion tracking has been facing several challenges. Browsers have phased out third-party cookies, mobile operating systems have added tracking restrictions, and regulations like the GDPR require a clear legal basis, usually explicit consent, before you can set non-essential tracking cookies. You can read the full requirements in GDPR.eu’s guide to cookies.
All of this pushes tracking toward first-party, server-side methods that don’t depend on a cookie surviving in someone’s browser. That’s why postbacks, webhooks, and Conversion APIs matter more every year: they capture the sale on the server, then feed a clean signal back to ad platforms so their algorithms optimize on real data instead of modeled guesses. If you want to see this in action on the ad side, our full guide to the Facebook Conversion API covers the setup end to end.
Not every tracker fits every store. A few questions worth asking before you commit:
Strong ecommerce conversion tracking is what separates stores that know exactly which campaigns are profitable from those still guessing. The mechanics are consistent no matter where you sell: create your conversions, append the click ID to your offer, capture the sale server-side, and feed it back to your ad platforms. Whether you run Shopify, WooCommerce, Funnelish, CartPanda, or Digistore24, the setup is a simple, repeatable flow rather than a one-click connector. Get that foundation right, and every budget decision after it gets easier.
Ecommerce conversion tracking records the actions shoppers take on your store, such as purchases, add-to-carts, and signups, and ties each one back to the ad, campaign, or channel that drove it, so you can measure real revenue instead of raw traffic.
Accuracy depends on the method. Server-side approaches like S2S postbacks, webhooks, and Conversion APIs are the most reliable because they don’t depend on a cookie or browser. Pixels and thank-you page scripts still work but are best treated as fallbacks.
Not quite. Ecommerce tracking is a guided setup rather than a one-click connector. You create conversions and an offer in ClickFlare, then add a script, plugin, webhook, or postback on your store. It’s simple and works mostly the same way across Shopify, WooCommerce, Funnelish, CartPanda, and Digistore24.
A pixel fires in the shopper’s browser and can be blocked by cookie restrictions or ad blockers. Server-side tracking records the conversion on the server instead, so it isn’t affected by browser limits, making it far more reliable for modern ecommerce.
Different platforms use different attribution windows, counting rules, and tracking methods, so some mismatch is normal. A dedicated tracker gives you one consistent source of truth, which is why the numbers there rarely line up perfectly with each ad platform.