

Black Friday came early. Early-access prices until Nov 8.Black Friday: early-access prices until Nov 8.Early-access price ends in0d00h00m00sClaim the deal



If MGID is spending budget but your conversions column stays empty or looks suspiciously thin, the problem is almost always the tracking setup, not the campaign. MGID conversion tracking runs on a server-to-server (S2S) postback, which means a conversion only shows up if your tracker stores the MGID click ID and fires it back to MGID when the sale happens. Miss one piece of that chain and MGID has no idea the click ever converted.
This guide walks through the full S2S setup using ClickFlare, step by step, so your teasers, widgets, and goals all report back correctly. We will also cover pulling in accurate cost data and the mistakes that quietly break most MGID setups.
Quick Summary
{click_id}). ClickFlare stores it as the External ID and returns it in the postback as c.MGID conversion tracking is the process of connecting a click on an MGID teaser to whatever the user does afterward, such as a lead, a signup, or a purchase. MGID is a native ad network, so your ads appear as teasers inside recommendation widgets on publisher sites, and the network needs a reliable way to learn which of those clicks turned into revenue.
It does this with a server-to-server postback. When someone clicks your teaser, MGID attaches a unique {click_id} to the destination URL. Your tracker stores that click ID, and when the conversion fires, it sends the same click ID back to MGID's servers. That round trip is what tells MGID, 'this specific click converted, optimize toward more like it.'
Because the whole system hangs on that click ID being captured and returned, a missing or malformed click ID is the single most common reason MGID conversions fail to show up.
Native ad clicks pass through a redirect and often land on an affiliate offer or a separate landing page, so there is no persistent browser session for MGID to read a pixel from. On top of that, browser privacy changes and ad blockers have made client-side tracking unreliable for exactly this kind of traffic.
Server-side postbacks sidestep all of that. The conversion is reported server to server, independent of the user's browser, cookies, or device. That is why MGID uses a postback for native campaigns and does not offer a Conversion API for teasers. If you want the deeper background on how this method works, our guide to server-side tracking and our beginner's guide to postback URLs both cover it in plain terms.
ClickFlare is a server-side ad tracker built for performance marketers running paid traffic across native networks, affiliate offers, and ad platforms. For MGID specifically, it does the two jobs the network cannot do on its own: it stores the click ID for every visit, and it fires the postback back to MGID at the exact moment a conversion is recorded.
It also gives you a layer of reporting MGID's own dashboard does not. ClickFlare breaks performance down by teaser, widget, campaign, and geo, so you can see which placements actually convert rather than just which ones get clicks. That widget-level visibility is what turns native buying from guesswork into something you can optimize.
A few things need to be in place before the setup will work end to end:
The setup has five stages: build the campaign and traffic source in ClickFlare, create the goal in MGID, add the postback, place your tracking link, and test. Follow them in order and the click ID will flow all the way through.
In ClickFlare, go to Campaigns and click New. In the Traffic Source field, click + New Traffic Source, search for mgid, and select the MGID template.
Give it a name, and set the Cost currency to match your MGID account currency. The template pre-fills every parameter you need, so you do not have to map macros by hand:
| Parameter | MGID Macro | What It Captures |
|---|---|---|
| externalId | {click_id} |
The MGID click ID, required for the postback to work |
| cost | {click_price} |
The click price MGID passes in the URL |
| teaser_id | {teaser_id} |
The ad (teaser) that was clicked |
| widget_id | {widget_id} |
The publisher widget where the ad appeared |
| campaign_id | {campaign_id} |
The MGID campaign ID |
| title | {title} |
The ad title, useful for spotting winning creatives |
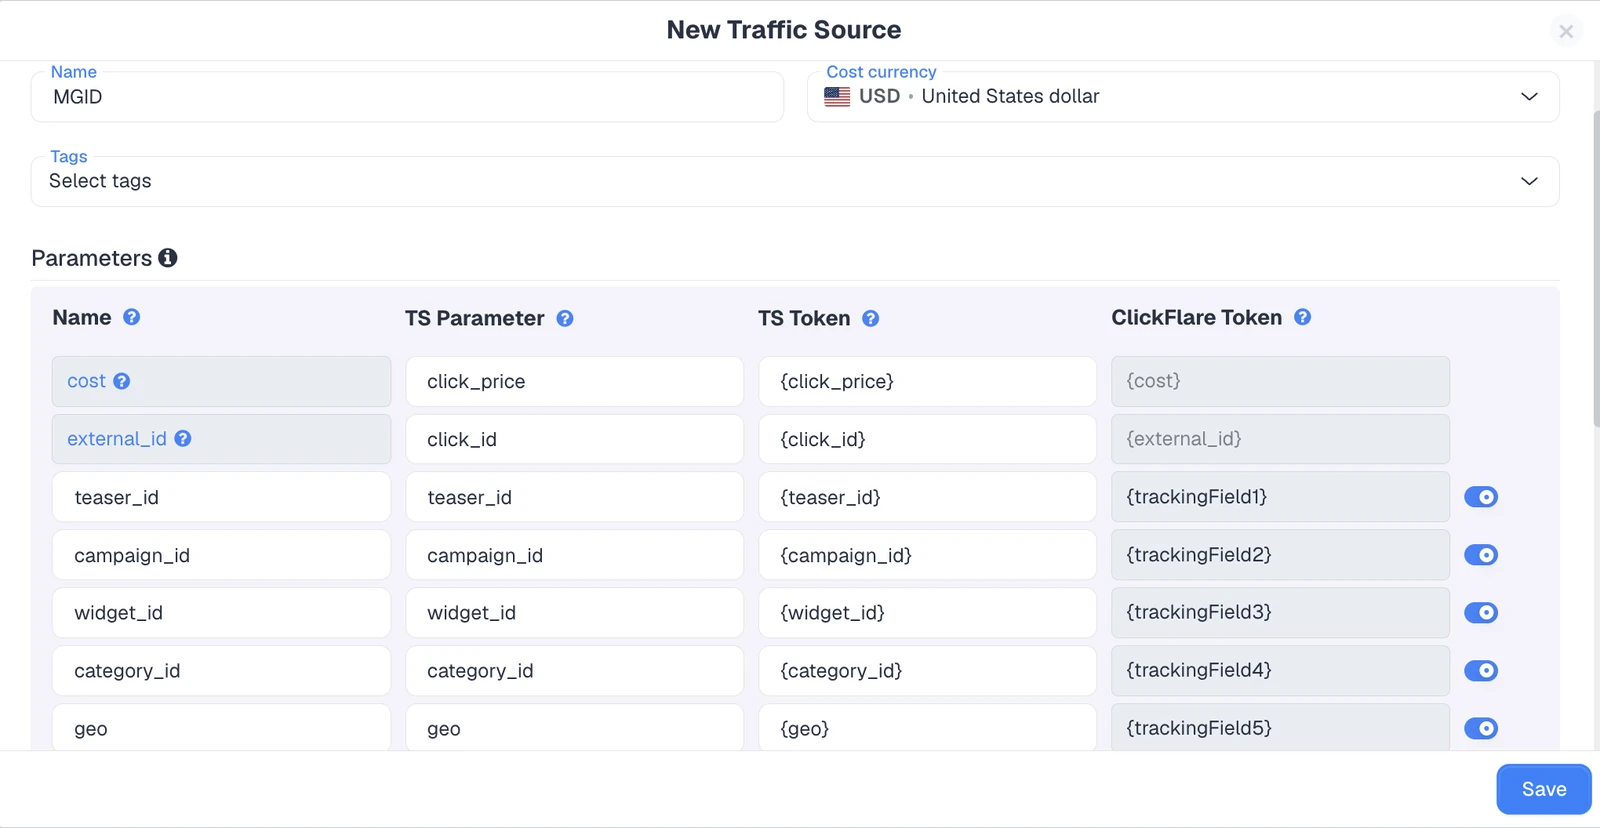
The one rule that matters here: do not change or remove the externalId row. Without {click_id} in the campaign URL, MGID conversions cannot be attributed, and no amount of postback tweaking will fix it.
The tracking fields become report columns in ClickFlare. widget_id is the one to watch, since it tells you which publisher placements convert, while teaser_id and title show which creatives are pulling their weight. One note on the geo parameter if you add it: it reflects the countries you targeted in MGID, not the visitor's real location. For the visitor's actual country, use ClickFlare's own geo data.
Now switch to MGID. Open the campaign you want to track, go to Conversion tracking, and on the Tracking settings tab choose Postback.
Add a conversion goal and give it a name such as purchase or lead. Keep goal names to Latin letters and numbers only, with no spaces, underscores, or dashes, and make each one unique. Under advanced settings you can set unique or non-unique counting per goal; unique is the default. MGID's own postback setup documentation covers these options in more detail if you need it.
Then, under Postback URLs, click Get Postback URL and copy it. It looks like this:
https://a.mgid.com/postback/CLIENT_ID?c={click_id}&e=purchase&r={revenue}You only need two values from it: your client ID (the number right after /postback/) and the goal name (the e value). Keep both handy for the next step.
Back in the ClickFlare traffic source form, scroll to Passing conversion info to traffic source and turn on Traffic source postback URL. ClickFlare loads its own version of the MGID template:
https://a.mgid.com/postback/YOUR_CLIENT_ID?c={external_id}&e=REPLACE_EVENT_NAME&r={payout}Make two replacements, and only two:
YOUR_CLIENT_ID becomes your actual MGID client ID.REPLACE_EVENT_NAME becomes your exact MGID goal name, for example purchase.Leave {external_id} and {payout} exactly as they are. Those are ClickFlare tokens: {external_id} is the stored MGID click ID, and {payout} is the conversion value. The finished postback should read like this:
https://a.mgid.com/postback/12345?c={external_id}&e=purchase&r={payout}
In the dropdown on the left, choose which ClickFlare event fires the postback. Leave it on Conversions to send every conversion, or pick a specific custom conversion such as purchase. Then click Save.
Two quick notes. The c and e values are required; r is optional, but without it MGID receives no revenue, so keep it. And send payouts in your MGID account currency so the numbers reconcile cleanly.
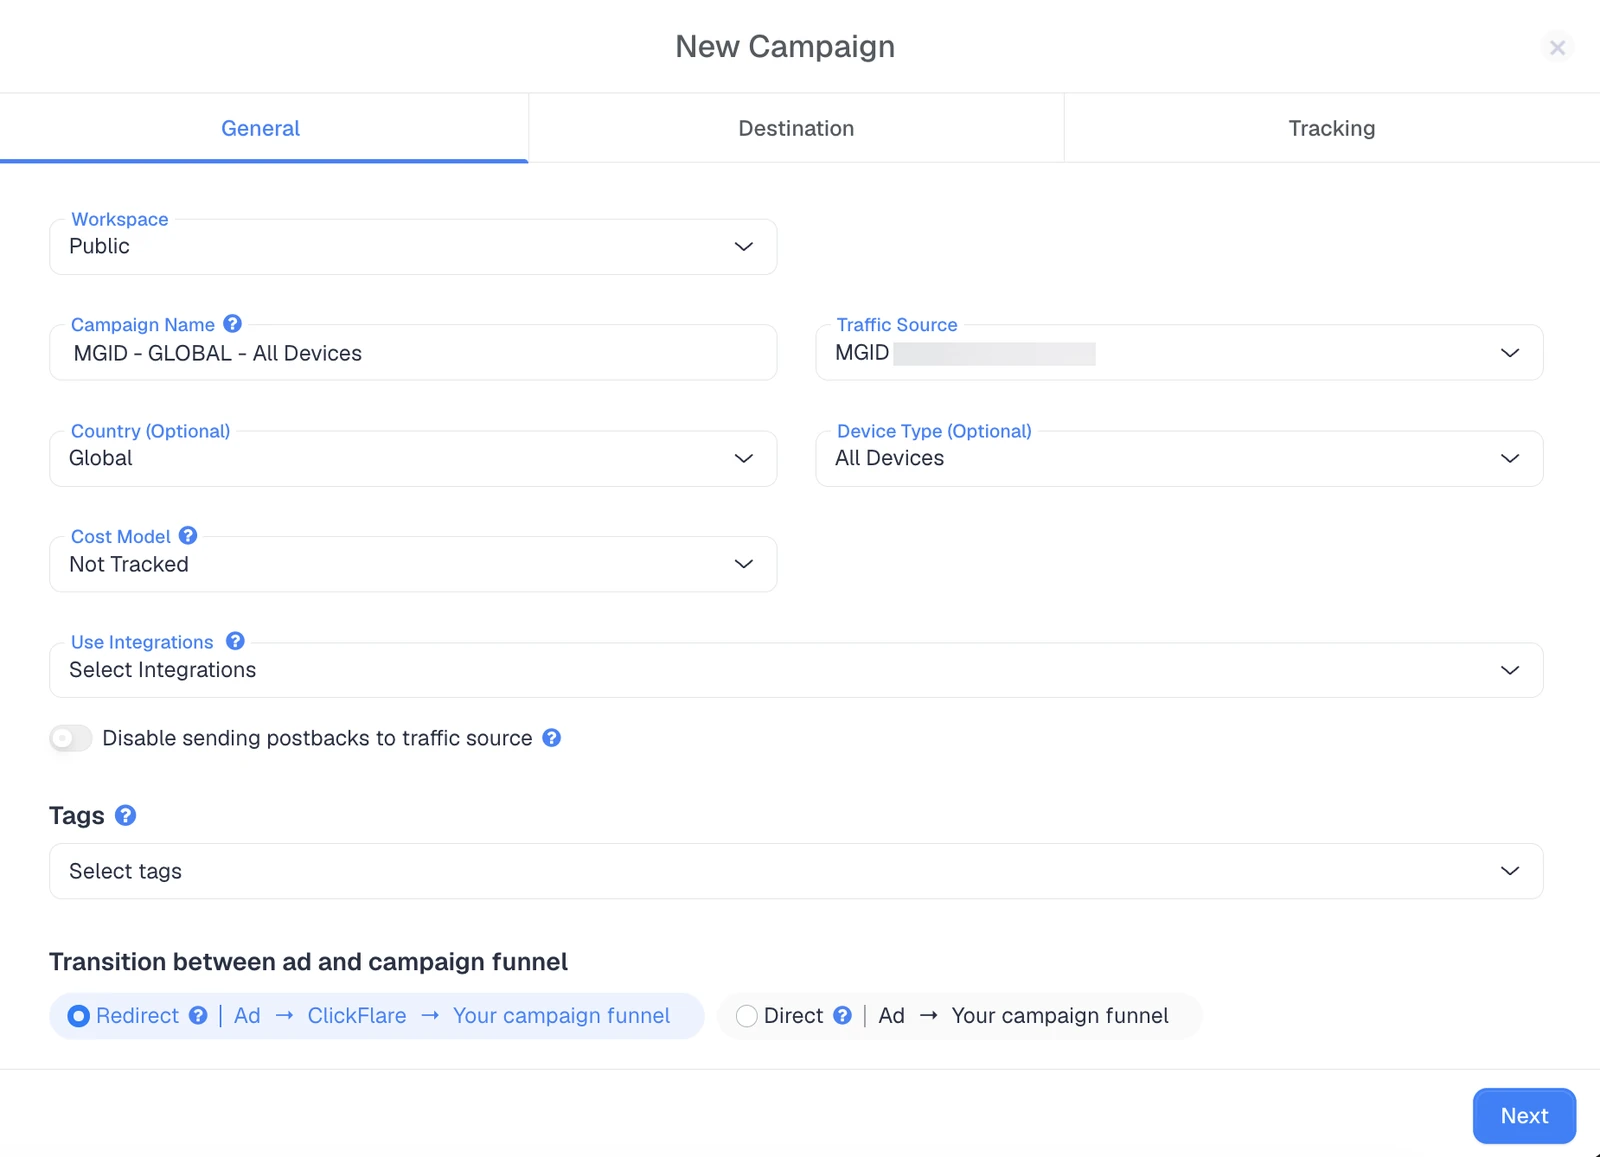
Finish building the ClickFlare campaign: set the Cost Model, choose Redirect tracking (the usual choice for native), add your lander and offer on the Destination step, and save. Then open the Tracking tab, select your tracking domain, and copy the campaign URL. It already includes the MGID macros, such as click_id={click_id}.
In MGID, set your targeting, budget, and bid, then paste the ClickFlare campaign URL, unchanged, into each ad's URL field. Before publishing, check the Tracking link preview and confirm that click_id={click_id} appears only once. Avoid adding the same parameters again through MGID's Tracking Tags, as duplicating them is a common cause of empty columns.
If you use a landing page, remember that its call-to-action must link to the ClickFlare click URL, not directly to the offer, or the click ID never gets passed along.
Do not wait for live traffic to find out whether it works. In MGID, open the ad preview (the eye icon on an ad image), click through, and complete the offer. Preview clicks are automatically flagged as tests.
Then verify each link in the chain:
{click_id}.a.mgid.com confirms the postback fired.Once a test conversion lands under the right goal, your MGID conversion tracking is live.
Most funnels have more than one meaningful action, like a lead followed by a purchase. MGID supports this, but within strict limits: a maximum of three goals per campaign (one main plus two additional), and one postback per goal.
To set it up, add a goal in MGID for each step and note its exact name. In ClickFlare, create a matching custom conversion per step, then on the MGID traffic source click + Another postback URL for each extra goal. Map each custom conversion to its matching e value, so your postbacks end up looking like this:
https://a.mgid.com/postback/YOUR_CLIENT_ID?c={external_id}&e=lead&r={payout}
https://a.mgid.com/postback/YOUR_CLIENT_ID?c={external_id}&e=purchase&r={payout}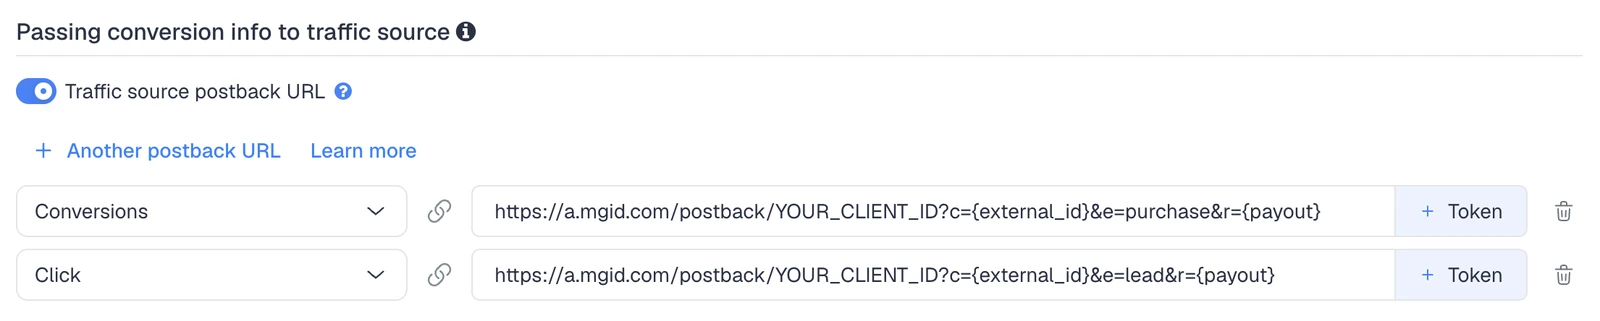
Test each goal separately. For bidding, point MGID's optimization at the goal closest to revenue, usually the final purchase, so the network learns from the action that actually matters. If you only want MGID to see your final sale, keep a single postback mapped to it; earlier events still appear in ClickFlare but are not sent to MGID.
By default, the MGID template passes click cost through the {click_price} macro, and ClickFlare stores that as the visit cost. For this to be used, set the campaign Cost Model to Not Tracked so ClickFlare reads the value from the URL rather than applying a fixed CPC.
There is a catch worth knowing. {click_price} is an estimate. MGID discounts some clicks after the fact and never charges for them, so the URL cost can overstate your actual spend. For reporting you can trust, connect the MGID cost integration instead.
The cost integration pulls spend directly from MGID's API at the campaign, content, and publisher level, which is far more accurate than the URL value. To set it up, go to the Integrations tab, click Add Integration under Cost Tracking Integrations, select MGID, and enter your MGID email, password, Client API ID, and access token, then pick a timezone. Once it is created, select it under Cost Integration on the MGID traffic source and keep the Cost Model on Not Tracked. The integration takes priority over the URL value.
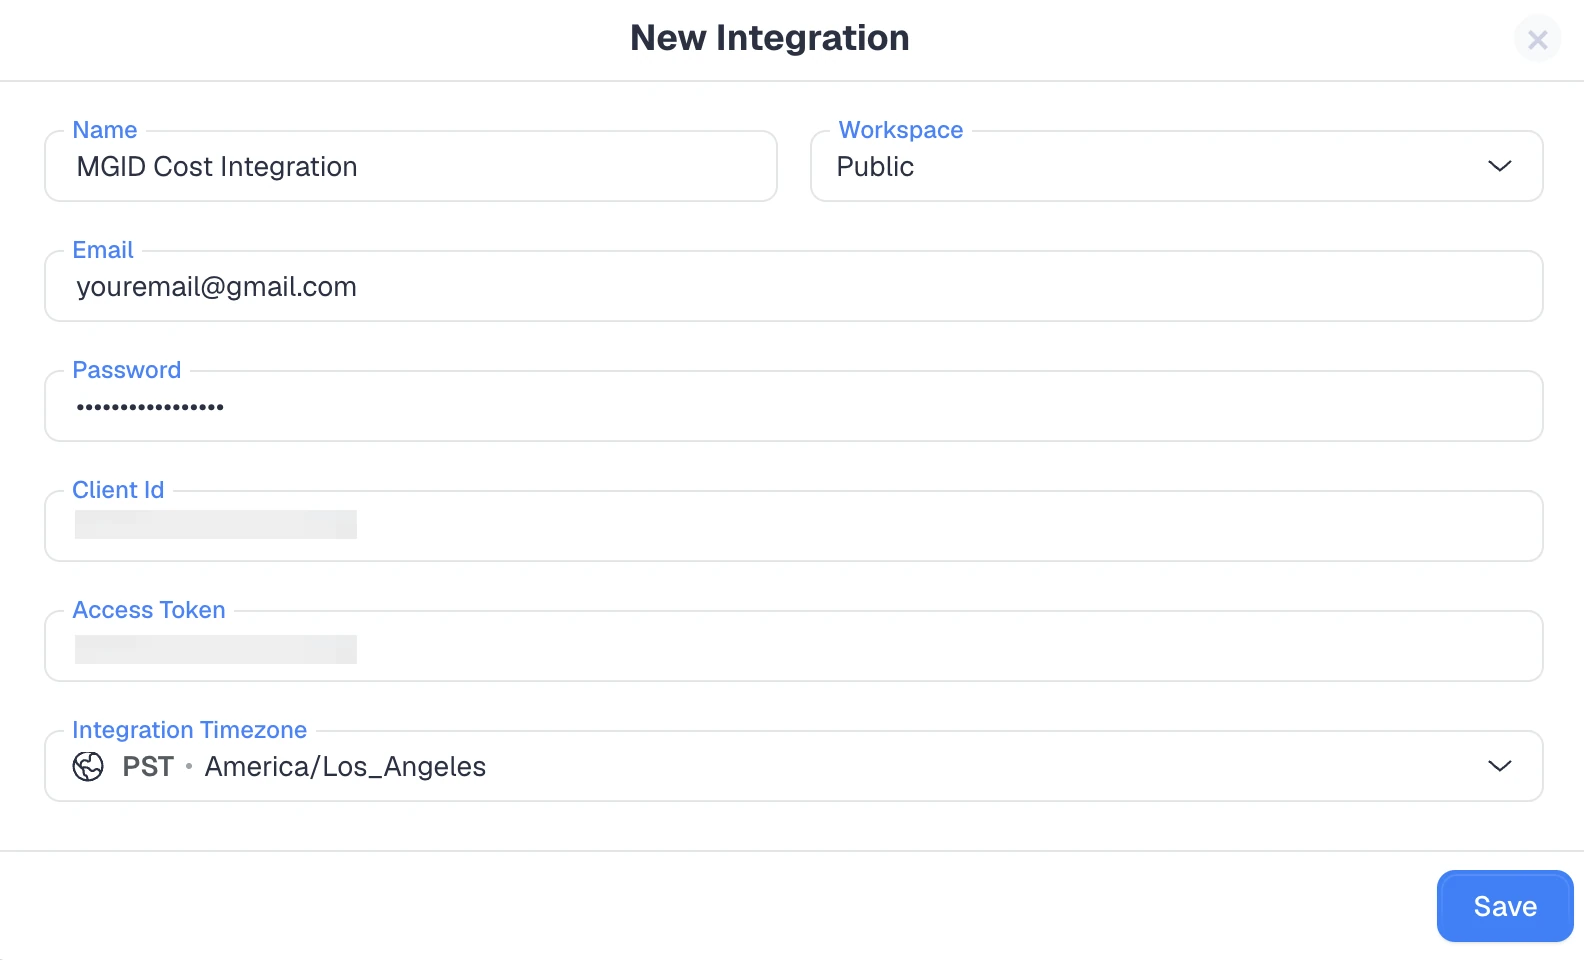
One setting trips people up: set the integration timezone to match your MGID account. If they differ, your daily costs will drift and never quite line up with MGID's dashboard.
Once conversions and cost are both flowing in, the useful work is figuring out which widgets and teasers deserve more budget and which are burning it. This is where ClickFlare's native reporting earns its keep, since you can group by widget_id to spot converting placements and by teaser_id or title to find your best creatives.
ClickFlare's AI Copilot speeds that analysis up. Instead of manually pivoting through columns, you can ask it to surface your strongest and weakest placements, flag widgets that spend without converting, and summarize how a campaign is trending. You still make the buying decisions, but Copilot gets you to them faster, which matters when a native campaign can involve hundreds of widgets.
Almost every broken MGID setup comes down to one of these:
YOUR_CLIENT_ID or REPLACE_EVENT_NAME is still sitting in the postback, MGID will not record anything. Replace both.e value must match the MGID goal name exactly. A different spelling, or an illegal character like a space or underscore, breaks the match.{external_id}, not MGID's {click_id}. Mixing them up is a frequent culprit.click_id={click_id} appears twice, or MGID's Tracking Tags re-add parameters the ClickFlare URL already carries, your widget and teaser columns arrive empty. Paste the ClickFlare URL unchanged.MGID conversion tracking is not complicated once you see the shape of it: capture the click ID, store it in ClickFlare as the External ID, and fire it back to a.mgid.com with a postback whose goal name matches MGID exactly. Get those three things right and the rest, cost, widgets, and multi-goal funnels, falls into place.
From there, lean on ClickFlare's widget-level reporting to cut the placements that waste spend and scale the ones that convert. That is where native buying on MGID actually becomes profitable. If your numbers still look off across platforms after setup, our guide on why your conversions don't match across platforms is a good next read, and if you are buying across other native networks too, the same S2S logic applies in our Taboola and Outbrain tracking guides.
Neither. MGID tracks native teaser conversions through a server-to-server postback sent to a.mgid.com. There is no pixel or Conversion API for teasers, which is why a tracker that stores and returns the click ID is required.
The usual causes are a leftover YOUR_CLIENT_ID or REPLACE_EVENT_NAME in the postback, a goal name that does not match MGID exactly, or the postback sending MGID's {click_id} instead of ClickFlare's {external_id}. Check Logs then Postback Status first.
The click ID ({click_id}) is the unique identifier MGID attaches to each teaser click. ClickFlare stores it as the External ID and returns it in the postback as the c value, which is how MGID matches a conversion back to its original click.
MGID allows a maximum of three goals per campaign: one main goal plus two additional. Each goal needs its own postback URL in ClickFlare, and goal names must be unique and use Latin letters and numbers only.
The URL macro {click_price} is only an estimate, and MGID discounts some clicks later. Connect the MGID cost integration for API-level accuracy, and make sure its timezone matches your MGID account so daily costs line up.
Need a hand with MGID conversion tracking?
Try out ClickFlare for free and book a call with one of our tracking specialists who will guide you through the entire setup.


