

Black Friday came early. Early-access prices until Nov 8.Black Friday: early-access prices until Nov 8.Early-access price ends in0d00h00m00sClaim the deal



Your Outbrain campaigns are spending every day, but the conversion column in your reports looks thin, delayed, or empty. Nine times out of ten the campaigns are fine and the problem is Outbrain conversion tracking. Outbrain measures conversions through a server-to-server (S2S) postback, which means a conversion only shows up if your tracker stores the click ID and fires it back correctly.
Once that connection is set up properly, you get accurate conversions, clean cost data, and the ability to see which widgets and sections actually make money. This guide walks through the full S2S setup step by step, from the traffic source to the postback to testing, using ClickFlare as the tracker.
Quick Summary
Outbrain conversion tracking is the process of recording what happens after someone clicks one of your Outbrain native ads, then tying that action back to the exact campaign, widget, and section that drove it. It answers the question every media buyer cares about: which placements are producing sales or leads, and which are just spending budget.
Outbrain handles this with a server-to-server integration. When a user clicks your ad, Outbrain attaches a unique ob_click_id to the destination URL, and your tracker stores that ID against the visit. When the user later converts, the tracker sends a postback to Outbrain containing that same ID, and Outbrain matches the conversion to the original click. That click ID is the whole mechanism: if it isn't captured on the way in or isn't returned on the way out, Outbrain has nothing to match, and the conversion never appears in your dashboard.
Native platforms like Outbrain send traffic across thousands of publisher sites, and the conversion usually happens on a different domain than the ad. Trying to measure that with cookies or a browser pixel is unreliable, because ad blockers, cookie restrictions, and cross-domain limits all break client-side tracking before the conversion is recorded. Server-to-server tracking avoids all of that, since the conversion is reported from your server to Outbrain's server and doesn't depend on the user's browser keeping a cookie alive. This is the same approach that makes server-side tracking the standard for affiliate and native campaigns.
Two things are worth knowing before you start. First, Outbrain does not offer a Conversion API in the way Meta or TikTok do, so the postback is the method. Second, Outbrain does not pass cost data through the postback. Spend is pulled in separately through a cost integration, which we cover further down.
ClickFlare is a server-side ad tracking and attribution platform built for performance marketers. It sits between your traffic source and your offer, records every click and conversion, and reports cost, revenue, and profit in one place. For native traffic specifically, it is the piece that captures the ob_click_id and holds it until a conversion happens.
On its own, Outbrain only knows what you tell it. It sees the click, but it can't see a sale that happens later on your offer or affiliate network, often on a different domain. A dedicated tracker closes that loop: it stores the click ID, matches the conversion back to the exact widget and section, fires the postback to Outbrain so the platform can optimize, and pulls in cost so you see real profit rather than raw spend.
You can run Outbrain without one, but you lose placement-level attribution and the clean conversion signal Outbrain's bidding needs. That is why an S2S setup through a tracker like ClickFlare is the practical standard for anyone buying native at scale.
A few pieces need to be in place before the setup will work end to end. Getting these ready first saves you from a half-finished integration that silently drops conversions.
The flow has five parts: build the Outbrain traffic source, create the conversion event in Outbrain, add the postback in ClickFlare, place the tracking in your Outbrain campaign, and test it. Follow them in order.
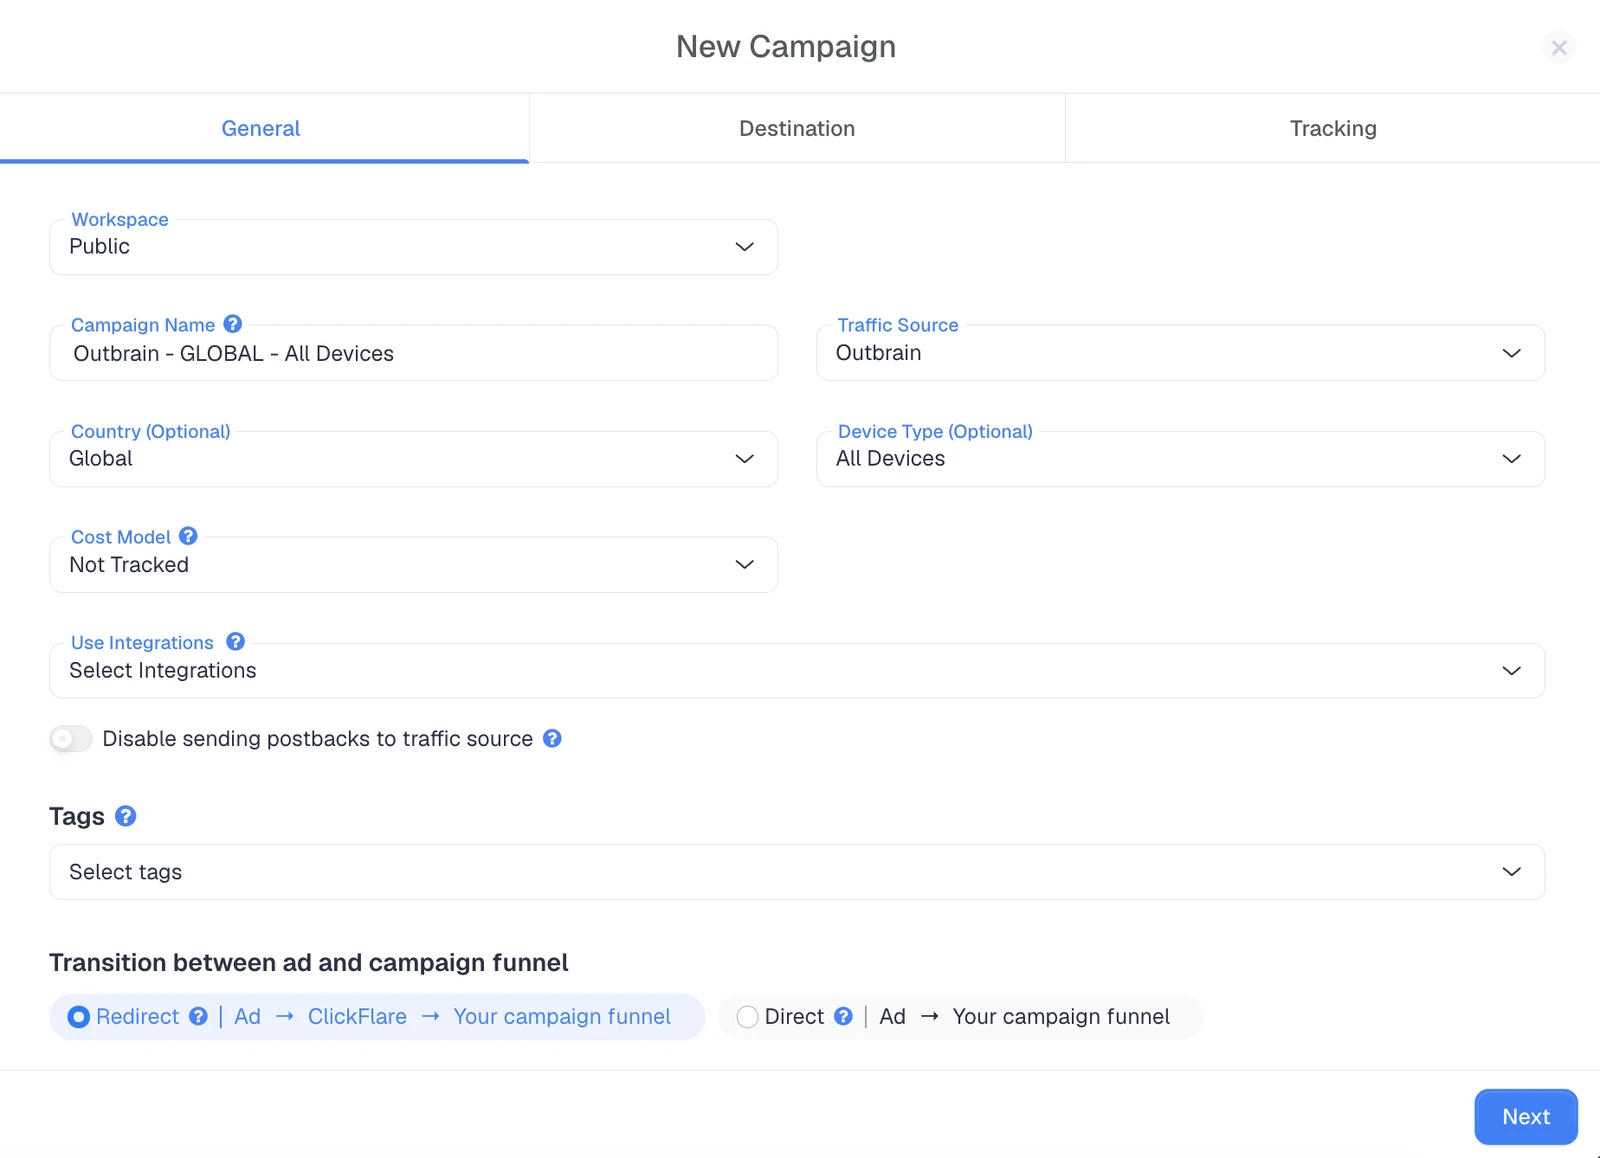
In the ClickFlare campaign editor, create a new campaign and select Outbrain as the traffic source. Set the cost model to Not Tracked if you plan to use the cost integration, and keep the transition on Redirect for the usual setup.
If you are building the Outbrain traffic source for the first time, create it from the Outbrain template. The cost currency defaults to USD, and the template pre-fills the tracking parameters for you. Outbrain macros use double curly braces, like {{ob_click_id}}.
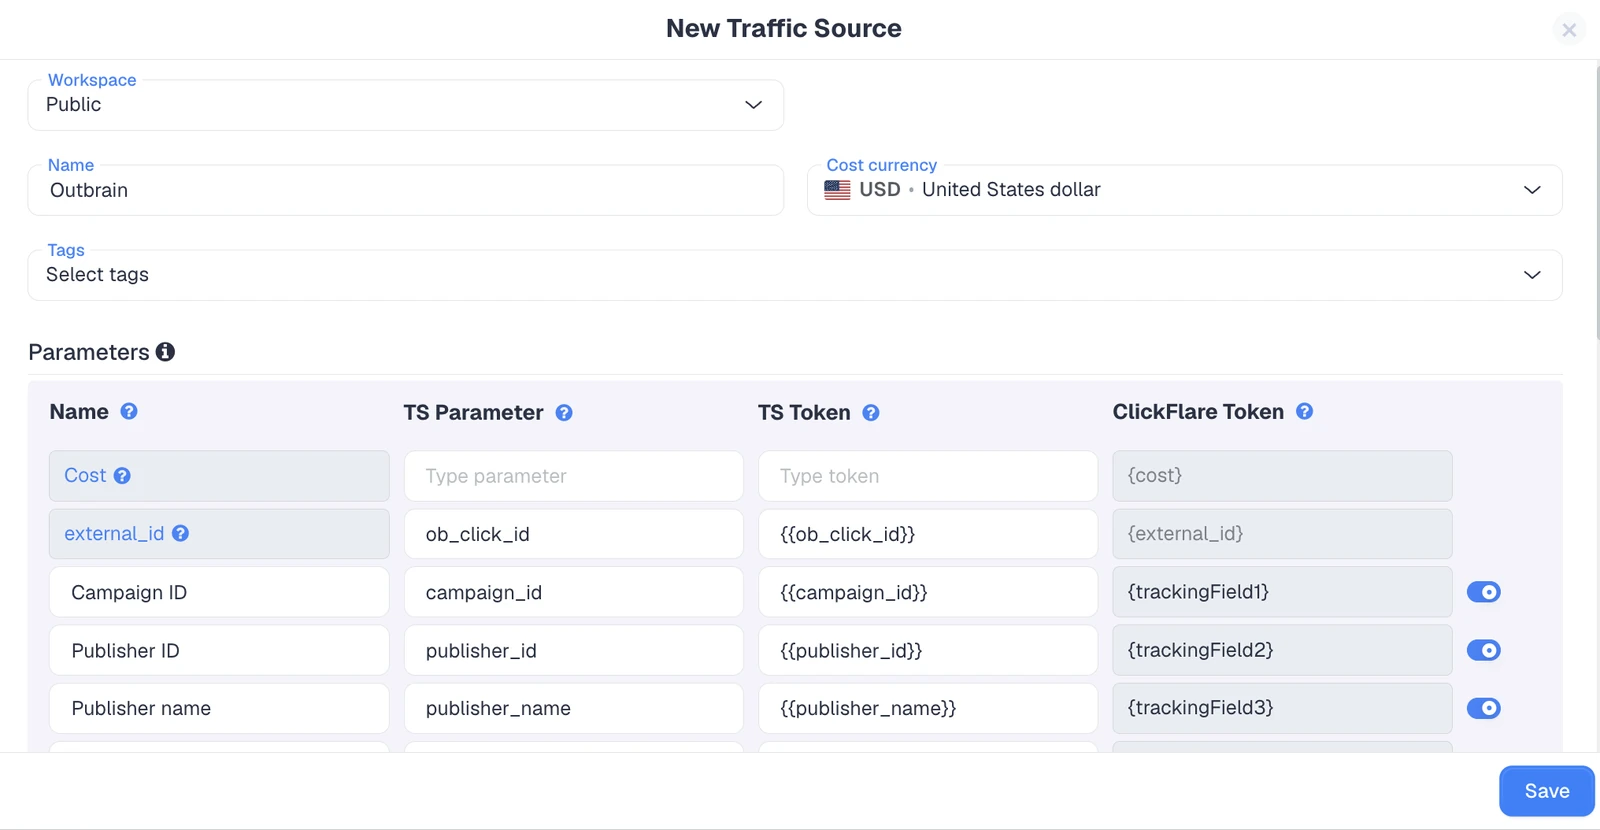
The most important row is the click ID. The table below shows the main parameters the template maps so you know what each one captures.
| ClickFlare Token | Outbrain Macro | What It Captures |
|---|---|---|
| {external_id} | {{ob_click_id}} | The unique click ID (required for attribution) |
| {trackingField1} | {{campaign_id}} | The Outbrain campaign ID |
| {trackingField2} | {{publisher_id}} | The publisher (widget) ID |
| {trackingField3} | {{publisher_name}} | The publisher name |
| {trackingField4} | {{ad_id}} | The ad (promoted link) ID |
| {trackingField6} | {{section_id}} | The section ID within a publisher |
Do not modify or remove the ob_click_id row. Without it, no Outbrain click ID is stored and your conversions cannot be attributed. If you want extra data points, you can add more Outbrain macros using the Add Parameter option, entering the macro in double braces as the token value. Note that some Outbrain macros only populate in impression pixels, not on click URLs.
In Outbrain, create an event-based conversion, not a URL-based one. The URL-based type is only for cases where you don't need server-to-server tracking, so for a proper S2S setup you want the event type.
Give the conversion a clear name and note it exactly. Outbrain conversion names are case-sensitive and must be unique. You will paste this exact name into the postback in the next step, so "Purchase" and "purchase" are not interchangeable. A single mismatched character means Outbrain never records the conversion.
Back in the ClickFlare traffic source, turn on the traffic source postback URL and enter the Outbrain endpoint. The template uses this format:
https://tr.outbrain.com/unifiedPixel?ob_click_id={external_id}&name=REPLACE&orderValue={payout}¤cy={payout_currency}

Replace REPLACE with the exact Outbrain event name from Step 2. This is the single most common point of failure, so double check the spelling and capitalization. Then choose which ClickFlare event triggers the postback, which is Conversions by default, or a specific custom conversion if you only want certain actions sent.
A couple of notes. If all your offers pay in one currency, you can hardcode it (for example, currency=USD) instead of passing the token. And you don't need Outbrain's pixel snippet anywhere on your pages, since S2S tracking doesn't use it.
In ClickFlare, finish the campaign by setting the cost model, choosing Redirect (the usual option) or Direct tracking, and adding your offer and optional lander. If you use a lander, its CTA must point to the ClickFlare click URL, not straight to the offer, or the click ID won't carry through.
Copy the campaign URL from the Tracking section on your custom domain. It already includes the Outbrain macros. Now split that URL at the question mark and place each half in the right field in Outbrain.
| Where in Outbrain | What to Enter |
|---|---|
| Landing page URL | The part before the ?, with no trailing slash and no parameters |
| Tracking section | The part after the ? (without the ? itself) |
Keeping the parameters in the Tracking field rather than jamming them onto the landing page URL is what lets Outbrain populate the macros cleanly.
Never assume the setup works until you have confirmed a click and a conversion flow through. Run a real click on your ad, then check both sides.
The conversion status in Outbrain tells you exactly where you stand.
| Status | What It Means |
|---|---|
| Pending | The conversion was created but hasn't received data yet |
| Active | Conversions are firing and being recorded correctly |
| No Recent Activity | No conversion has fired in the last 72+ hours |
| Not Active | The event never fired. Check the event name for a mismatch |
Most funnels have more than one action worth tracking, like a lead and then a sale. Outbrain handles this with one event-based conversion per step, matched by one postback per step in ClickFlare. Create a separate event-based conversion in Outbrain for each event, and a matching custom conversion in ClickFlare. Then add a postback for each one using the "+ Another postback URL" option, giving each its own name= value. If you only want to send some conversions to Outbrain, use the Event filter on the postback to control which ones go.

One important detail for optimization: Outbrain's conversion-based bidding optimizes toward the single goal you choose for the campaign, so pick the event closest to revenue. Feeding the right event back is what lets the algorithm chase profitable conversions instead of top-of-funnel clicks.
Because the postback doesn't carry spend, you connect cost separately. The preferred method is ClickFlare's Outbrain cost integration, which pulls spend directly from Outbrain's reporting API and matches it to the right campaigns, widgets, and sections automatically.
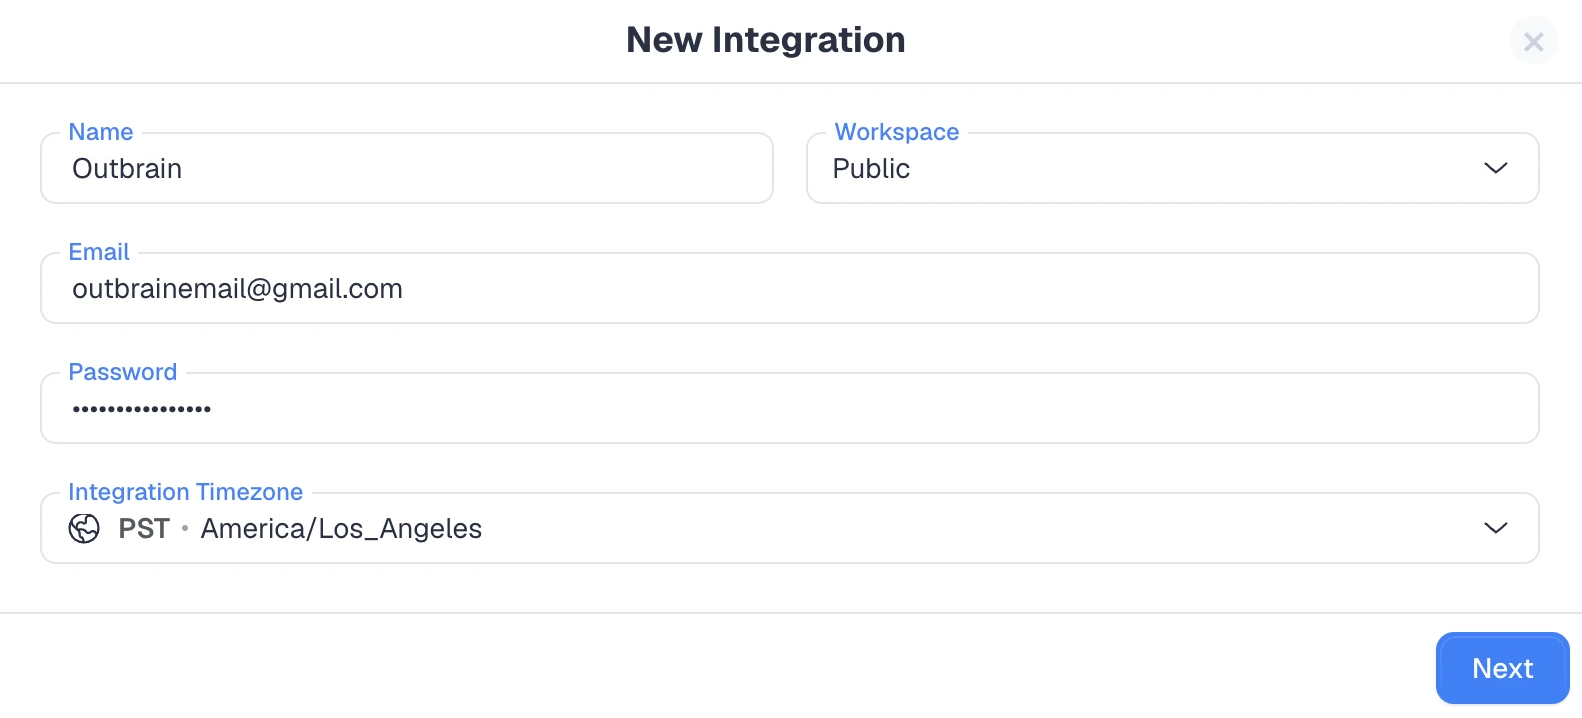
This one needs a little lead time. You need API access from Outbrain, which you request through your account manager or Outbrain's partner API form, and approval usually takes two to five business days. Once you have it, add the integration in ClickFlare under Cost Tracking Integrations, enter your Outbrain credentials and timezone, and select the ad accounts. The timezone must match your Outbrain account, and the campaign cost model should be set to Not Tracked so the integration owns the cost numbers.
If you can't wait on API approval, there are two fallbacks. You can add Outbrain's {{cpc}} macro (in USD) to the Cost row of the traffic source, though you should test it before relying on it. Or you can set the cost model to CPC with your bid and correct historical numbers later with a manual cost upload.
Once tracking and cost are flowing, you don't have to jump back into Outbrain to act on what you see. ClickFlare Ads Manager lets you start and pause ads, campaigns, and individual sites directly from the tracker, and edit bids and budgets without leaving the dashboard.
That matters because you are making those calls against real profit data, not Outbrain's raw metrics. If a publisher or section is burning spend with no conversions, you can block or pause it on the spot, then push more budget to the placements that are actually returning.
ClickFlare's AI Copilot sits on top of your tracking data and helps you make sense of it faster. You can ask it to surface which campaigns, widgets, or sections are driving profit, spot patterns you might miss in a wide report, and sanity check a decision before you make it.
It is there to speed up analysis and guide your strategy, not to run your campaigns for you. The actions still happen in Ads Manager, but Copilot helps you decide where to point them.
Almost every broken Outbrain setup comes down to the same handful of issues. Check these first before you tear anything down.
If conversions show in ClickFlare but not Outbrain, confirm the traffic source postback is enabled, that sending postbacks isn't disabled at the campaign level, and that the event mapping is correct. This kind of platform-to-platform gap is common across native networks, and our breakdown of why your conversions don't match across platforms explains the usual causes.
Outbrain conversion tracking lives or dies on two things: capturing the ob_click_id on the way in and returning it with an exactly matching event name on the way out. Get those right, run everything on a custom domain, and connect the cost integration, and you have a clean picture of which widgets and sections are profitable.
Native traffic rewards the buyers who can see cost and revenue at the placement level and cut what doesn't convert. A proper S2S setup is what makes that possible, and it is the same foundation that works across the major native advertising platforms. If you want the deeper mechanics behind the postback itself, the guide on what a postback URL is covers it step by step. You can also check Outbrain's own help documentation on conversion tracking for platform-side details.
Outbrain uses a server-to-server (S2S) postback, not a Conversion API like Meta or TikTok. Your tracker stores the ob_click_id from the click and sends it back to Outbrain when a conversion happens, so the match is made server-side rather than in the browser.
"Not Active" means the event has never fired. The usual cause is a mismatch between the Outbrain event name and the name= value in your postback URL. Outbrain names are case-sensitive, so check the spelling and capitalization exactly, and confirm the postback is enabled.
The ob_click_id is the unique identifier Outbrain attaches to each click. ClickFlare stores it as the visit's External ID, then returns it in the postback so Outbrain can match the conversion back to the exact click, widget, and section that drove it.
Outbrain doesn't send cost through the postback. Spend is pulled separately through ClickFlare's Outbrain cost integration, which needs API access from Outbrain and a timezone that matches your Outbrain account. Without that integration connected, no cost appears.
Yes. Create one event-based conversion in Outbrain per funnel step and a matching postback in ClickFlare using "+ Another postback URL", each with its own name= value. For bidding, set the campaign goal to the event closest to revenue.
Need a hand with Outbrain conversion tracking?
Try out ClickFlare for free and book a call with one of our tracking specialists who will guide you through the entire process.


