

Black Friday came early. Early-access prices until Nov 8.Black Friday: early-access prices until Nov 8.Early-access price ends in0d00h00m00sClaim the deal



If you are running native campaigns on RevContent, the numbers in your ad account only tell half the story. RevContent conversion tracking is what connects a click on a widget to the sale, lead, or signup it actually produced, so you can see which content and placements make money instead of guessing. RevContent does this through a server-to-server (S2S) postback rather than a browser pixel, which means the setup lives between RevContent and your tracker. This guide walks through the full S2S postback setup in ClickFlare, step by step, plus cost syncing, testing, and the mistakes that quietly break tracking.
Quick Summary
rc_uuid. ClickFlare captures it, stores it as the visit's External ID, and sends it back in the postback as {external_id}.amount must never be zero.RevContent conversion tracking is the process of recording what happens after someone clicks one of your RevContent native ads, then attributing that action back to the exact widget, content item, and boost that drove it. A conversion can be a purchase, a lead, an app install, or any event that matters to your campaign.
RevContent assigns every click a unique identifier called rc_uuid. Your tracker captures that ID when the visitor lands, holds onto it through the funnel, and then passes it back to RevContent the moment a conversion fires. That round trip is what lets RevContent tie a sale to a specific placement, and it is the foundation of accurate reporting and smarter bidding.
Native traffic is tricky to track with browser-based methods. Visitors bounce across domains, use ad blockers, and sit behind privacy settings that strip cookies and block pixels. A conversion pixel that depends on the browser will miss a meaningful share of your conversions, and missing data on native traffic usually means wasted spend.
Server-to-server postback tracking avoids all of that. Instead of firing from the visitor's browser, the conversion is reported directly from your tracker's server to RevContent's server using the stored click ID. Nothing depends on a cookie surviving, which is why S2S is the standard for native and affiliate traffic. If you want the full mechanics of how this works, our guide on what a postback URL is breaks it down from scratch.
Two things are worth knowing about RevContent specifically. The postback has no separate event parameter, so every postback you send counts as a conversion for that boost. And cost data does not come through the postback, so you pull it through a separate integration covered later in this guide.
Have these ready before you begin, so the setup runs start to finish without stopping:
The full setup has five parts: create the traffic source and campaign, confirm your parameter mapping, add the postback, place your tracking URL in RevContent, and test it. Work through them in order.
In ClickFlare, go to Campaigns and click New. In the Traffic Source dropdown, choose + New Traffic Source, search for revcontent, and select the Revcontent template.
Give it a name (for example, Revcontent) and leave Cost currency on USD unless your RevContent account bills in another currency. The template arrives with its parameters pre-filled, which you will review in the next step.
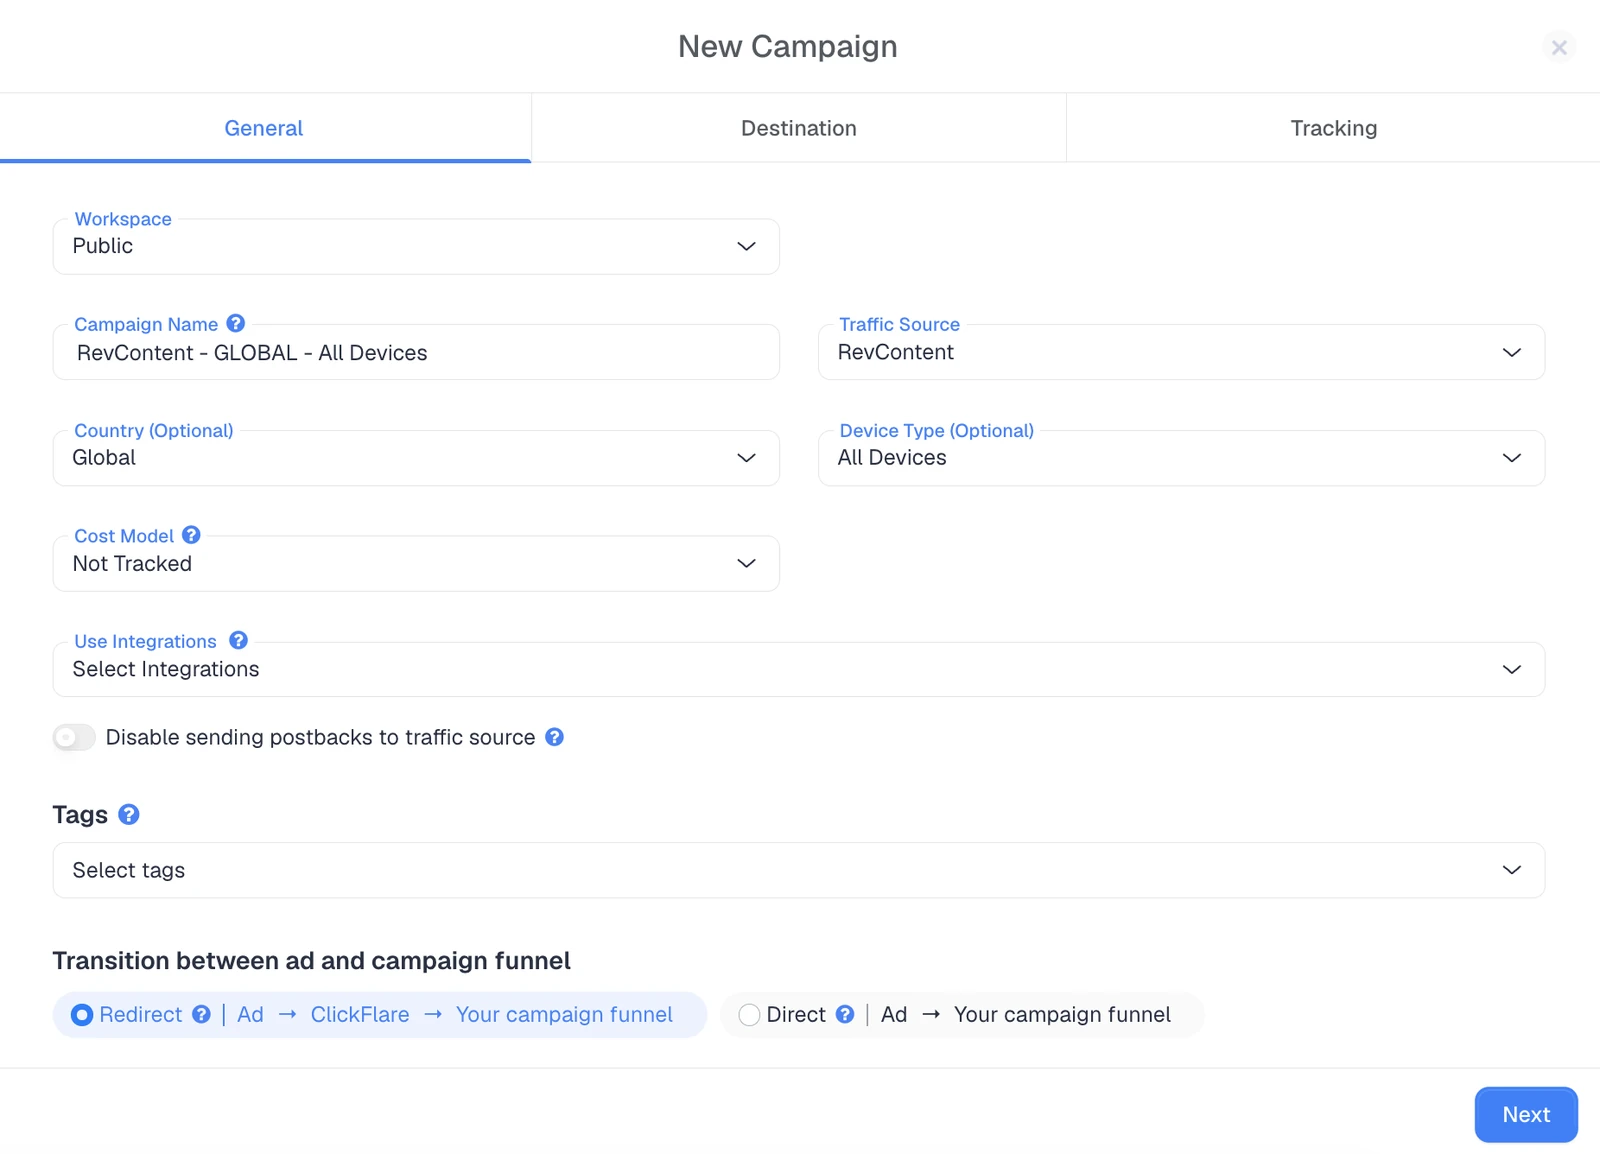
After saving the traffic source, finish the campaign: set the Cost Model, choose Redirect or Direct tracking (Redirect is the usual choice), add your destination, and save.
The RevContent template pre-fills a parameters table that maps RevContent's own macros to ClickFlare tokens. This is what captures the click ID and the placement data you will optimize against later. Review it rather than editing it blindly.
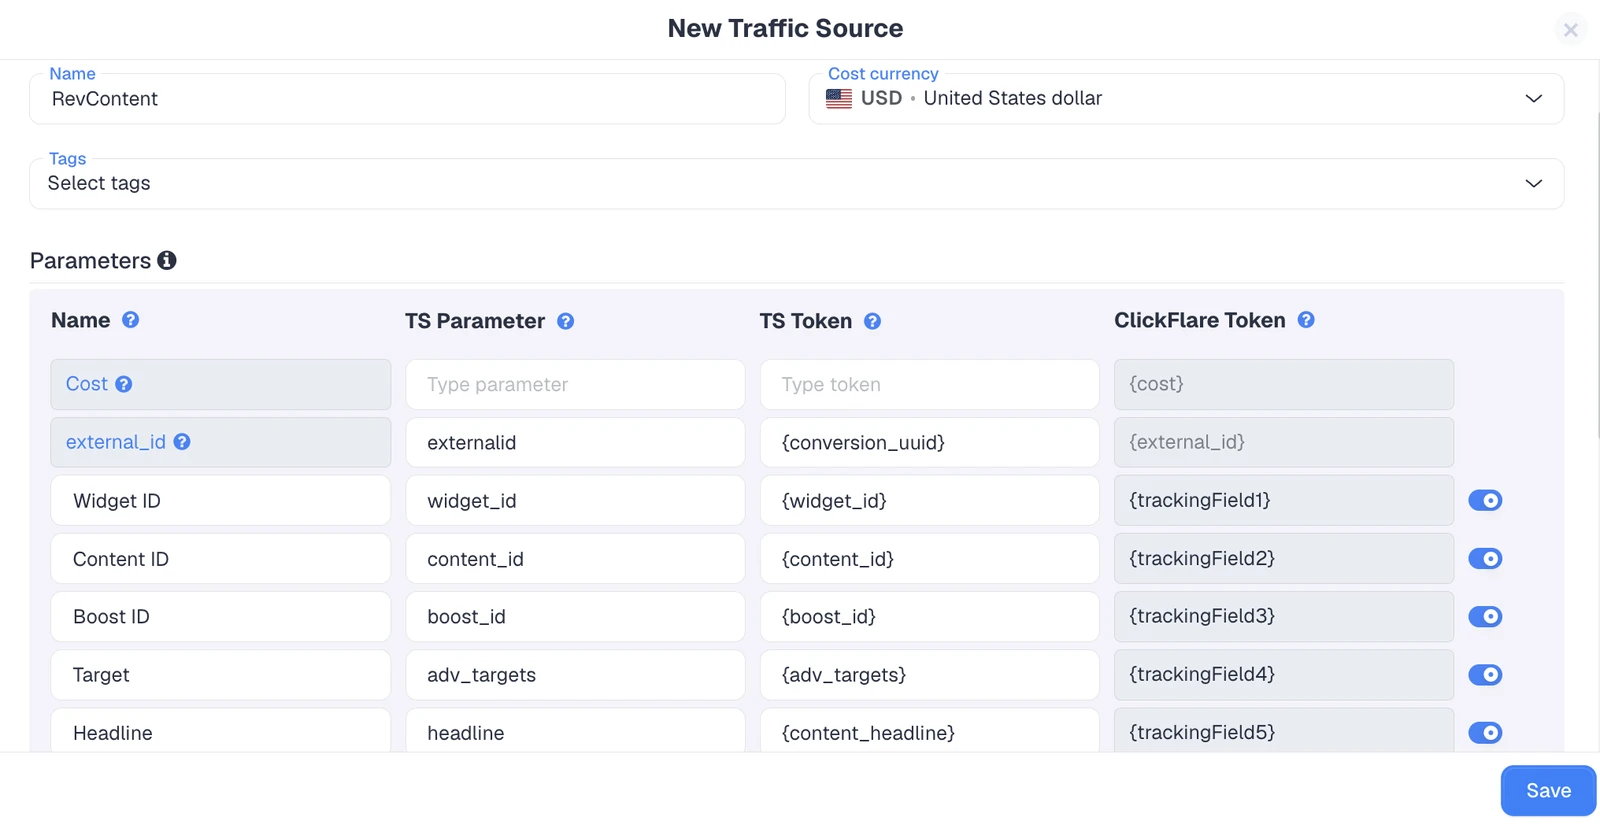
| Name | TS Parameter | RevContent Macro | ClickFlare Token |
|---|---|---|---|
| Cost | (empty) | (empty) | {cost} |
| externalId | externalid | {conversion_uuid} | {external_id} |
| Widget ID | widget_id | {widget_id} | {trackingField1} |
| Content ID | content_id | {content_id} | {trackingField2} |
| Boost ID | boost_id | {boost_id} | {trackingField3} |
| Target | adv_targets | {adv_targets} | {trackingField4} |
| Headline | headline | {content_headline} | {trackingField5} |
| Site Name | site_name | {site_name} | {trackingField6} |
The externalId row is the one that matters most. RevContent's {conversion_uuid} macro copies the click ID (rc_uuid) into the externalid parameter, ClickFlare stores it as the visit's External ID, and the postback later sends it back as {external_id}. Do not remove that row, do not change its TS parameter, and do not add rc_uuid to your URLs manually. Any of those will leave {external_id} empty, and RevContent will reject the postback as invalid.
If you want deeper placement data, you can add more RevContent variables through Add Parameter, including {target_id}, {user_ip}, {city}, {state}, and {country}.
On the RevContent traffic source, find the Passing conversion info to traffic source section and switch on Traffic source postback URL. This postback is set once at the traffic source level and applies to every campaign that uses it, so you do not repeat it per campaign.
The template postback looks like this:
https://trends.revcontent.com/api/v1/conversion.php?api_key=REPLACE_WITH_YOUR_API_KEY&rc_uuid={external_id}&amount={payout}Replace REPLACE_WITH_YOUR_API_KEY with the API key from your RevContent Account Settings. Paste it exactly, with no extra spaces or typos. Then pick the ClickFlare event in the dropdown. Keep Conversions to send all conversions, or choose a specific custom conversion such as purchase.
Here is what each endpoint parameter does:
| Parameter | Required | Value |
|---|---|---|
api_key | Yes | Your RevContent API key |
rc_uuid | Yes | The click ID, passed as {external_id} |
amount | Yes | The payout, passed as {payout}, and never zero |
user_ip | No | Visitor IP, appended as &user_ip={ip} |
user_agent | No | Visitor user agent |
One note on amount: RevContent needs a non-zero payout to accept the conversion. If your payouts vary, the {payout} token passes the real value automatically. If you are sending a fixed payout, hardcode a number greater than zero rather than leaving it blank.

Back in ClickFlare, open the Tracking tab, select your custom domain, and copy the campaign URL. That URL already carries externalid={conversion_uuid}, widget_id, boost_id, and the rest of the template variables. It does not contain rc_uuid, because RevContent appends that to every click on its side.
In RevContent, create your boost, add your content, and paste the ClickFlare campaign URL into each content item's Destination URL field. If you run a landing page before the offer, the page's call-to-action button must link to the ClickFlare click URL, not straight to the offer, or the click ID never gets captured.
Do not wait until you are spending real money to find out tracking is broken. Run a quick end-to-end test:
trends.revcontent.com request. Check that rc_uuid has a real click ID, amount has the payout, and api_key is your actual key.If all five checks pass, your RevContent conversion tracking is working end to end. If the visit shows but the conversion does not, the postback is almost always the culprit, so start there.
This is where RevContent differs from platforms with a richer postback. The RevContent endpoint has no event parameter, so it cannot tell one event type from another. Every postback you send is counted as a conversion for that boost.
Because of that, send only the single event you want RevContent to optimize toward, which is usually the final sale or the action closest to revenue. Use ClickFlare's Event filter to control which conversions get passed through. Do not add a second postback hoping to report an upper-funnel event too, since RevContent cannot distinguish between the two and your reporting will inflate. You can still track every funnel step inside ClickFlare for your own analysis, you just send one of them back to RevContent.
Conversions tell you what came back. Cost data tells you what you paid, and you need both in one place to judge profit by widget and content. RevContent cost does not travel in the postback, so you connect it with a dedicated API integration.
The credentials are a Client ID and Client Secret, found in RevContent under Account Settings > Stats API Credentials. These are separate from the API key you used in the postback, so do not mix them up. In ClickFlare, open the Integrations tab, go to Cost Tracking Integrations, click Add Integration, and select RevContent. Fill in the workspace, a recognizable integration name, your Client ID and Client Secret, a timezone that matches your RevContent account, and the ad accounts you want to pull costs from, then save.
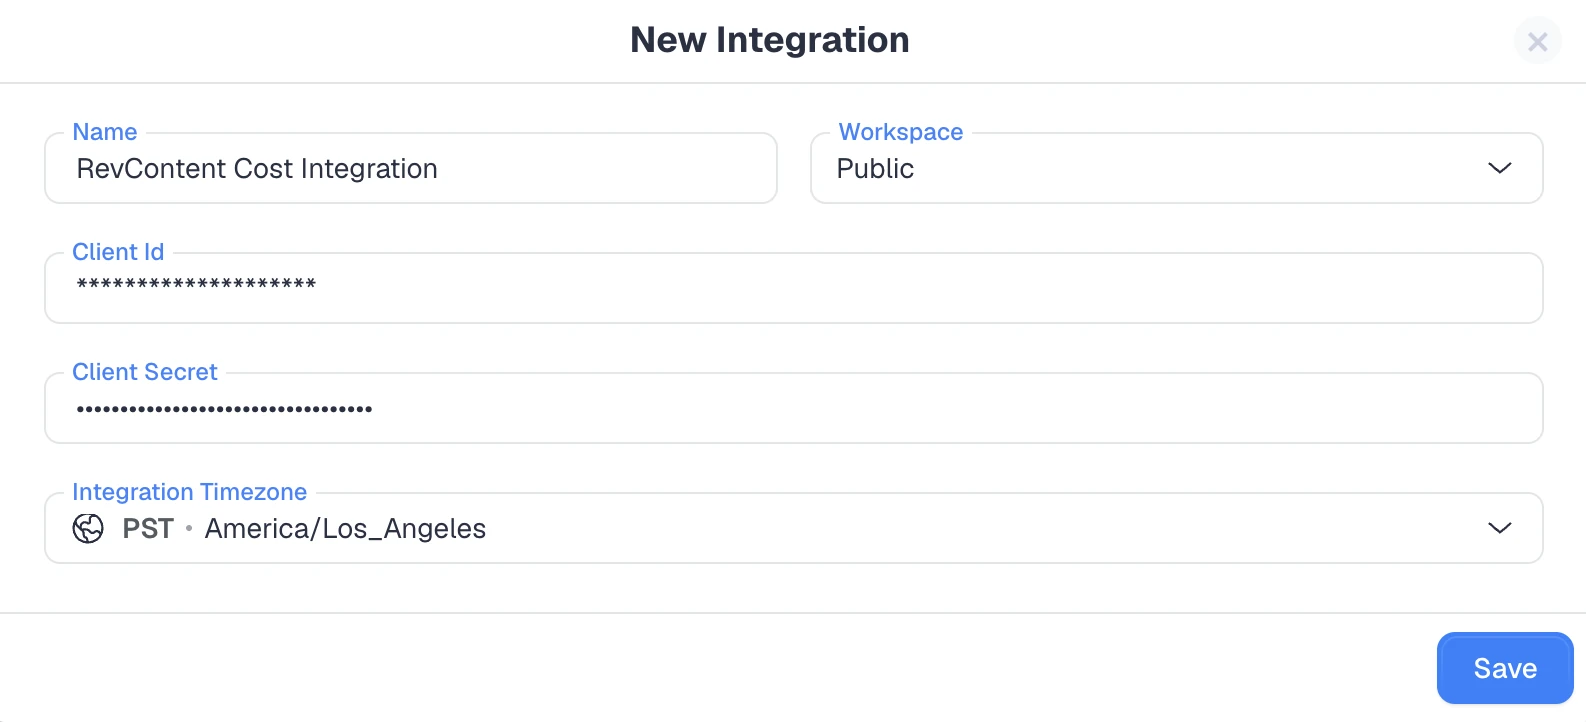
Set the campaign's Cost Model to Not Tracked so the API integration owns the cost numbers. One integration per business account is enough, and it can cover multiple ad accounts. ClickFlare then matches cost to your campaigns, content, and widgets automatically. If you would rather not connect the API, you can set the Cost Model to CPC and enter your bid, but that is an estimate only and will not reflect real spend.
Once conversions and cost are both flowing in, you are looking at real profit per placement rather than raw platform stats. ClickFlare's Ads Manager lets you act on that without switching tabs. You can pause weak content, adjust budgets and bids, and make the calls your profit data is pointing to, all from inside ClickFlare.
Ads Manager is a manual execution layer, not an automation engine. It puts the controls next to the numbers so you move faster, but you are still the one making each decision. For hands-off rule-based automation, that lives in the sister platform TheOptimizer, not in ClickFlare.
RevContent campaigns generate a lot of rows once widget, content, and boost data stack up. ClickFlare's AI Copilot helps you read that faster, surfacing patterns like which widgets convert, where spend is leaking, and which content is worth scaling.
Treat Copilot as an analyst that speeds up your review, not an operator that runs campaigns for you. It points you at what deserves attention, and you decide what to do with it.
Most broken RevContent setups come down to the same handful of errors:
{external_id} and RevContent rejects the postback.rc_uuid to URLs manually. RevContent already appends it on click, so adding it yourself breaks the mapping.amount. RevContent needs a non-zero payout, so a blank or zero value fails.If conversions show in ClickFlare but not in RevContent, the issue is usually the postback request itself, so open the trends.revcontent.com entry in your postback log and read the parameters. For a wider look at why counts drift between a tracker, an ad platform, and a network, our guide on why your conversions don't match across platforms covers the usual causes.
RevContent conversion tracking comes down to two things working together: capturing the rc_uuid click ID on the way in, and firing a clean S2S postback with a non-zero payout on the way out. Get those right, add the cost integration, and you are optimizing on real profit per widget and content instead of platform estimates.
From there, the data is yours to act on. Use Ads Manager to prune and scale placements, lean on AI Copilot to spot patterns faster, and keep your postback log handy whenever a number looks off. If you run native traffic across more than one platform, it is worth seeing how RevContent stacks up in our roundup of the best native advertising platforms, and if you also buy on Outbrain, the Outbrain conversion tracking guide follows the same S2S approach. You can review RevContent's own platform details on the RevContent website.
RevContent uses a server-to-server postback, not a browser pixel. Conversions are reported server-side from your tracker to RevContent using the stored rc_uuid click ID, which keeps tracking accurate even when cookies or pixels are blocked.
rc_uuid is the unique click ID RevContent appends to every click. ClickFlare captures it on landing, stores it as the visit's External ID, and sends it back in the postback as {external_id} so the conversion is matched to the right click.
The most common causes are an empty {external_id} from editing the externalId row, a zero or missing amount, or a mistyped API key. Open the postback request in Logs and confirm all three parameters carry real values.
Not as separate events. The RevContent postback has no event parameter, so every postback counts as one conversion. Send only the event you want RevContent to optimize for, usually the final sale, and use an event filter to control it.
Through a separate API integration, not the postback. Add your RevContent Client ID and Client Secret under Cost Tracking Integrations, set the campaign cost model to Not Tracked, and ClickFlare matches spend to your campaigns, content, and widgets automatically.
Need a hand with RevContent conversion tracking?
Try out ClickFlare for free and book a call with one of our tracking specialists who will walk you through the entire setup.


