If you are running ads on Snapchat, the Snapchat Pixel is what connects the money you spend to the results you actually get. It is a small piece of code on your website that tells Snapchat when someone views a product, adds to cart, or buys, so the platform can attribute conversions and optimize your campaigns.
Here is the catch: since Apple's iOS privacy changes, the pixel on its own quietly misses a large share of those conversions. That is why the accurate setup pairs the Snapchat Pixel with server-side tracking through the Conversion API. In this guide, we will cover what the Snapchat Pixel is, how it works, why it underreports on its own, and how to track it accurately using ClickFlare.
Quick Summary
- The Snapchat Pixel is a snippet of code on your website that reports on-site actions like purchases and signups back to Snapchat.
- Because it runs in the browser, the pixel alone underreports conversions thanks to Apple's iOS 14 App Tracking Transparency changes, ad blockers, and cookie restrictions.
- Snapchat's Conversion API fixes this by sending conversions server-side, which is far more reliable than the browser pixel on its own.
- With ClickFlare, you connect your Snapchat Pixel ID and Conversion API token once, map your events, and fire accurate conversions to Snapchat server-side.
- ClickFlare also pulls your Snapchat ad costs automatically every hour, so you can see spend, revenue, and ROI in one place.
What Is the Snapchat Pixel?
The Snapchat Pixel is a piece of JavaScript you place on your website that reports visitor actions back to Snapchat. Each time someone lands on a page, views a product, adds an item to their cart, or completes a purchase, the pixel fires an event so Snapchat knows what happened after the ad click.
That data does two jobs. It powers conversion reporting, so you can see which campaigns and creatives drive results, and it feeds Snapchat's algorithm the signals it needs to find more people likely to convert. It also builds the audiences you use for retargeting. In short, the Snapchat Pixel is the client-side foundation of conversion tracking on the platform, and it is where most advertisers start.
How Does the Snapchat Pixel Work?
At a basic level, the Snapchat Pixel assigns identifiers to visitors and logs the actions they take on your site. When someone clicks your Snapchat ad and lands on your page, the pixel records that visit. If that person later completes a key action, like a purchase, the pixel fires a matching event and sends it back to Snapchat, which ties the conversion to the ad that drove it.
The important thing to understand is that all of this happens in the user's browser. The pixel depends on a script loading and a cookie surviving long enough to connect the click to the conversion. When that chain breaks, and increasingly it does, the conversion never gets reported. That single dependency is the root of the accuracy problem we will get to shortly.
What You Can Track with the Snapchat Pixel
Snapchat supports a set of standard events that map to the most common actions people take on your site. When you set up tracking, you match your site's actions to these events so Snapchat understands what each conversion represents. Common standard events include:
- Purchase. A completed sale, the most important event for ecommerce advertisers.
- Add to Cart. A product added to the cart, useful for mid-funnel optimization and retargeting.
- Start Checkout. A visitor who has begun the checkout process but not yet paid.
- Sign Up. A registration or account creation, key for lead generation campaigns.
- Page View and View Content. Top-of-funnel signals that help build audiences and measure interest.
These are just some of the standard events available. You can also define custom events when the standard set does not match a specific action in your funnel, which gives you flexibility to track exactly what matters to your business.
How to Set Up the Snapchat Pixel
Before you can track anything, the pixel needs to exist and be installed on your site. At a high level, you create the pixel inside Snapchat's Events Manager, then install it on your website either manually, through a tag manager, or with a partner integration for platforms like Shopify.
Snapchat maintains detailed, up-to-date installation instructions, so rather than duplicate them here, follow Snapchat's official guide to installing the Snap Pixel. Once it is live, it is worth confirming the pixel actually fires on your key pages before you scale spend, so you are not paying for traffic you cannot measure. With the pixel in place, the real question becomes how accurate that data actually is.
Why the Snapchat Pixel Alone Isn't Enough
This is the part most guides skip. The Snapchat Pixel is necessary, but on its own it is no longer sufficient. Because it runs entirely in the browser, anything that interferes with the browser interferes with your data.
The biggest shift came with Apple's App Tracking Transparency framework, introduced in iOS 14 and 14.5, which lets users opt out of tracking. Combined with ad blockers, Safari's cookie restrictions, and general privacy settings, this means a meaningful share of conversions simply never make it back to Snapchat through the pixel. The result is underreported conversions, weaker campaign optimization, and reporting that looks worse than your real sales. If you have ever noticed your tracker and your ad platform showing different numbers for the same campaign, our breakdown of why your conversions don't match across platforms explains exactly what causes it.
The fix is not to abandon the pixel. It is to back it up with server-side tracking, so the conversions the browser misses still get reported.
Snapchat Pixel vs. the Conversion API
Snapchat gives you two ways to report conversions, and the accurate setup uses both together. The pixel handles tracking in the browser, while the Conversion API sends events server-to-server. Here is how they compare:
| Method |
How It Works |
Strengths |
Limitations |
| Snapchat Pixel |
Fires events from the visitor's browser when they act on your site |
Quick to install, powers retargeting audiences |
Blocked or lost to iOS ATT, ad blockers, and cookie limits |
| Conversion API |
Sends conversion events directly from a server to Snapchat |
Not affected by browser restrictions, far more reliable |
Needs a server-side setup, usually through a tracker |
The two are complementary, not competing. The pixel gives you real-time browser signals and retargeting, while the Conversion API fills in the conversions the browser misses. Snapchat's Conversion API still uses your Snap Pixel ID as the identifier, but the events are sent server-side rather than depending on the pixel script firing in someone's browser.
The concept is the same server-to-server approach behind affiliate tracking, which our guide on what a postback URL is explains in detail, and it mirrors how the Facebook Conversion API works for Meta.
How to Track the Snapchat Pixel Accurately with ClickFlare
This is where a dedicated tracker earns its place. ClickFlare sends your conversions to Snapchat server-side through the Conversion API, using events it tracks itself rather than relying on the browser pixel to fire. Setup takes a few minutes, and ClickFlare has one of the most flexible Conversion APIs available, so you control exactly which events and parameters you send. Here is how it works.
Step 1: Get Your Snapchat Pixel ID and Conversion API Token
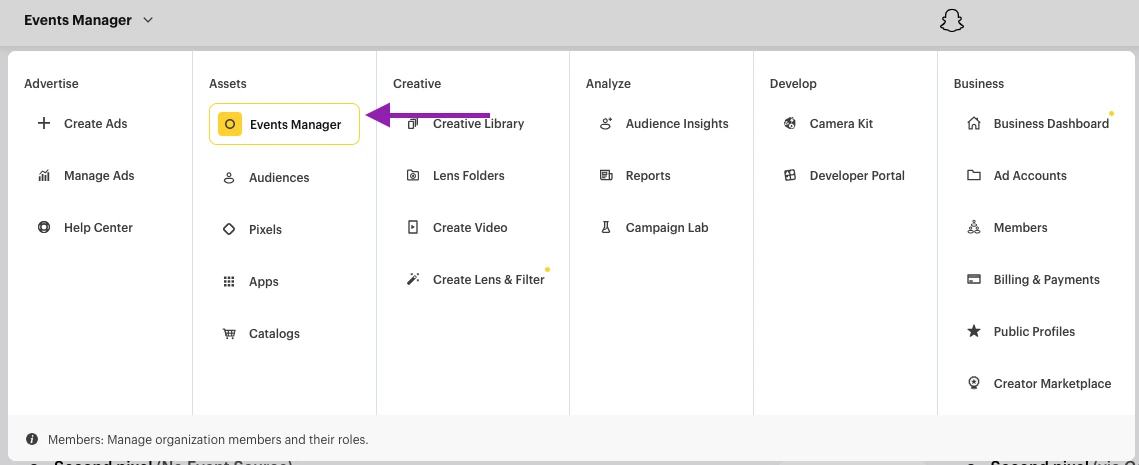
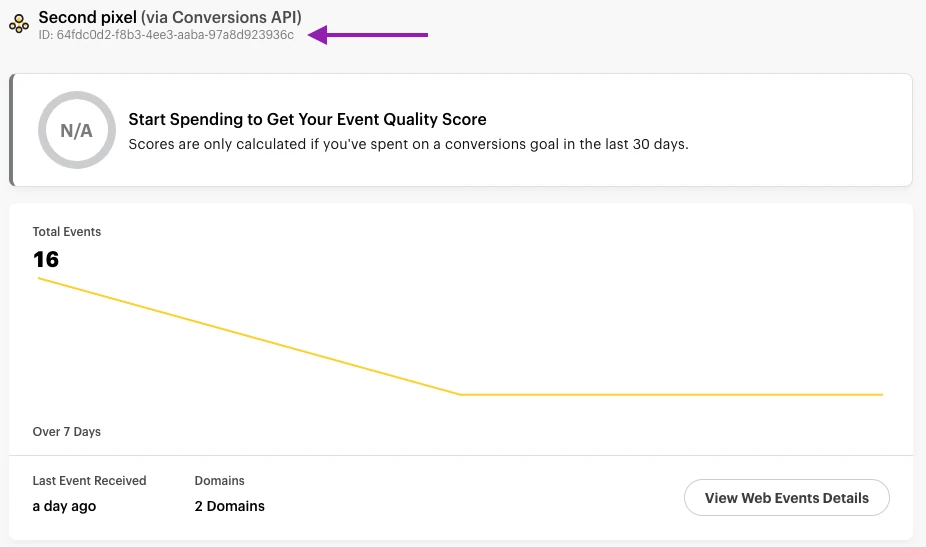
You need two things from Snapchat. Your Pixel ID is found in Snapchat's Events Manager, listed in the ID field right under the pixel's name.
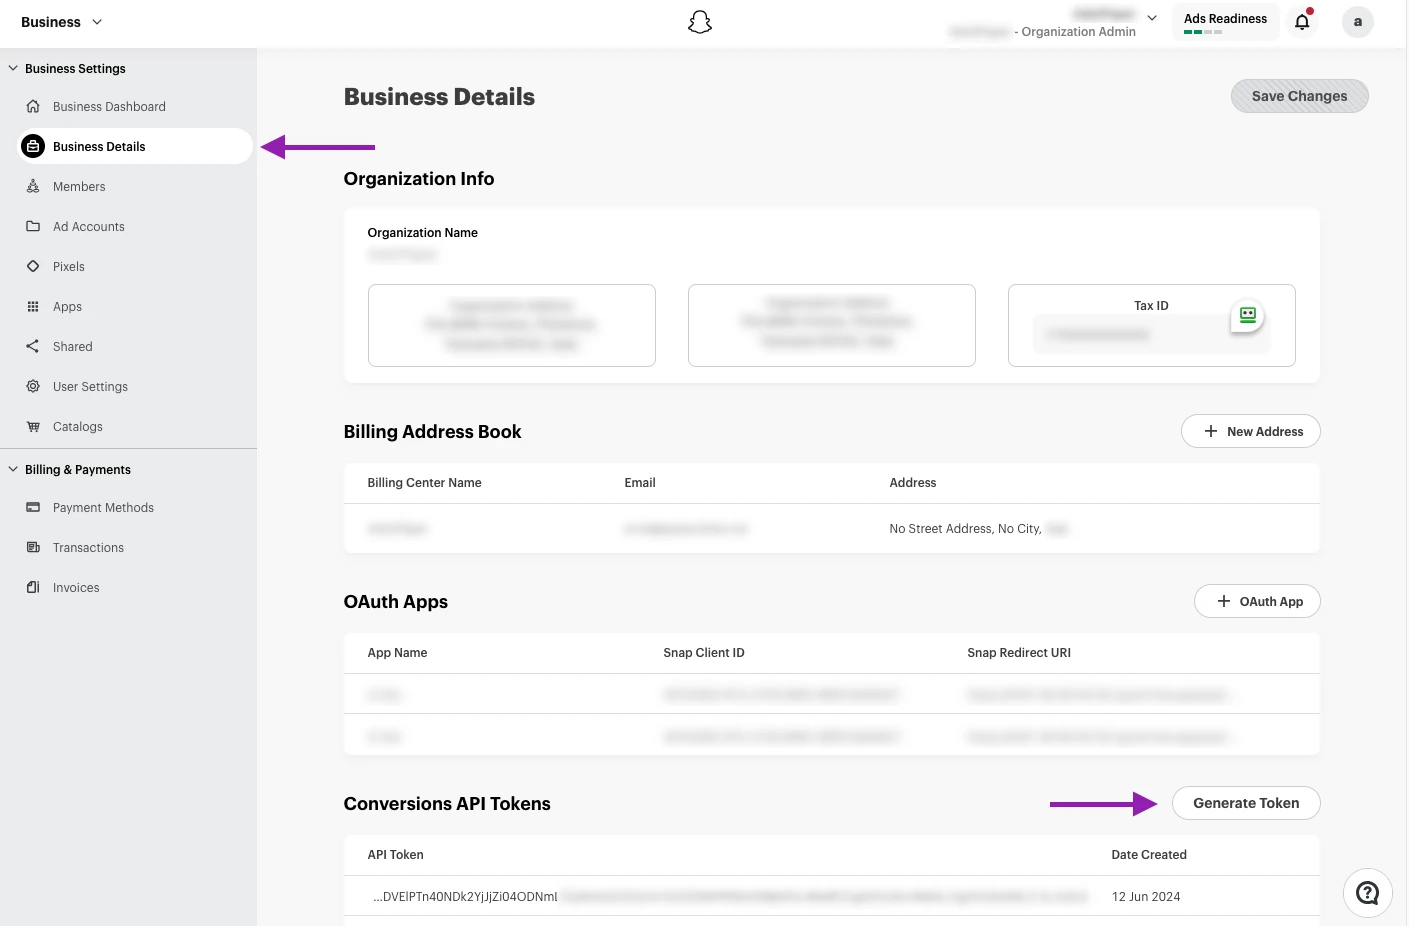
Your Conversion API token is generated separately: log in to Snapchat Ads Manager, open the Business Dashboard, click Business Details, scroll to the Conversions API Tokens section, and click Generate Token.
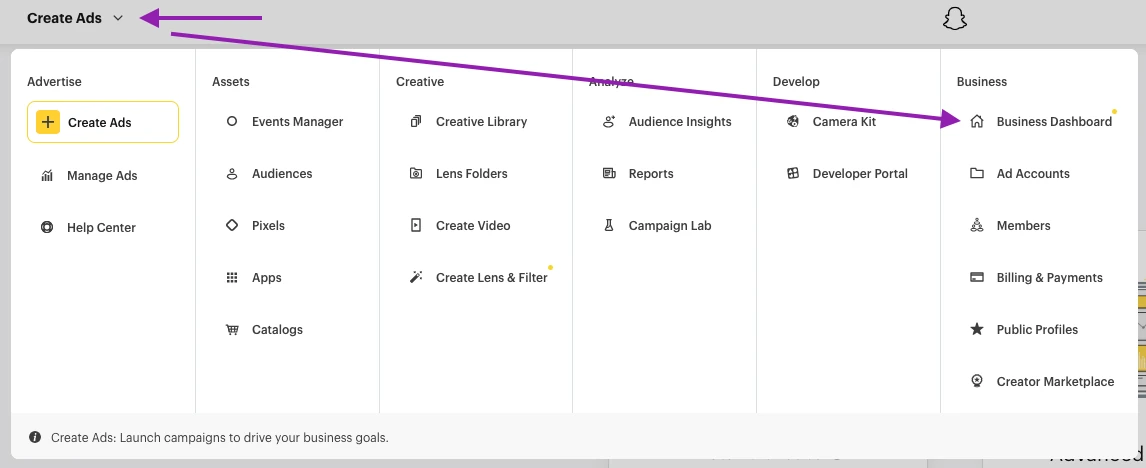
One useful detail is that the token is generated at the account level, so you do not need a new one for each pixel. Copy both and keep them somewhere safe.
Step 2: Create the Conversion API Integration in ClickFlare
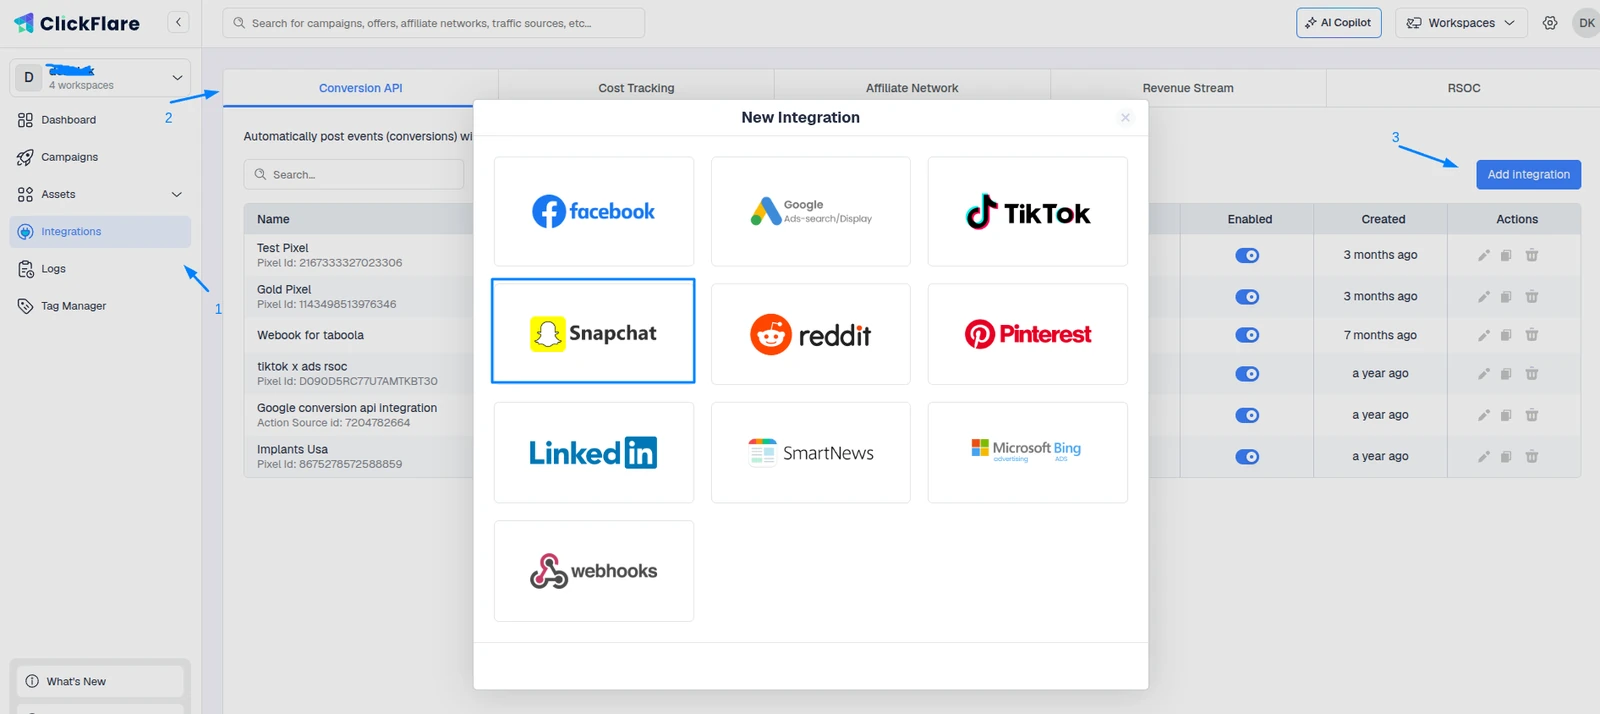
In ClickFlare, open the left sidebar and go to Integrations. Under Conversion API Integrations, click Add Integration and select Snapchat.
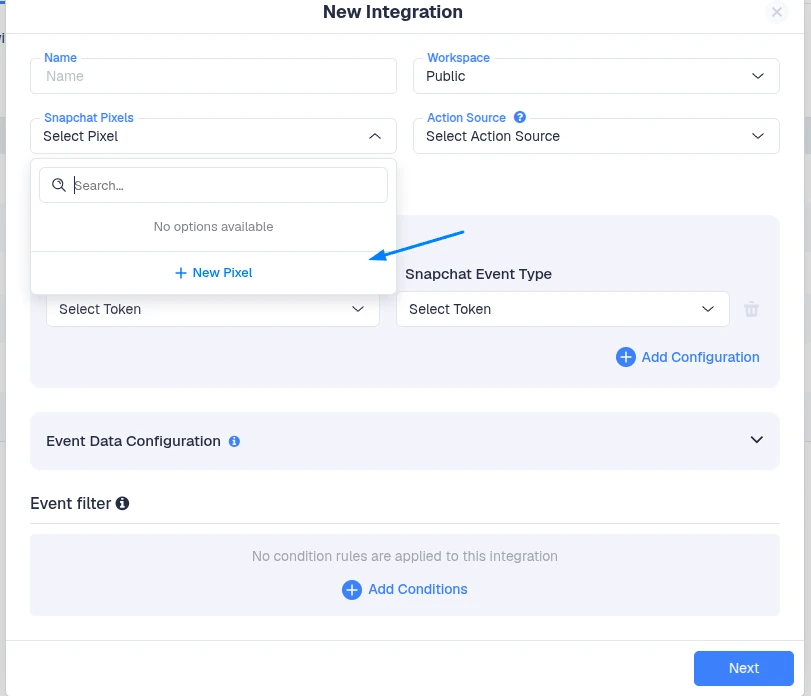
Click Add a New Pixel.
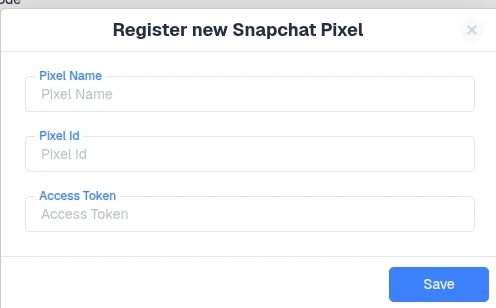
Give it a name, and paste in the Pixel ID and Conversion API token you copied earlier.
Step 3: Set Your Action Source and Map Events
Snapchat requires you to define an Action Source, so select where your events come from, such as Website if the data comes from a website or landing page, or App if it comes from an app.
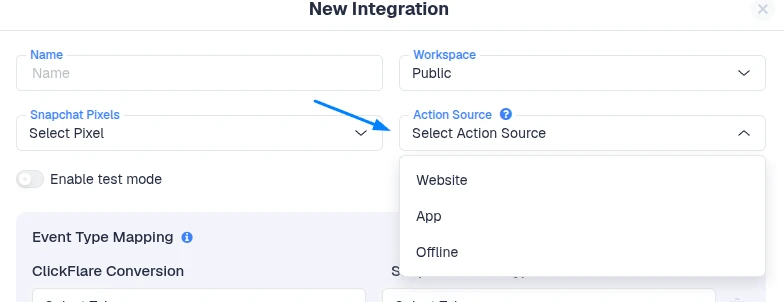
Then use Event Type Mapping to match your ClickFlare tracked events to Snapchat's standard events, or to custom events you have created. This mapping is what tells Snapchat which conversions to count and how, and you can send multiple event types.
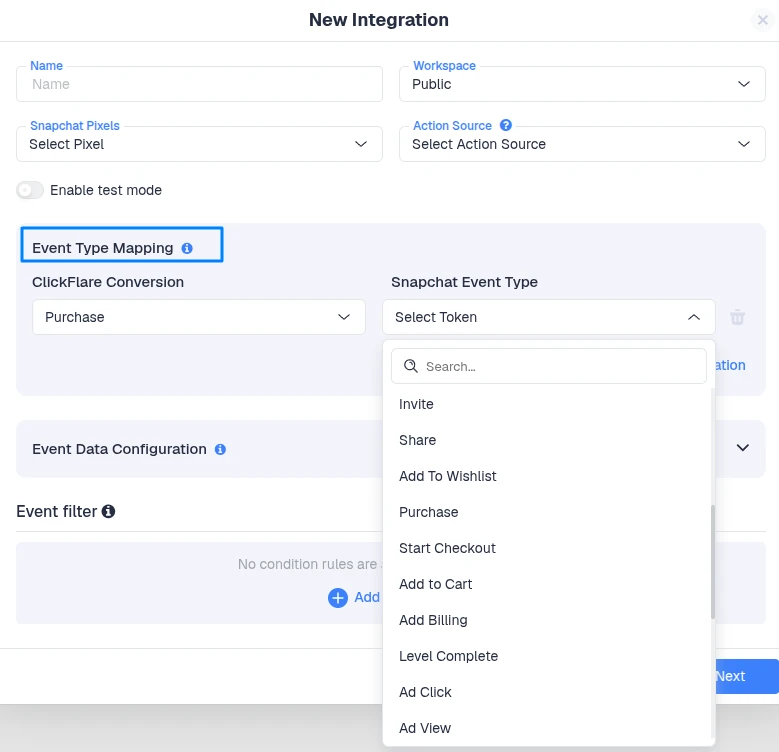
Step 4: Configure Event Data
Finally, use the Event Data Configuration to control what information is sent alongside each event. Some fields are grayed out because that information is passed to Snapchat by default, and some parameters are required by the traffic source and cannot be changed.
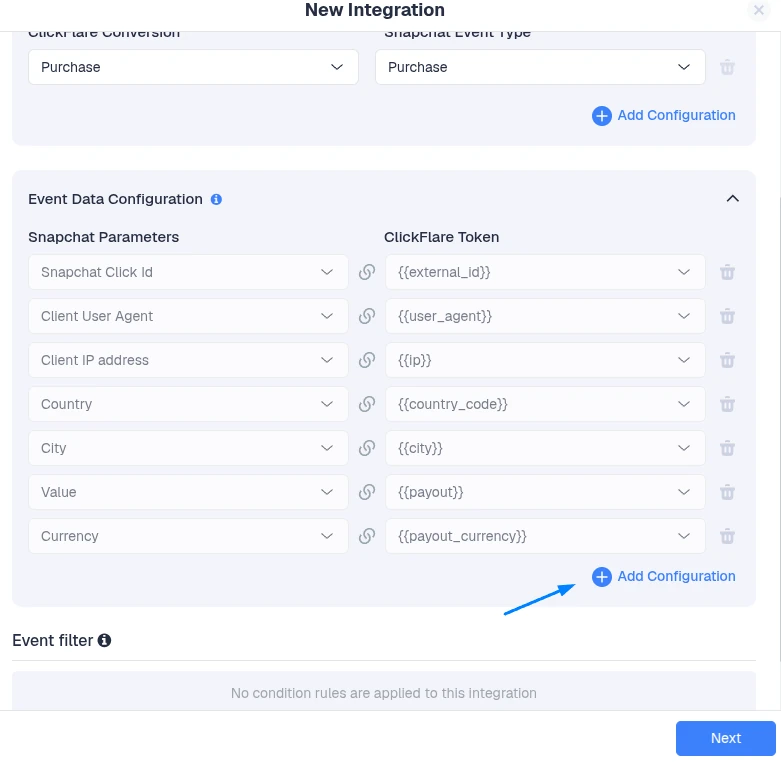
You can add more parameters to enrich each event, which helps Snapchat's algorithm optimize. When everything is set, click Save, and the new integration appears under the Conversion API section, firing your conversions to Snapchat automatically from that point on.
How to Track Snapchat Ad Costs in ClickFlare
Accurate conversions are only half of the ROI equation. To know whether a campaign is actually profitable, you also need your ad spend in the same dashboard. ClickFlare's direct Snapchat cost integration pulls your campaign, ad set, and ad costs automatically, with updates every hour. To set it up:
- On the left hand menu, go to Integrations.
- In the Cost Tracking Integrations section, click Add Integration and select Snapchat. Pick a workspace and name the integration.
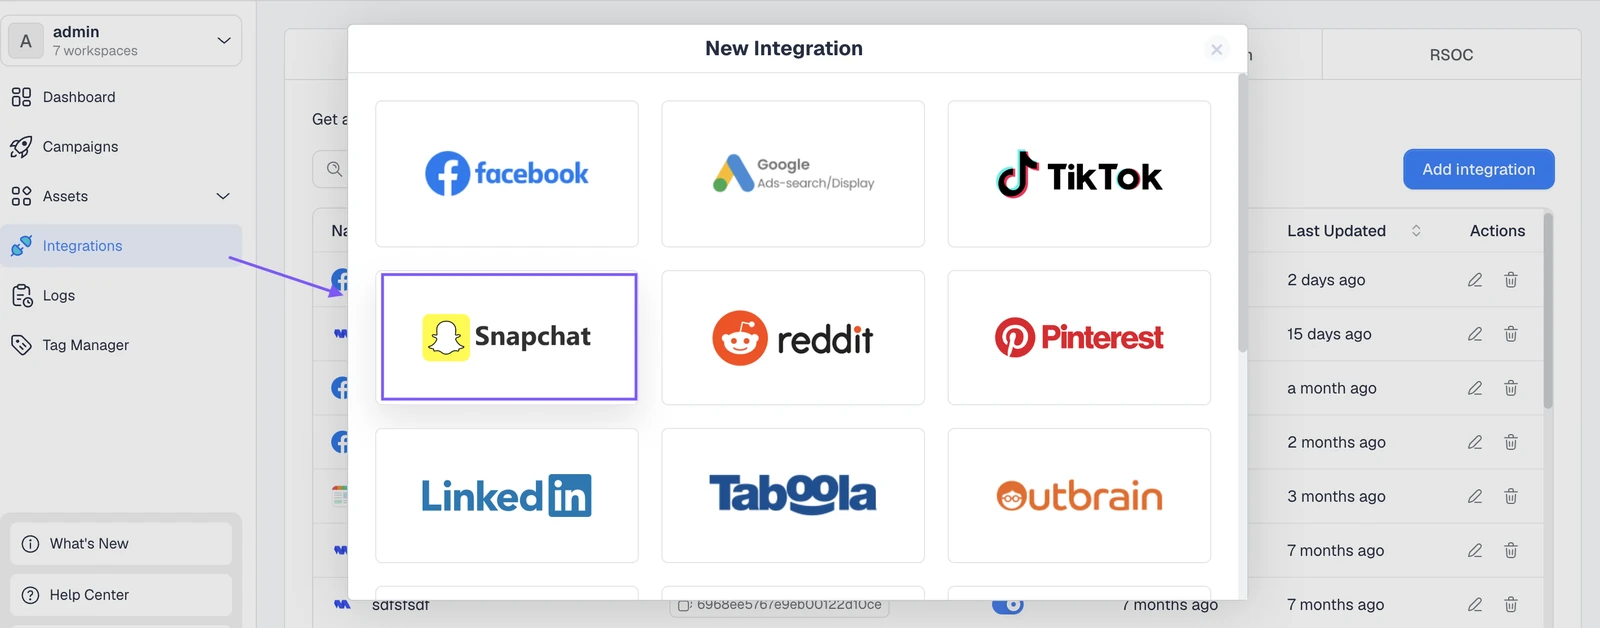
- Select your Snapchat account, or click Sign in with Snapchat to connect a new one, then choose your organization.
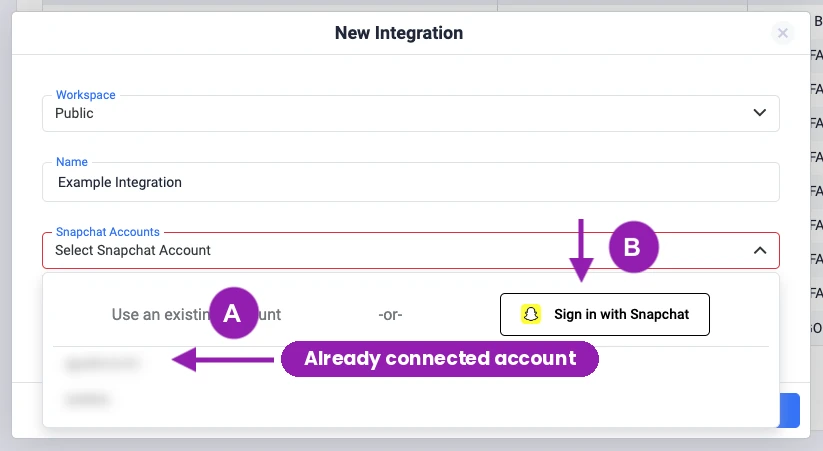
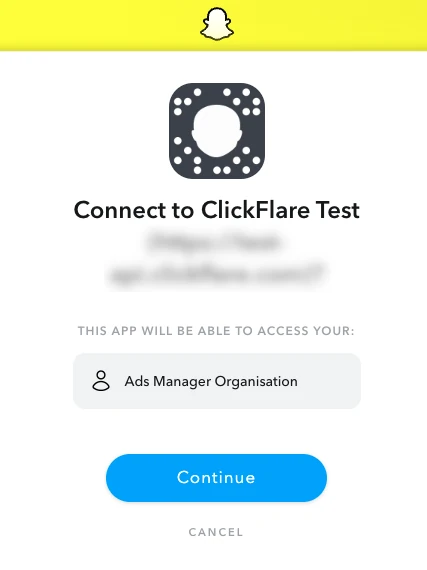
- Set a timezone that matches your Snapchat account and click Next. Choose the ad account or accounts you want costs pulled from, then link the integration to a traffic source and click Save.
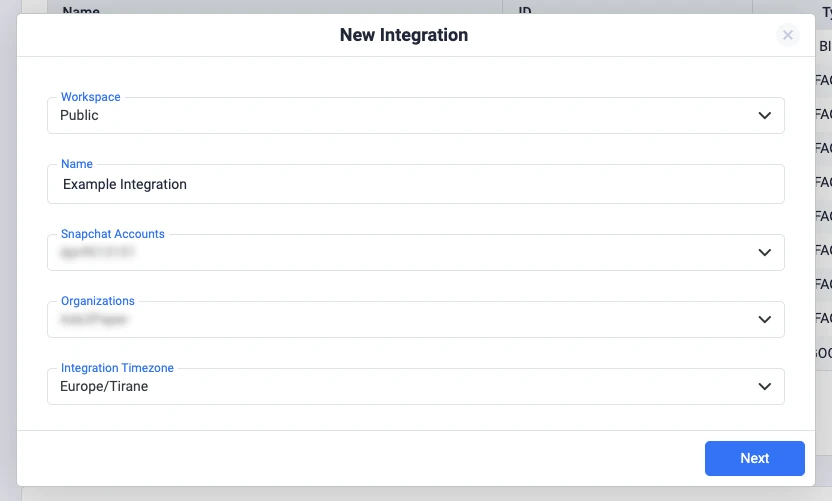
One detail worth repeating: you must link the cost integration to a traffic source, otherwise costs will not be pulled. With cost and conversion data flowing together, you get real revenue and ROI for every Snapchat campaign in a single view.
If you run an online store, our Shopify conversion tracking guide walks through the same setup end to end for ecommerce.
Common Snapchat Pixel Mistakes to Avoid
- Relying on the pixel alone. Browser-only tracking increasingly misses conversions. Without the Conversion API, you are underreporting and feeding Snapchat's algorithm an incomplete signal.
- Not deduplicating events. If the pixel and the Conversion API both send the same conversion without deduplication, you risk double counting and skewed data.
- Mismatched timezones. If your cost integration timezone does not match your Snapchat account, your spend and revenue will not line up correctly by day.
- Forgetting to link the cost integration. Creating the cost integration but not linking it to a traffic source means no cost data gets pulled at all.
- Never verifying the pixel fires. Skipping a quick check means you might scale spend on a pixel that is not even recording events.
Final Thoughts on the Snapchat Pixel
The Snapchat Pixel is where conversion tracking starts, but it is not where it should end. On its own, the browser-based pixel underreports thanks to iOS privacy changes, ad blockers, and cookie restrictions, which leaves you optimizing on incomplete data.
Pairing the Snapchat Pixel with server-side tracking through the Conversion API closes that gap, and adding accurate cost tracking on top lets you see true ROI for every campaign. A dedicated tracker like ClickFlare makes that full setup simple, connecting your pixel and Conversion API in a few steps and posting clean conversion data to Snapchat so its algorithm can do its best work for you.
Frequently Asked Questions
What Is the Snapchat Pixel?
The Snapchat Pixel is a piece of code placed on your website that reports visitor actions like purchases and signups back to Snapchat. It powers conversion reporting, feeds Snapchat's optimization algorithm, and builds the audiences used for retargeting campaigns.
How Do I Set Up the Snapchat Pixel?
Create the pixel in Snapchat's Events Manager, then install it on your site manually, through a tag manager, or via a partner integration like Shopify. Snapchat's official install guide covers the steps, and you should verify the pixel fires before scaling spend.
Why Does the Snapchat Pixel Underreport Conversions?
Because it runs in the browser, the Snapchat Pixel loses data to Apple's iOS 14 App Tracking Transparency changes, ad blockers, and cookie restrictions. Conversions that the browser cannot capture never reach Snapchat, which is why server-side tracking through the Conversion API matters.
What Is the Difference Between the Snapchat Pixel and the Conversion API?
The Snapchat Pixel tracks events in the visitor's browser, while the Conversion API sends them server-to-server directly to Snapchat. The pixel is easy to install but affected by privacy restrictions, whereas the Conversion API is far more reliable. Used together, they give the most accurate data.
How Do I Track the Snapchat Pixel with ClickFlare?
Copy your Snapchat Pixel ID and Conversion API token, then in ClickFlare go to Integrations, add a Snapchat Conversion API integration, paste in your credentials, set the action source, map your events, and save. ClickFlare then fires conversions to Snapchat server-side.
Need a hand with Snapchat Pixel tracking?
Try out ClickFlare for free and book a call with one of our tracking specialists who will guide you through the entire process.
TRY CLICKFLARE FREE FOR 14 DAYS →