

- Out to ImageAdvantage: the ClickFlare click ID travels in the
click_idparameter of the offer (feed) URL. - Back to ClickFlare: every hour, ClickFlare pulls your revenue from the ImageAdvantage API and matches it to the original click by that click ID.
At a glance
To set up ImageAdvantage with ClickFlare:- Create the custom conversion.
- Open a new ImageAdvantage integration.
- Connect your ImageAdvantage account.
- Pick the conversion and save.
- Add the click ID to your offer URL.
How the data flows
Revenue comes in through the API pull, not through a postback. If the offer URL doesn’t carry
click_id={cf_click_id}, ClickFlare has nothing to match the revenue to.What you’ll need
- An active ClickFlare account with your own tracking domain. Shared domains get flagged. See Tracking domains.
- An ImageAdvantage account, with the email and password you log in with and your ImageAdvantage account ID. If you don’t know your account ID, ask your ImageAdvantage account manager.
- Your ImageAdvantage feed URL and the parameters it needs. These come from your ImageAdvantage account manager.
- A custom conversion for the imported revenue, for example
imageadvantage_revenue. Create it under Custom conversions. - Optional: a second custom conversion for delayed revenue, for example
delayed_conv.
Set up the integration
1
Create the custom conversion
Go to Settings → Custom Conversions and add the conversion the ImageAdvantage revenue will be recorded as. Leave Include in Revenue and Include in Conversions on for this one, so the revenue shows in your main columns.If you plan to use delayed revenue postback, create the delayed conversion now too. See Delayed revenue postback for how to set it.
2
Open a new ImageAdvantage integration
Go to Integrations → RSOC, click New integration and choose ImageAdvantage.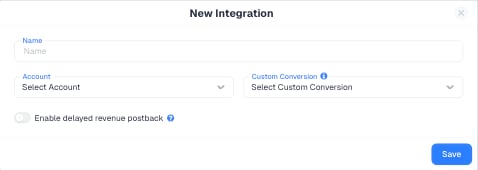
3
Name the integration
Enter a Name you’ll recognize later, for example ImageAdvantage Main.
4
Connect your ImageAdvantage account
Open the Account dropdown and click + Connect Account. The New Account form opens. Fill in: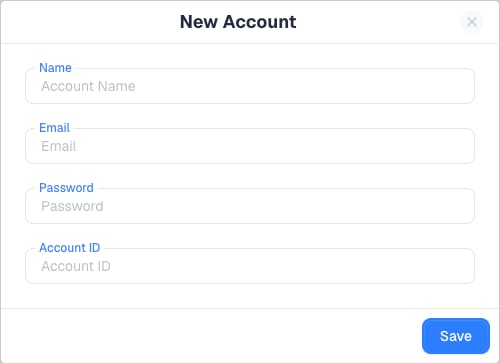
- Name: a label for this account in ClickFlare.
- Email: the email you log in to ImageAdvantage with.
- Password: your ImageAdvantage password.
- Account ID: your ImageAdvantage account ID.
5
Choose the custom conversion
In Custom Conversion, pick the conversion you created in step 1. Every bit of revenue ClickFlare pulls from ImageAdvantage is recorded as this conversion.
6
Save
Save the integration. To send settled revenue to your traffic source as well, turn on delayed revenue postback first (next section).
Delayed revenue postback
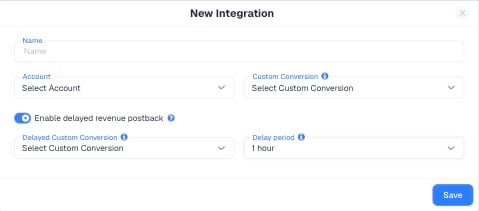
Feed revenue often isn’t final when it first appears. Most traffic sources, Meta and TikTok included, keep the value of the first conversion they receive and ignore later updates. If you forward the conversion straight away, your traffic source optimizes on numbers that may still change. Delayed revenue postback solves this with a second conversion. Turn on Enable delayed revenue postback in the integration. The tooltip explains it: Enabling this option allows you to set a delay period after which the custom conversion is posted to the selected ‘Delayed Custom Conversion’. Two fields appear:- Delayed Custom Conversion: the conversion ClickFlare posts once the delay period is over.
- Delay period: how long ClickFlare waits. Choose 1, 2, 3, 4, 5, 8 or 12 hours.
- Go to Integrations → Conversion API and edit your traffic source’s integration, for example Facebook.
- Under Event Type Mapping, map the delayed conversion to the event your traffic source optimizes on. For Facebook, use Purchase, since it carries a value.
- Save.
Build the offer URL in your campaign
Do this from inside the campaign that sends traffic to ImageAdvantage. See Creating a campaign if you’re starting from scratch.1
Open the campaign
Open the campaign in the campaign editor and go to the step of its flow that leads to ImageAdvantage.
2
Add the ImageAdvantage offer
Add an offer whose URL is your ImageAdvantage feed URL, with the parameters your account manager gave you.
3
Append the click ID
Add If the feed URL has no
&click_id={cf_click_id} to the end of the URL. Keep the braces: ClickFlare replaces {cf_click_id} with the real click ID on every visit.? yet, start the parameter with ?click_id= instead of &click_id=.4
Save the campaign
Save. New clicks now carry the click ID to ImageAdvantage.
Verify the setup
- Open your campaign’s tracking link in a browser. When you land on ImageAdvantage, check the address bar:
click_id=should be followed by a long ID, not by{cf_click_id}. - Send a small amount of real traffic and let it earn.
- Wait for the next hourly pull. Then open the campaign report in ClickFlare and add the column for your ImageAdvantage custom conversion. Revenue should appear on the campaign that sent the traffic.
- If you turned on delayed revenue postback, check that the delayed conversion appears after the delay period, and that it reaches your traffic source.
- Compare ClickFlare’s revenue with your ImageAdvantage reporting for the same period. If the numbers differ, ask your account manager which time zone ImageAdvantage reports in and set your ClickFlare report to match.
Troubleshooting
No revenue shows in ClickFlare
No revenue shows in ClickFlare
- Check that the offer URL contains
click_id={cf_click_id}and that the address bar shows a real ID after you click through. - Check that the integration is saved with an account and a Custom Conversion selected.
- Add your custom conversion’s column to the report.
- Wait for the next hourly pull before checking again.
The account won't connect
The account won't connect
Check the Email, Password and Account ID in the New Account form. They must match your ImageAdvantage login and the account ID ImageAdvantage gave you. If you changed your ImageAdvantage password, update it in ClickFlare. If it still fails, ask your ImageAdvantage account manager to confirm the account ID.
Revenue shows on ImageAdvantage but not on the right campaign
Revenue shows on ImageAdvantage but not on the right campaign
The revenue is matched by click ID. Traffic that skipped your ClickFlare link, or used a parameter name other than
click_id, can’t be matched; the name must be exactly click_id. Make sure every ImageAdvantage link in your campaigns has &click_id={cf_click_id}.ClickFlare and ImageAdvantage totals don't match
ClickFlare and ImageAdvantage totals don't match
Compare the same time zone and date range on both sides. Revenue that ImageAdvantage adjusts later also changes between pulls.
FAQ
Does ClickFlare integrate with ImageAdvantage?
Does ClickFlare integrate with ImageAdvantage?
Yes, through an API integration. You connect your ImageAdvantage account with your email, password and account ID, and ClickFlare pulls your revenue every hour and matches it to each click.
How often does ClickFlare get ImageAdvantage revenue?
How often does ClickFlare get ImageAdvantage revenue?
Every hour. Each pull matches the revenue to the click through the
click_id value.Do I need to set a postback in ImageAdvantage?
Do I need to set a postback in ImageAdvantage?
Not for revenue. The integration pulls revenue through the ImageAdvantage API. What you need is the click ID in the offer URL.
Can I connect more than one ImageAdvantage account?
Can I connect more than one ImageAdvantage account?
Yes. Add another account with + Connect Account and create a separate integration for it, with a name that tells them apart.
What currency and time zone does ImageAdvantage report in?
What currency and time zone does ImageAdvantage report in?
Ask your ImageAdvantage account manager, then set your ClickFlare reports to the same time zone when you compare numbers.
Related
Delayed revenue
Send settled revenue to traffic sources
Custom conversions
Create the conversion types
About RSOC
How RSOC tracking works