

Black Friday came early. Early-access prices until Nov 8.Black Friday: early-access prices until Nov 8.Early-access price ends in0d00h00m00sClaim the deal



If your Taboola campaigns are spending money but your conversion numbers look thin or empty, the problem is almost always the tracking setup, not the campaign. Taboola conversion tracking runs on server-to-server (S2S) postbacks, which means conversions are passed from your tracker's server straight to Taboola's, without depending on a pixel surviving in the browser.
Done right, it tells Taboola exactly which clicks turned into leads or sales, so its algorithm can optimize toward the traffic that actually makes you money. This guide walks through the full S2S setup in ClickFlare step by step, plus how to pull in cost data and manage publisher sites once your tracking is live.
Quick Summary
Taboola conversion tracking is the process of recording what happens after someone clicks your Taboola ad, from a page view to a lead or a purchase, and reporting that action back to Taboola so it can measure and optimize your campaigns. Taboola's advertising platform is called Realize, and that's where you create conversion events and check whether they're being received.
The important detail is how that conversion data gets back to Taboola. Taboola supports server-to-server (S2S) postback tracking, where the conversion is reported from your tracker's server directly to Taboola's server. It does not rely on a browser pixel or a Conversion API the way some other platforms do, as Taboola explains in its own S2S conversion tracking documentation. That makes the click ID the backbone of the whole setup.
When someone clicks your ad, Taboola generates a unique {click_id} and attaches it to your destination URL, and your tracker stores that ID against the visit. If that visitor later converts, your tracker fires a postback to Taboola that includes the same click ID, and Taboola matches the conversion to the original click. No click ID stored means no conversion reported, which is why most 'Taboola isn't tracking' problems trace back to a missing or broken click ID.
Native platforms like Taboola send traffic across thousands of publisher sites, and the people clicking are often outside the walled gardens of Meta or Google. Browser-based tracking struggles in that environment because of ad blockers, cookie restrictions, and privacy changes across browsers and devices. Server-side tracking sidesteps all of that.
Because a postback is a server-to-server call, it isn't affected by what the browser does or doesn't allow. The conversion is logged on your tracker when it genuinely happens, then handed to Taboola directly. If you want the underlying mechanics in plain terms, our complete guide to server-side tracking breaks down why it has become the default for serious media buyers.
Two things to be clear about with Taboola specifically. First, there is no Taboola Conversion API in this flow; conversions are reported through the S2S postback only. Second, the tracking template does not pass cost back automatically, so cost reporting is handled by a separate integration covered later in this guide. And if you're still choosing a native source, our roundup of the best native advertising platforms is a good starting point.
Before jumping into the dashboards, it helps to picture the whole setup. Taboola conversion tracking has two sides that have to line up: a conversion event you create in Taboola, and a postback in ClickFlare that reports conversions back to that event. ClickFlare does the heavy lifting here, storing the click ID and firing the postback, while Taboola receives the data and uses it to optimize bidding.
So the plan for the rest of this guide is simple: build the ClickFlare side, create the matching event on the Taboola side, connect them with a postback, then test. Here's what to have ready before you begin:
The setup has two sides that need to match: a conversion event in Taboola, and a postback in ClickFlare that references that event by name. Here's the full sequence.
In ClickFlare, go to Campaigns and click New. Under Traffic Source, open the dropdown and click + New Traffic Source, type taboola in the search box, and select the Taboola template. Give it a name such as Taboola, and leave Cost currency on USD unless your Taboola account bills in a different currency.
The Taboola template pre-fills a set of tracking parameters, including the one that matters most, externalId. This maps Taboola's {click_id} into ClickFlare's External ID field, which is what the postback uses later. The other parameters pull useful reporting data like the publisher site, campaign, and creative.
| Parameter | Taboola Macro | What It Captures |
|---|---|---|
| externalId (required) | {click_id} | The unique click ID used to attribute conversions |
| site | {site} | Publisher site name |
| site_id | {site_id} | Publisher site ID |
| campaign_id | {campaign_id} | Taboola campaign ID |
| creative_name | {creative_name} | Creative name for reporting |
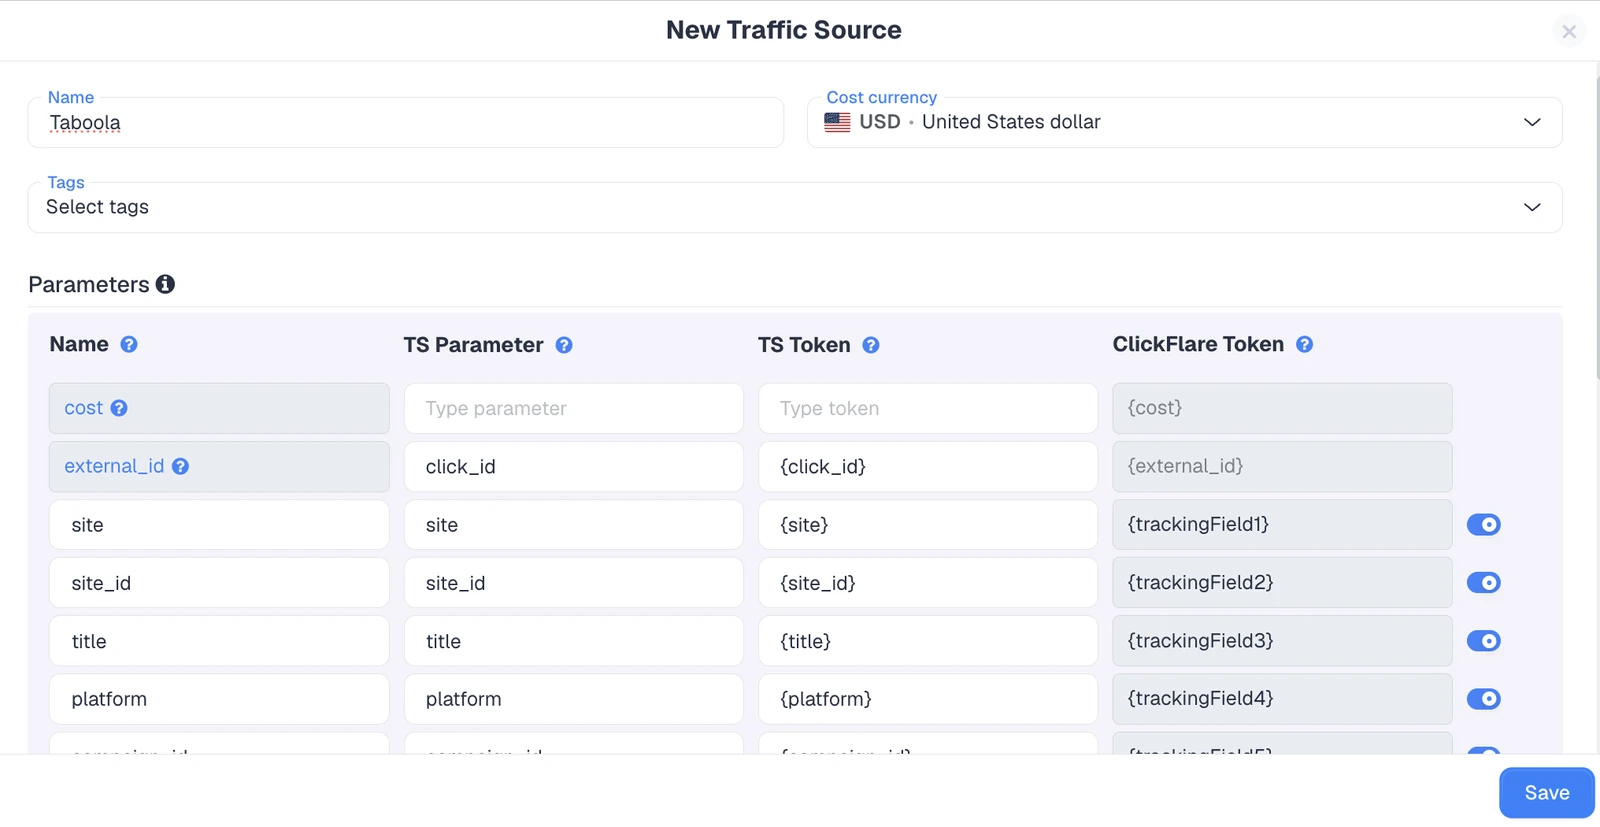
You can click Add Parameter to pass extra Taboola data such as {site_domain}, {campaign_group_id}, {custom_id}, or {timestamp}. Just don't edit or remove the externalId row. Without {click_id} in the campaign URL, Taboola has nothing to match conversions against.
Now hop over to Taboola Realize. Select your account at the top left and click Tracking in the sidebar, then + New Conversion. Choose Create conversions using code and click Continue. From here:
make_purchase. Keep Include in total conversions ticked for the event you want Taboola to optimize on.The Event Name is the critical value to write down. It allows only letters, numbers, underscores, and dashes, no spaces, and it is case-sensitive. The postback matches on this exact Event Name, not the friendlier Conversion Name, so make_purchase and Make_Purchase are two different things to Taboola.

Back in the ClickFlare New Traffic Source form, scroll to Passing conversion info to traffic source and turn on Traffic source postback URL. The template fills in the Taboola postback for you. In the dropdown on the left, choose which ClickFlare event should fire it, keeping Conversions for all conversions or selecting a specific custom conversion.
The postback the template generates points to Taboola's server and carries the click ID, payout, and currency:
https://trc.taboola.com/actions-handler/log/3/s2s-action?click-id={external_id}&name=REPLACE_EVENT_NAME&revenue={payout}¤cy={payout_currency}

Two things to do here before saving. First, replace REPLACE_EVENT_NAME with the exact Taboola Event Name from Step 2 (so name=make_purchase). Leaving the placeholder in, or mistyping the name by even one character, makes Taboola drop the conversion. Second, confirm the token on the click ID is click-id with a hyphen, which is Taboola's parameter, paired with ClickFlare's {external_id} token. Then click Save.
A quick note on the mirror between the two URLs that trips people up. In the campaign URL, you pass ClickFlare's click_id parameter filled by Taboola's {click_id} macro. In the postback URL, it flips: you use Taboola's click-id parameter filled by ClickFlare's {external_id} token. If you need a refresher on how the whole round trip works, our beginner's guide to postback URLs covers it end to end.
On currency: {payout_currency} is dynamic and will send whatever currency the conversion was logged in. If every offer pays in one currency, you can hardcode it instead, such as ¤cy=USD. Taboola expects a three-letter, capitalized code, and if the parameter is missing it falls back to your account default.
Finish building the ClickFlare campaign (set the cost model, choose Redirect or Direct, add your lander and offer), then open Tracking, select your tracking domain, and copy the campaign URL. If you use a lander, make sure its call-to-action links to the ClickFlare click URL, not straight to the offer, or the click won't be tracked.
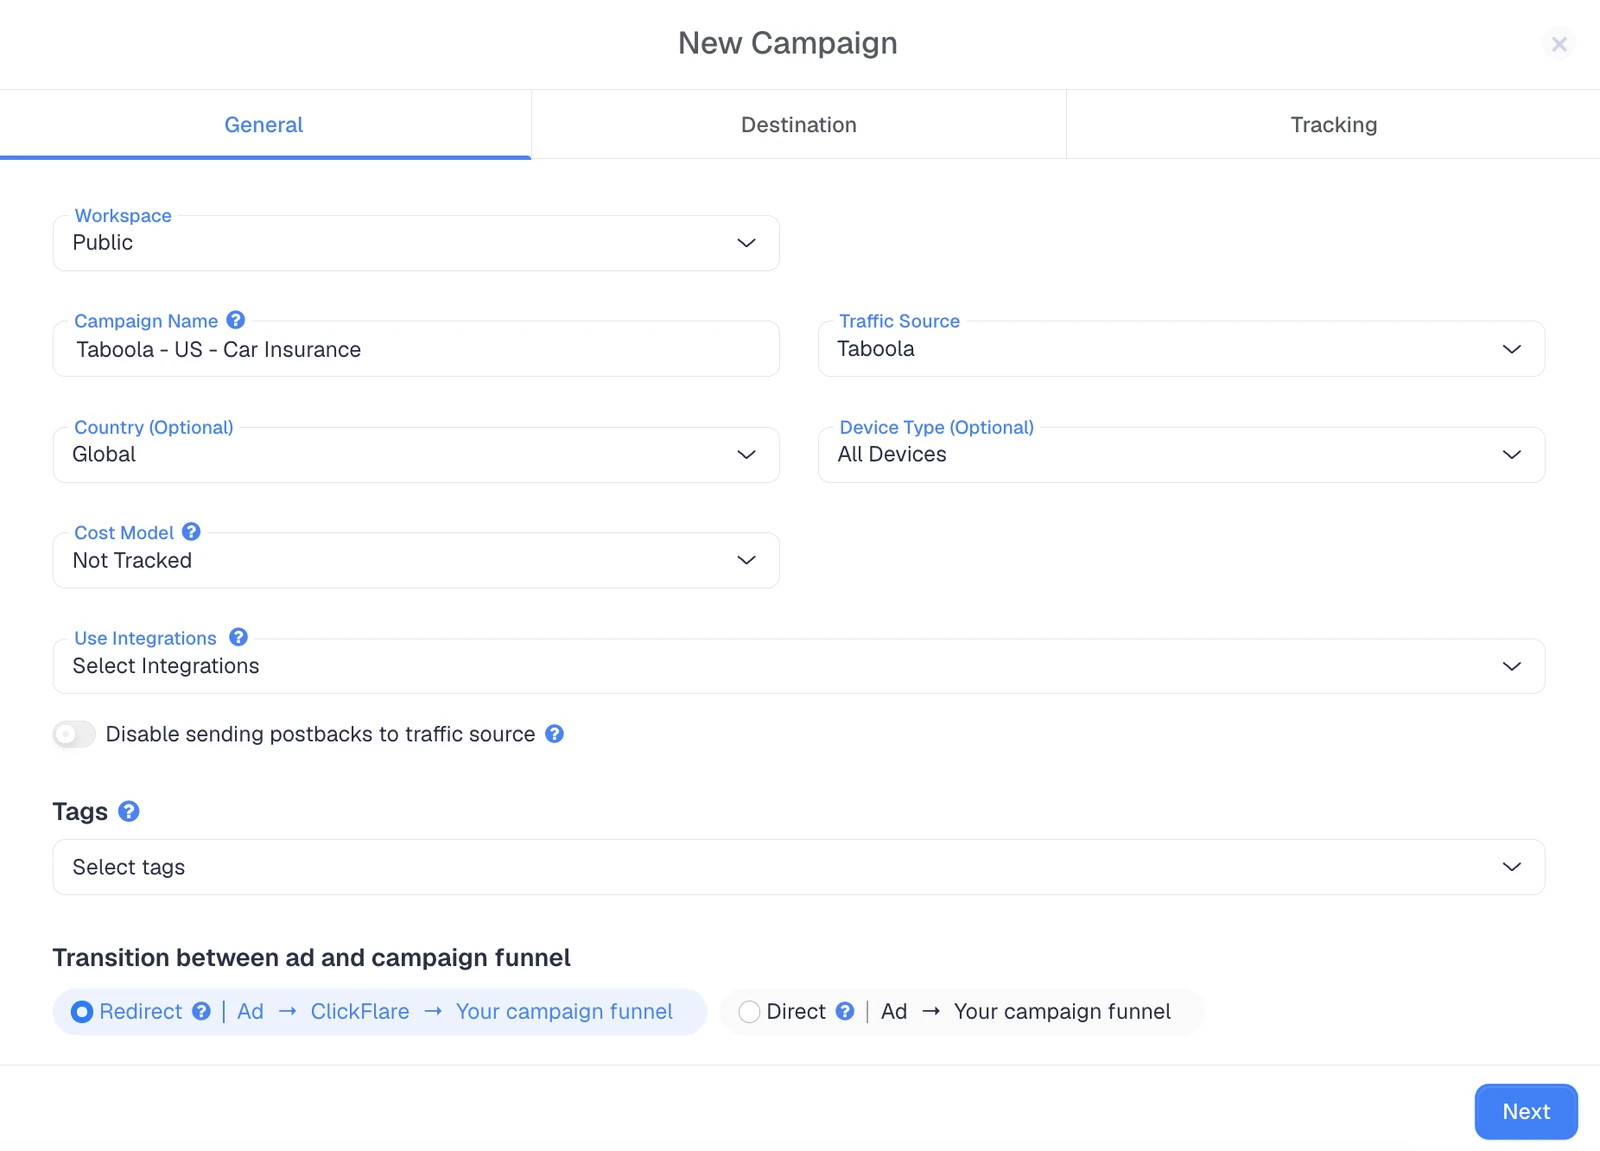
In Taboola, you have two ways to attach that URL, and you should use one, not both:
| Where | What to Enter | Note |
|---|---|---|
| Each ad's URL field | The full ClickFlare campaign URL | Editing it later sends the ad back to policy review |
| Campaign Tracking Code section | Everything after the ?, without the ? | Applies to all ads; editing doesn't trigger review |
New Taboola campaigns often start with utm_source=taboola&utm_medium=referral already in the Tracking Code, and Taboola appends its own tblci value to ad URLs. That's fine. Just make sure your click_id parameter stays intact, because that's what ClickFlare reads.
Don't trust a setup you haven't tested. Click your own ad (or wait for live clicks) and complete the offer, then run through these checks:
{click_id}. A literal macro means the parameter isn't being filled.Taboola shows one of three statuses for each conversion:
| Status | What It Means |
|---|---|
| No Activity Yet | No event received yet; usually an event-name mismatch |
| Active | Events received within the last 7 days |
| No Recent Activity | Worked before, but nothing in the last 7 days |
Most funnels have more than one step worth tracking, such as a lead and then a purchase. Taboola handles this cleanly as long as each step is set up on both sides.
Create one Taboola conversion per step (for example lead and make_purchase), and one matching ClickFlare custom conversion per step. On the ClickFlare traffic source, click + Another postback URL for each extra event, point each one at the right ClickFlare event, and set its &name= to the matching Taboola Event Name.
Keep Include in total conversions ticked only on the events that should influence bidding, usually your main conversion. Taboola will still record the others for reporting without letting them skew optimization. If you want to send only a subset of conversions on a given postback, use the Event filter option under the postback.
Conversion tracking tells you what's converting. Cost data tells you whether it's profitable. ClickFlare has a dedicated Taboola cost integration that pulls campaign, content, and widget (publisher) costs in through its API connection with Taboola, so your spend, profit, and ROI sit right next to your revenue.
For this integration you'll need a Taboola Client ID and Client Secret. These come from your Taboola account manager or Taboola support, and requesting them is not instant, so it's worth starting that request early. To connect it:
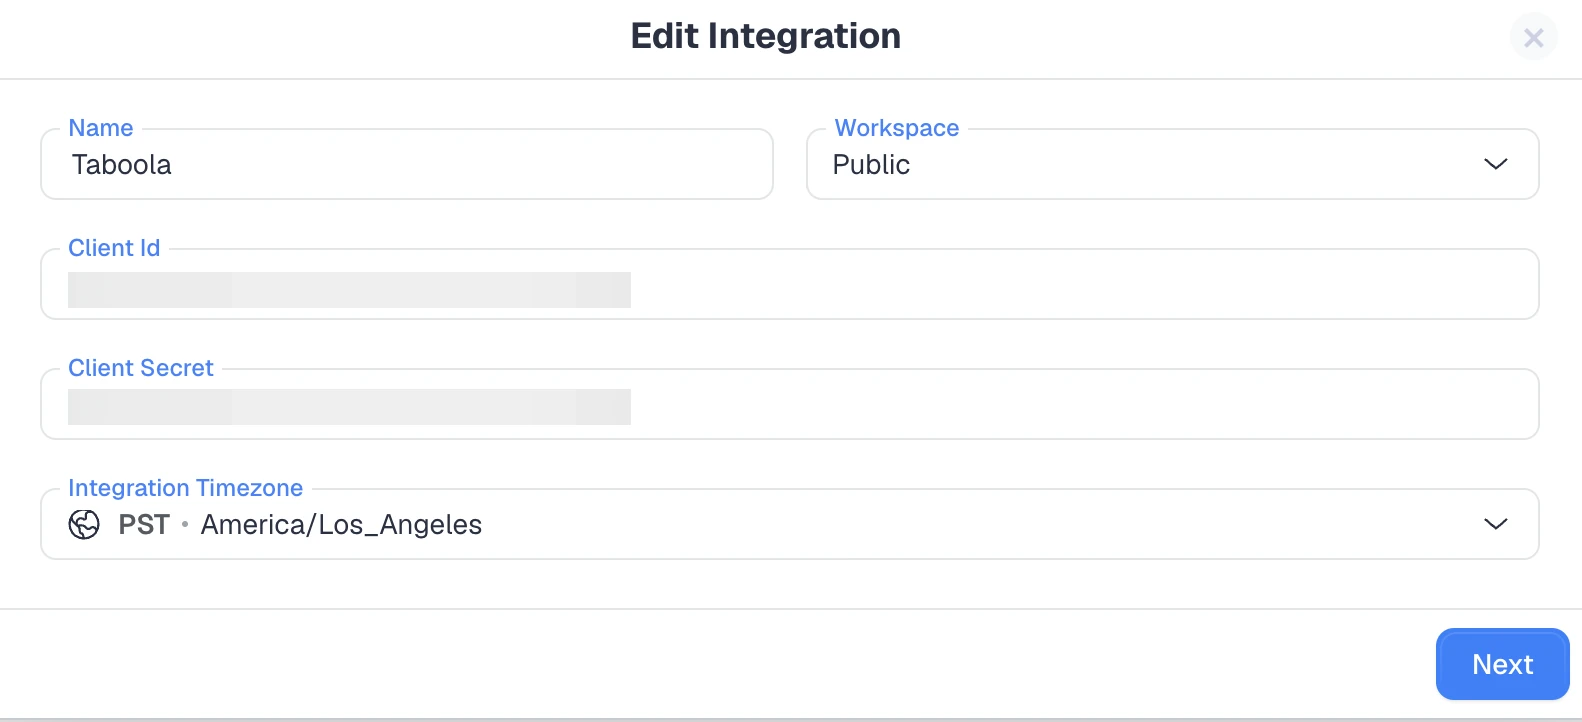
If you select the new integration on the traffic source, costs flow into ClickFlare on their own. If you forget that last step, costs simply won't pull, which is the most common reason spend shows up empty. Seeing cost and revenue side by side is also what makes mismatches easy to spot, and our guide on why conversions don't match across platforms explains the usual culprits.
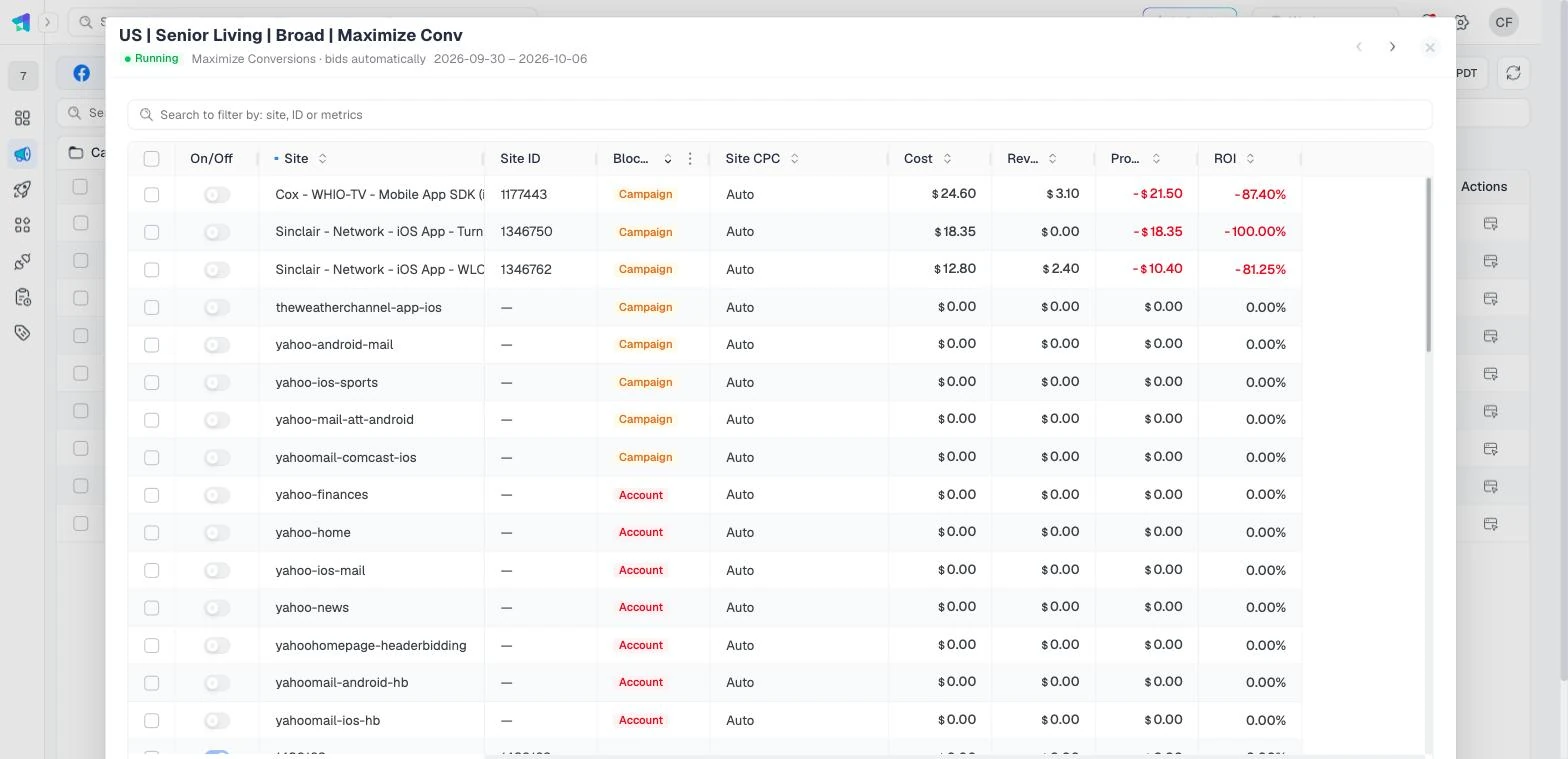
Once tracking and cost are both flowing, you can act on the data without leaving ClickFlare. In Ads Manager, each Taboola campaign has a Manage sites button in the Actions column that opens a site report listing every publisher site the campaign ran on, with columns for site CPC, cost, revenue, profit, and ROI.
A switch next to each site blocks or unblocks it directly on Taboola, and a Blocked column shows whether a site is blocked for that campaign, for the whole account, or not at all. Sorting by cost or ROI makes it easy to find the sites burning budget without returning anything, so you can cut them in a couple of clicks.
You're not limited to site management either. From the same Ads Manager screen you can start and pause your Taboola campaigns and ads, and change their budgets, all without logging back into Taboola. Note that these write actions need a one-time reconnect of the integration to grant write permission.
Almost every Taboola tracking issue comes down to a handful of recurring errors. Check these first:
click-id with a hyphen. Changing it to click_id stops attribution.{click_id} instead of a real value, the campaign URL isn't passing the macro, so fix the parameter before anything else.Taboola conversion tracking isn't complicated once you see the shape of it: Taboola passes a click ID, your tracker stores it, and a server-side postback sends the conversion back with that same ID and the exact Event Name attached. Get the click ID and the event name right, add the cost integration, and you have accurate, browser-proof data feeding both your reports and Taboola's optimization. From there, Ads Manager turns that data into action by letting you prune the publisher sites that aren't paying their way and adjust campaigns on the spot. Set it up once, test it properly, and your Taboola campaigns stop running blind.
Taboola conversion tracking in ClickFlare runs on a server-to-server (S2S) postback, not a Conversion API. Taboola passes a click ID on the click, and your tracker reports the conversion back to Taboola's server with that same ID attached.
This almost always means the event name in your postback doesn't match the Event Name in Taboola. The match is case-sensitive, so check for typos, capitalization differences, or a leftover REPLACE_EVENT_NAME placeholder in the postback URL.
The tracking template doesn't pass cost. You need the separate Taboola cost integration, connected with your Client ID and Client Secret and then assigned to the traffic source. If that integration isn't selected on the traffic source, costs won't pull.
The {click_id} is a unique identifier Taboola attaches to each click. ClickFlare stores it as the visit's External ID and sends it back on the postback, which is how Taboola matches a conversion to the ad click that caused it.
Yes. Create a separate conversion event in Taboola for each step, such as a lead and a purchase, add a matching ClickFlare custom conversion, and add one postback URL per event. Keep 'Include in total conversions' ticked only on the event you want Taboola to optimize toward.
Need a hand with Taboola conversion tracking?
Try out ClickFlare for free and book a call with one of our tracking specialists who will walk you through the entire S2S setup.


