

- The offer URL sends the ClickFlare click ID to CPAlead in
subidon your direct offer link. - The postback URL sends it back to ClickFlare with every conversion, together with the payout and CPAlead’s unique lead ID. You save it once in CPAlead’s Postback Configuration.
At a glance
To set up CPAlead with ClickFlare:- Set up your domain and postback time.
- Create the CPAlead affiliate network.
- Save the postback in CPAlead.
- Copy the offer’s direct link.
- Create the offer and launch.
How the data flows
Offer URL = their parameter + your token. Postback URL = your parameter + their token. CPAlead writes the click ID into
subid on the way in and reads it back with the {subid} macro on the way out. The names to the left of = are ClickFlare’s; the macros in braces are CPAlead’s.What you’ll need
- An active ClickFlare account with your own tracking domain set up, on HTTPS. Shared domains get flagged by networks and blocked by browsers. See Tracking domains.
- A CPAlead publisher account.
- Direct offer links. The offerwall and lockers pass your own user IDs in
subidto reward users, which is a different flow. See Offerwall and lockers.
What the CPAlead template contains
ClickFlare has a CPAlead affiliate network template. It fills in the CPAlead macros ClickFlare needs.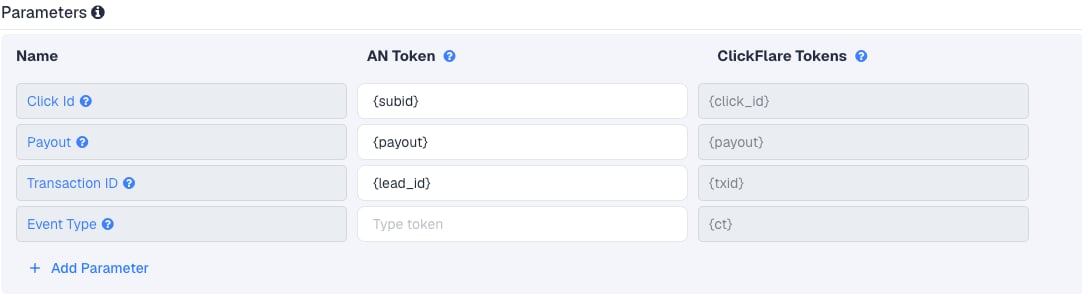
The offer parameter is
subid. CPAlead only accepts the macros it supports, in lowercase, and rejects anything else when you save or test the postback.
Setup
Everything in ClickFlare is done from inside the campaign editor. Create the offer and the affiliate network inline as you go.1
Set up your own tracking domain
Add a custom tracking domain before anything else, for example
trk.yourdomain.com, with SSL. CPAlead expects an HTTPS postback URL that answers directly, without redirects. The postback URL is built on this domain, so changing it later means updating it in CPAlead too. See Tracking domains.2
Report conversions by postback time
Go to Settings → General Settings and set Conversion registration time reporting to Postback Timestamp.CPAlead reports a conversion on the day it happened. With the default Visit Timestamp, ClickFlare reports it on the day of the original click, so a conversion or event that comes in days later lands on a different date in each platform. See Conversion registration time.
This is an account-wide setting. It changes the date conversions are reported on for every campaign.
3
Create the campaign
Go to Campaigns → New Campaign, choose Redirect tracking, pick your traffic source and select your tracking domain. See Creating a campaign.
4
Create the CPAlead affiliate network
While creating the offer for the campaign, create a new affiliate network in its Affiliate Network field. You can also create it first under Affiliate Networks → + New. Either way:
- Search for CPAlead and pick the template.
- Name it, for example “CPAlead”.
- Check the fields: Click Id
{subid}, Payout{payout}, Transaction ID{lead_id}. - Leave Event Type empty.
- Under Conversion tracking, select your own Tracking Domain and keep S2S Postback URL as the tracking method.
- Set Payout currency to the currency of your CPAlead account.
5
Save the postback in CPAlead
In CPAlead, open Postback Configuration. Then:
- Paste the ClickFlare postback URL into the URL field.
- Leave Postback Password empty. ClickFlare doesn’t check it, and adding
{password}to the URL would only send your secret along with every conversion. - Turn on Postback Enabled.
- Click Save. Turning on the switch alone doesn’t save it.
6
Get the offer's direct link from CPAlead
Copy the tracking link for the offer from your CPAlead account. A direct link looks like this:
id is the offer and pub is your publisher ID. Keep the tracking domain, offer ID and publisher ID as CPAlead gives them.7
Create the offer in ClickFlare
In the offer form:
- Name the offer.
- Select the CPAlead affiliate network you just created.
- Paste the CPAlead link into Offer URL with
&subid={cf_click_id}at the end:
subid, you can turn on Append Click ID to Offer Url instead. ClickFlare then adds subid={cf_click_id} from the template. Use one or the other, not both.Set the payout to Auto so ClickFlare uses the payout value from the postback.8
Add a lander (optional)
If you send traffic through a lander before the offer, the lander’s CTA must use the ClickFlare click URL, not the CPAlead link. ClickFlare then adds the click ID when it redirects to the offer. See Paths with landers and offers.
9
Save the campaign and launch
Save the campaign, copy the campaign URL from the Tracking tab and use it in your ads. Before you spend money on traffic, run the checks in Verify the setup.
Transaction ID
By default ClickFlare keeps one conversion per click ID. If several postbacks arrive with the same click ID and no transaction ID, ClickFlare treats them as the same conversion, and you only see one of them (the last one received). When they carry atxid, the same txid replaces the earlier conversion and a different txid adds a new one.
CPAlead’s {lead_id} is exactly what ClickFlare needs:
- Every conversion and every paid event gets its own
{lead_id}, so each one counts in ClickFlare. - CPAlead can deliver the same postback more than once when it retries after an error. A retry carries the same
{lead_id}, so it replaces the first one instead of counting twice.
{transaction_id} as another name for {lead_id}. Either works. Don’t use {subid} or {campaign_id} as the transaction ID: they are the same for every event on the click.
Event offers
Some CPAlead offers pay on several events for the same user, for example an install and then a level reached in an app. Each paid event arrives as its own postback, with its own{lead_id} and the event’s payout in {payout}. With txid={lead_id}, ClickFlare records each event as a separate conversion on the click. Events can arrive in any order.
To see events as their own conversion types, use CPAlead’s {event_key} macro as ct. It holds a key such as event_1, and is empty for ordinary conversions:
- Create a custom conversion in ClickFlare for each event you want as a column, with the parameter
event_1,event_2and so on. - Add
&ct={event_key}to the end of the postback URL in CPAlead:
¶m1={event_name} instead. See Postback parameters.
Delivery rules
CPAlead is strict about the receiving URL. Your ClickFlare tracking domain meets these rules once it’s set up with SSL:- HTTPS, and the final URL: CPAlead doesn’t follow redirects.
- A fast HTTP 2xx response, well within 15 seconds.
- Reachable without a login, cookies or JavaScript. If anything in front of your tracking domain filters traffic, allow CPAlead’s postback relay IP, shown in the postback section of your account.
Offerwall and lockers
On the offerwall and content lockers,subid is meant for your own user ID, so CPAlead knows which of your users to reward. There’s no ClickFlare click in that flow, so ClickFlare can’t match those conversions. And if your account has a single postback URL, as CPAlead’s docs describe, the same URL receives offerwall conversions too: they reach ClickFlare with a user ID as click_id and don’t match any click.
If you already use the postback to reward users on your own site, don’t replace it with ClickFlare’s URL. Ask CPAlead support whether your account can send a second postback, or keep ClickFlare tracking on a separate publisher account.
Verify the setup
1
Click through the campaign
Open the ClickFlare campaign URL (with a lander, also click the CTA). When the offer loads, the first request goes to CPAlead’s tracking domain. In your browser’s network tab, check that it has
subid= followed by a real ClickFlare click ID, not the literal text {cf_click_id}. Copy that click ID.2
Send a test from CPAlead
Open CPAlead’s Testing page. Replace the sample
subid with the click ID you copied, set a small payout and a test lead ID, and send it. The tester sends a real request: check that the resolved URL is your ClickFlare postback and that the response is 2xx. Tester values aren’t saved to your configuration.3
Check the conversion in ClickFlare
The test conversion should appear on the campaign with the payout you set, and with a
txid. After real conversions, check CPAlead’s Postback Logs for delivery results.Troubleshooting
Conversions show in CPAlead but not in ClickFlare
Conversions show in CPAlead but not in ClickFlare
Work through these in order:
- The postback isn’t saved. Turn on Postback Enabled and click Save in Postback Configuration.
- CPAlead rejects a macro. Every macro must be on CPAlead’s supported list, in lowercase.
{click_id}and{status}are not CPAlead macros. - Delivery fails. Check Postback Logs for the HTTP status. A redirect, a 4xx or a timeout means the URL isn’t your final HTTPS tracking domain.
- subid is empty in CPAlead. The offer URL is missing
subid={cf_click_id}, or the lander CTA links straight to CPAlead instead of using the ClickFlare click URL. - The earnings are CPC. CPC earnings don’t send postbacks.
ClickFlare receives a user ID or cf_click_id
ClickFlare receives a user ID or cf_click_id
- A user ID means the conversion came from your offerwall or a locker. See Offerwall and lockers.
- A literal
cf_click_idmeans the offer URL in ClickFlare has the token without braces. It must be{cf_click_id}.
Only one event per click shows in ClickFlare
Only one event per click shows in ClickFlare
The postback has no
txid. Add txid={lead_id} in the ClickFlare network and save the updated URL in CPAlead.The payout is 0 or in the wrong currency
The payout is 0 or in the wrong currency
- Check that the postback has
payout={payout}and the offer’s payout is set to Auto in ClickFlare. Don’t use{virtual_currency}: it’s usually 0. - Set the affiliate network’s Payout currency in ClickFlare to the currency of your CPAlead account.
FAQ
Does ClickFlare integrate with CPAlead?
Does ClickFlare integrate with CPAlead?
Yes. ClickFlare has a CPAlead affiliate network template. You pass the click ID in subid on the direct link and save the ClickFlare URL in CPAlead’s Postback Configuration.
Can I pass more data to CPAlead?
Can I pass more data to CPAlead?
Yes. Direct links also take
subid2 and subid3, and CPAlead returns them with {subid2} and {subid3}. Use them for your own labels, such as the traffic source or placement, and keep subid for the click ID. For mobile traffic you can also pass idfa and gaid.Can I see which offer converted?
Can I see which offer converted?
Add
¶m1={campaign_id} or ¶m1={campaign_name} to the postback in CPAlead. ClickFlare stores it as an extra parameter you can report on.Can I send the conversion back to my traffic source?
Can I send the conversion back to my traffic source?
Yes. Once ClickFlare records the CPAlead conversion, it can send it to the traffic source through the traffic source’s postback or conversion API integration. Nothing changes on the CPAlead side.
Related
Macro reference
Every network’s values
Custom conversions
Events as columns
Postback issues
Troubleshoot S2S