


- The offer URL sends the ClickFlare click ID to CJ in the
SIDparameter. CJ stores it with every commission. - You bring the commissions into ClickFlare from CJ’s commission data, with Conversion Upload or through the ClickFlare API, using the SID value as the click ID.
At a glance
To set up CJ Affiliate with ClickFlare:- Set the domain and reporting time.
- Create the CJ affiliate network.
- Create the offer with sid.
- Bring commissions into ClickFlare.
How the data flows
The Click ID & postback macros page doesn’t list CJ, because CJ has no postback macros to copy. This page has everything you need.
What you’ll need
- An active ClickFlare account with your own tracking domain set up. Shared domains get flagged by networks and blocked by browsers. See Tracking domains.
- A CJ publisher account, approved in the advertiser programs you want to promote.
- Access to your CJ commission data: the commission reports in the CJ Account Manager, or CJ’s Commission Detail API.
- For the API route only: a personal access token from the CJ Developer Portal and your CJ publisher ID (CID), plus a ClickFlare API key.
What the CJ Affiliate template contains
ClickFlare has a CJ Affiliate affiliate network template. Only its click ID field is useful.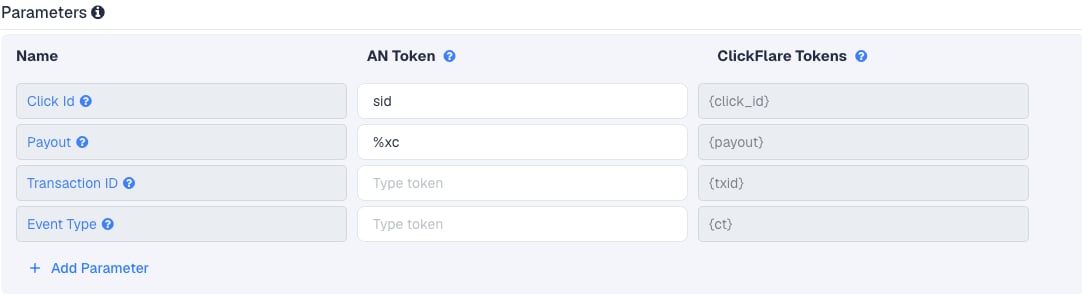
The Conversion tracking section still generates a postback URL, because every affiliate network in ClickFlare has one. With CJ it has nowhere to go. Ignore it.

Setup
Everything in ClickFlare is done from inside the campaign editor. Create the offer and the affiliate network inline as you go.1
Set up your own tracking domain
Add a custom tracking domain before anything else, for example
trk.yourdomain.com. Your campaign links use it, and a custom domain is less likely to be flagged than a shared one. See Tracking domains.2
Report conversions by postback time
Go to Settings → General Settings and set Conversion registration time reporting to Postback Timestamp.With the default Visit Timestamp, ClickFlare reports a conversion on the day of the original click. With Postback Timestamp, it uses the conversion time, which for uploads is the timestamp you include (or the upload time if you leave it out). See Conversion registration time.
This is an account-wide setting. It changes the date conversions are reported on for every campaign.
3
Create the campaign
Go to Campaigns → New Campaign, choose Redirect tracking, pick your traffic source and select your tracking domain. See Creating a campaign.
4
Create the CJ affiliate network
While creating the offer for the campaign, create a new affiliate network in its Affiliate Network field. You can also create it first under Affiliate Networks → + New. Either way:
- Search for CJ and pick the CJ Affiliate template.
- Name it, for example “CJ Affiliate”. One network covers all your CJ advertisers.
- Set Payout currency to the currency CJ pays you in.
- Save the network. You don’t need to copy the postback URL.
5
Get the link from CJ
In the CJ Account Manager, get the link for the advertiser you want to promote, for example with the deep link generator. Copy the link.
6
Create the offer in ClickFlare
In the offer form:
- Name the offer, for example after the advertiser.
- Select the CJ affiliate network you just created.
-
Paste the CJ link into Offer URL and turn on Append Click ID to Offer Url. ClickFlare adds
sid={cf_click_id}. You can also add it by hand:?sid={cf_click_id}at the end, or&sid={cf_click_id}if the link already has a?. Use one or the other, not both.
SID, while other trackers use lowercase sid. After your first commissions, check that CJ shows the click ID in the SID column. If it’s empty, write the parameter yourself as SID={cf_click_id} and leave the toggle off.SID is optional for publishers, so CJ records commissions without it too. Those can’t be matched in ClickFlare.7
Add a lander (optional)
If you send traffic through a lander before the offer, the lander’s CTA must use the ClickFlare click URL, not the CJ link. ClickFlare then fills in the click ID when it redirects to the offer. See Paths with landers and offers.
8
Save the campaign and launch
Save the campaign, copy the campaign URL from the Tracking tab and use it in your ads. Then set up one of the two routes below to bring the commissions in.
Bring CJ commissions into ClickFlare
Each CJ commission carries the SID, which is the ClickFlare click ID. Map CJ’s fields to ClickFlare’s like this:
The exact column names depend on the CJ report or API query you use. Check them in your first export.
Route 1: Conversion Upload (no code)
- In CJ, open your commission report for the period since your last upload and export it.
- In a spreadsheet, keep the five columns above, in that order, and drop rows with an empty SID.
- In ClickFlare, go to Settings → Conversion Upload and paste one conversion per line, in the order
click_id,payout,transaction_id,conversion_type,timestamp, without a header line. For example:
- Click Upload. See Conversion Upload for every format it accepts.
Route 2: API (automated)
If you upload often, automate it with a small script or an automation tool:- Pull new commissions from CJ’s Commission Detail API with your personal access token. CJ says transactions are batched in throughout the hour, and that this API can show some of them before they appear in the CJ interface.
- Send each one to ClickFlare with the raw conversion uploader in the ClickFlare API, or call your tracking domain’s conversion endpoint directly:
cf_click_id, payout, txid, ct and param1 to param20:
txid. Use whichever your import script builds more easily.
Why the transaction ID matters
By default ClickFlare keeps one conversion per click ID. If two commissions arrive with the same click ID and no transaction ID, ClickFlare treats them as the same conversion and keeps only the last one received. A transaction ID that differs per commission keeps them apart. It also makes re-uploads safe. If you upload a commission again with the same click ID and the same transaction ID, ClickFlare replaces the earlier conversion instead of counting it twice. So when in doubt, upload an overlapping date range: duplicates overwrite, they don’t add up. If CJ reports a correction to a commission, such as a reversal, check how it appears in your export. A row with its own ID and a negative amount can be uploaded as its own conversion, and ClickFlare subtracts it from revenue.Verify the setup
1
Click through the campaign
Open the ClickFlare campaign URL (with a lander, also click the CTA). When the offer loads, the first request goes to CJ. In the address bar or your browser’s network tab, check that it has
sid= followed by a real ClickFlare click ID, not the literal text {cf_click_id}.2
Test an upload
Copy a real click ID from ClickFlare and upload it with a test payout in Settings → Conversion Upload, for example
REAL_CLICK_ID,1,test1. The conversion should show on the campaign. This tests ClickFlare’s side only.3
Check the first real commissions
When CJ records your first commissions, check that the SID column holds ClickFlare click IDs. Upload them and confirm they appear on the right campaign in ClickFlare.
Troubleshooting
The SID is empty in CJ
The SID is empty in CJ
- The offer URL is missing
sid={cf_click_id}. Check Offer URL or turn on Append Click ID to Offer Url. - The lander CTA links straight to CJ instead of using the ClickFlare click URL.
- If both look right, CJ may expect uppercase
SID. WriteSID={cf_click_id}yourself and turn the toggle off.
The SID shows cf_click_id or braces
The SID shows cf_click_id or braces
The offer URL has the token without braces, or the braces were encoded. It must be
{cf_click_id} exactly.Uploaded conversions don't appear
Uploaded conversions don't appear
- The
click_iddoesn’t exist in ClickFlare, for example because it came from a test click or has extra spaces. Trim the values. - The columns are in the wrong order. ClickFlare reads
click_id, payout, transaction_id, conversion_type, timestamp, comma-separated. - The timestamp isn’t ISO-8601. Leave it out to use the upload time, or fix the format.
Only one of several commissions shows
Only one of several commissions shows
The upload has no
transaction_id, or the same one for every row. Add CJ’s commission or order ID so each commission is unique.Revenue in ClickFlare is too high
Revenue in ClickFlare is too high
You uploaded the sale amount instead of your commission. Re-upload with the commission amount and the same transaction IDs: the new values replace the old ones.
FAQ
Does ClickFlare integrate with CJ Affiliate?
Does ClickFlare integrate with CJ Affiliate?
Yes. ClickFlare has a CJ Affiliate template that passes the click ID in sid. CJ has no publisher postback, so you bring commissions in with Conversion Upload or the ClickFlare API.
Can I use the postback URL from the CJ template?
Can I use the postback URL from the CJ template?
No. CJ doesn’t support S2S postbacks for publishers, so there’s no field in CJ to paste it into. Other trackers also bring CJ conversions in by API, not by postback.
How often should I upload?
How often should I upload?
As often as you make decisions. Daily works for most campaigns. If you scale fast or bid automatically, automate the API route and run it every hour.
Can I pass more data to CJ?
Can I pass more data to CJ?
SID is the parameter CJ describes for publishers’ own tracking, and here it holds the click ID, so keep it for that. Ask CJ support whether your account can pass other values.
Can I send the conversion back to my traffic source?
Can I send the conversion back to my traffic source?
Once ClickFlare records a CJ conversion, it is a conversion like any other. Bear in mind it reaches ClickFlare in a batch, so a traffic source that optimizes on conversions gets them later than with a postback network.
Related
Conversion Upload
Upload formats
ClickFlare API
Automate the import
Macro reference
Every network’s values