

- The offer URL sends the ClickFlare click ID to Mobidea in
tag. - The postback URL sends it back to ClickFlare with every conversion, together with the payout. You set it once as Mobidea’s Global Postback, or per offer and Smartlink.
tag parameter yourself, how global and per-link postbacks interact, and how to check that it all works.
At a glance
To set up Mobidea with ClickFlare:- Set up your domain and postback time.
- Create the Mobidea affiliate network.
- Set the Global Postback in Mobidea.
- Copy the Mobidea link.
- Create the offer and launch.
How the data flows
Offer URL = their parameter + your token. Postback URL = your parameter + their token. Mobidea receives the click ID in
tag and returns it with its click ID token. Mobidea’s tokens use double braces.What you’ll need
- An active ClickFlare account with your own tracking domain set up. Shared domains get flagged by networks and blocked by browsers. See Tracking domains.
- A Mobidea affiliate account, and either an approved Single Offer or a Smartlink.
What the Mobidea template contains
ClickFlare has a Mobidea affiliate network template. It fills in the Mobidea tokens ClickFlare needs.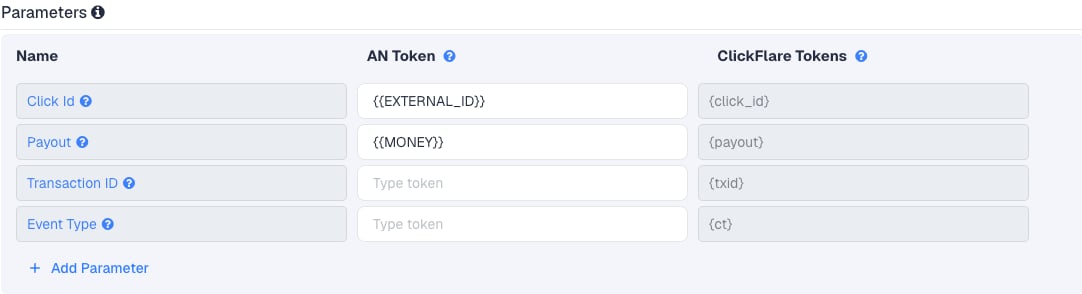
Setup
Everything in ClickFlare is done from inside the campaign editor. Create the offer and the affiliate network inline as you go.1
Set up your own tracking domain
Add a custom tracking domain before anything else, for example
trk.yourdomain.com. The postback URL is built on this domain, so changing it later means updating the postback in Mobidea too. See Tracking domains.2
Report conversions by postback time
Go to Settings → General Settings and set Conversion registration time reporting to Postback Timestamp.Mobidea reports a conversion on the day it happened. With the default Visit Timestamp, ClickFlare reports it on the day of the original click, so a conversion that comes in later lands on a different date in each platform. See Conversion registration time.
This is an account-wide setting. It changes the date conversions are reported on for every campaign.
3
Create the campaign
Go to Campaigns → New Campaign, choose Redirect tracking, pick your traffic source and select your tracking domain. See Creating a campaign.
4
Create the Mobidea affiliate network
While creating the offer for the campaign, create a new affiliate network in its Affiliate Network field. You can also create it first under Affiliate Networks → + New. Either way:
- Search for Mobidea and pick the template.
- Name it, for example “Mobidea”.
- Keep Click Id
{{EXTERNAL_ID}}and Payout{{MONEY}}, unless the tokens in your Mobidea account have other names. - Leave Transaction ID and Event Type empty.
- Under Conversion tracking, select your own Tracking Domain and keep S2S Postback URL as the tracking method.
- Set Payout currency to the currency your Mobidea account is paid in. Mobidea quotes its payment minimum in euros.
5
Set the Global Postback in Mobidea
In your Mobidea account, click the configuration wheel at the top right and select Global Postback. Then:
- Choose Custom postback. The other choices are templates for other trackers.
- Paste the ClickFlare postback URL.
- Compare the tokens in the URL with the list Mobidea shows below the field. They must match exactly.
- Save.
6
Get the offer's link from Mobidea
- Single Offer: go to Offers, filter by Approved, open the offer and click Copy link. You only get a link once Mobidea approves you on the offer.
- Smartlink: go to Smartlinks, choose the type of content and copy the link Mobidea creates.
7
Create the offer in ClickFlare
In the offer form:
- Name the offer.
- Select the Mobidea affiliate network you just created.
- Paste the Mobidea link into Offer URL and type
tag={cf_click_id}at the end, after?if the link has no query string yet, or after&if it does:
- Leave Append Click ID to Offer Url off.
{cf_click_id} with braces. Without them Mobidea stores the literal text cf_click_id, and the conversion cannot be matched to a click.Set the payout to Auto so ClickFlare uses the payout value from the postback.8
Add a lander (optional)
If you send traffic through a lander before the offer, the lander’s CTA must use the ClickFlare click URL, not the Mobidea link. ClickFlare then adds the click ID when it redirects to the offer. See Paths with landers and offers.Don’t use Mobidea’s own Click URL from its settings on your lander: it skips ClickFlare.
9
Save the campaign and launch
Save the campaign, copy the campaign URL from the Tracking tab and use it in your ads. Before you spend money on traffic, run the checks in Verify the setup.
Global and per-link postbacks
Mobidea has two levels of postback:
A per-offer or per-Smartlink postback overrides the Global Postback for that link. It doesn’t fire in addition to it.
That has two consequences:
- If you also run Mobidea traffic through another tracker, give those links their own postback and keep ClickFlare as the global one, or the other way round.
- If an old per-link postback points to a previous tracker, conversions on that link never reach ClickFlare, even with the Global Postback set. Turn it off or replace it with the ClickFlare URL.
Transaction ID
By default ClickFlare keeps one conversion per click ID. If several postbacks arrive with the same click ID and no transaction ID, ClickFlare treats them as the same conversion, and you only see one of them (the last one received). Mobidea doesn’t document a token for a unique conversion ID, so the template leaves Transaction ID empty. For most Mobidea offers that’s fine: a subscription, a sign-up or an install happens once per click. If an offer can pay more than once for the same click, check the token list below the postback field for a conversion ID, or ask your affiliate manager, and use it in Transaction ID. Don’t use a random value: a resent postback would then count twice.Verify the setup
1
Click through the campaign
Open the ClickFlare campaign URL (with a lander, also click the CTA). When the offer loads, the first request goes to Mobidea’s link domain. In your browser’s network tab, check that it has
tag= followed by a real ClickFlare click ID, not the literal text {cf_click_id} and not external_id=.2
Generate a test conversion
Ask Mobidea’s Affiliate Service or your account manager to fire a test conversion on your click. Mobidea says they can test the postback with you. A test fired without a real ClickFlare click has no click ID to match.
3
Check the conversion in ClickFlare
The conversion should appear on the campaign with the payout from Mobidea. If it doesn’t, open Logs → Event Logs: a postback with a literal
{{EXTERNAL_ID}} means the token name doesn’t match your account.Troubleshooting
Conversions show in Mobidea but not in ClickFlare
Conversions show in Mobidea but not in ClickFlare
Work through these in order:
- The click ID went into the wrong parameter. The offer URL has
external_id=from the Append Click ID to Offer Url toggle instead oftag=. Turn the toggle off and typetag={cf_click_id}. - A per-link postback overrides the global one. Check the Advanced tab of the offer, or the Smartlink’s settings, for an old postback.
- The Global Postback uses a tracker template. It must be Custom, with the ClickFlare URL.
- The tokens don’t match. Compare the URL with the token list below the postback field in Mobidea.
- The lander skips ClickFlare. The CTA links straight to Mobidea instead of using the ClickFlare click URL.
ClickFlare receives a literal token or cf_click_id
ClickFlare receives a literal token or cf_click_id
- A literal
{{EXTERNAL_ID}}or{{MONEY}}means Mobidea doesn’t know that token. Use the names from the list below the postback field, in ClickFlare and in Mobidea. - A literal
cf_click_idmeans the offer URL in ClickFlare has the token without braces. It must be{cf_click_id}.
The payout is 0 or in the wrong currency
The payout is 0 or in the wrong currency
- Check that the postback has a payout token and the offer’s payout is set to Auto in ClickFlare.
- Set the affiliate network’s Payout currency in ClickFlare to the currency your Mobidea account is paid in.
FAQ
Does ClickFlare integrate with Mobidea?
Does ClickFlare integrate with Mobidea?
Yes. ClickFlare has a Mobidea affiliate network template. You pass the click ID in tag on the offer link and set the ClickFlare URL as a Custom Global Postback in Mobidea.
Why tag and not external_id?
Why tag and not external_id?
Mobidea reads the tracker’s click ID from the
tag parameter of the offer link, as other trackers’ Mobidea integrations also do. external_id is only what ClickFlare’s toggle derives from the template’s token name.Why isn't ClickFlare one of the postback templates in Mobidea?
Why isn't ClickFlare one of the postback templates in Mobidea?
The templates in Global Postback fill in the URL for a few trackers. For every other tracker, including ClickFlare, choose Custom and paste the full URL. It works the same way.
Should I use a Smartlink or a Single Offer?
Should I use a Smartlink or a Single Offer?
Both work with ClickFlare in the same way:
tag={cf_click_id} on the link and the same postback. A Smartlink lets Mobidea pick the offer, so ClickFlare reports all its conversions under one offer. Use Single Offers when you want ClickFlare to compare offers.Can I send the conversion back to my traffic source?
Can I send the conversion back to my traffic source?
Yes. Once ClickFlare records the Mobidea conversion, it can send it to the traffic source through the traffic source’s postback or conversion API integration. Nothing changes on the Mobidea side.
Related
Macro reference
Every network’s values
Mobipium
Another mobile network
Postback issues
Troubleshoot S2S