

click.linksynergy.com.
To track Rakuten Advertising offers in ClickFlare, two links have to carry the ClickFlare click ID in both directions:
- The offer URL sends the ClickFlare click ID to Rakuten in
u1. - The postback URL sends it back to ClickFlare with every transaction event, together with your commission and Rakuten’s transaction ID. You register it through Rakuten’s Postback API.
u1 needs a feature called Signature on your account, the Postback API is in beta, and Rakuten can send the same sale more than once (a preliminary event, a final event, and a cancellation if the order is returned). This guide covers all of it.
At a glance
To set up Rakuten Advertising with ClickFlare:- Set the domain and reporting time.
- Create two custom conversions.
- Create the Rakuten affiliate network.
- Create the offer with u1.
- Register the postback with Rakuten.
How the data flows
Offer URL = their parameter + your token. Postback URL = your parameter + their field. Rakuten writes the click ID into
u1 on the way in and returns it in the <u1> field on the way out. Rakuten’s help center writes postback fields in angle brackets, for example is_event=<is_event>.What you’ll need
- An active ClickFlare account with your own tracking domain set up. Shared domains get flagged by networks and blocked by browsers. See Tracking domains.
- A Rakuten Advertising publisher account, approved in the advertiser programs you want to promote.
- Signature enabled on your account. Rakuten makes
u1available to publishers enabled for Signature. Ask your account manager or Rakuten support if you’re not sure. - Access to Rakuten’s Developer Portal (you log in with your Publisher Dashboard credentials), an API access token, and a user account associated with the publisher ID that will use the postback.
- Two custom conversions in ClickFlare, set up in the steps below.
What the Rakuten Advertising template contains
ClickFlare has a Rakuten Advertising affiliate network template. It comes pre-filled with the field names from Rakuten’s own documentation: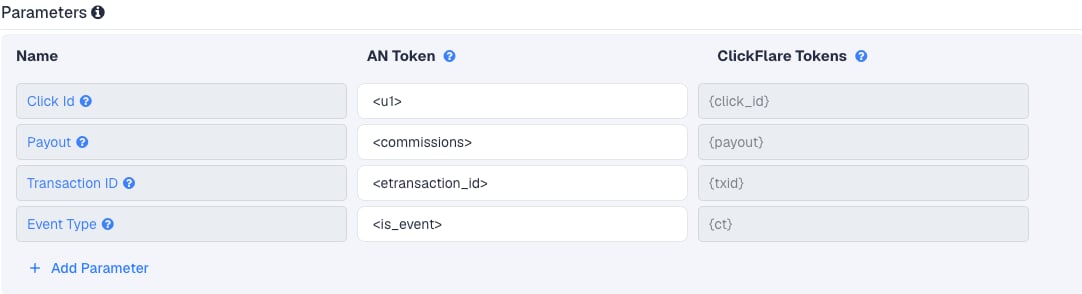
A Rakuten network you added before November 2026 may still hold the template’s older values:
{u1}, {sale-amount} and {transaction-id}, with Event Type empty. Open the network and change them to the values above.
Rakuten’s Postback API documentation lives in its Developer Portal, behind a login. The field names above come from Rakuten’s public help center. Before you go live, check them against the Developer Portal’s Events API field list, or ask Rakuten support to confirm the postback format.
Setup
Everything in ClickFlare is done from inside the campaign editor. Create the offer and the affiliate network inline as you go.1
Set up your own tracking domain
Add a custom tracking domain before anything else, for example
trk.yourdomain.com. The postback URL is built on this domain, so changing it later means registering the postback with Rakuten again. Rakuten skips any endpoint that takes longer than 400 ms to respond, so use a domain that answers quickly. See Tracking domains.2
Report conversions by postback time
Go to Settings → General Settings and set Conversion registration time reporting to Postback Timestamp.Many Rakuten advertisers confirm sales later, for example when the order ships. With the default Visit Timestamp, ClickFlare reports each conversion on the day of the original click. See Conversion registration time.
This is an account-wide setting. It changes the date conversions are reported on for every campaign.
3
Create two custom conversions
Go to Settings → Custom Conversions and add two:
The parameter must match the
ct value exactly, so enter capital Y and N. A ct value that matches no custom conversion is logged as a general conversion.4
Create the campaign
Go to Campaigns → New Campaign, choose Redirect tracking, pick your traffic source and select your tracking domain. See Creating a campaign.
5
Create the Rakuten affiliate network
While creating the offer for the campaign, create a new affiliate network in its Affiliate Network field. You can also create it first under Affiliate Networks → + New. Either way:
- Search for Rakuten and pick the Rakuten Advertising template.
- Name it, for example “Rakuten Advertising”.
- Check that Click Id is
<u1>, Payout is<commissions>and Transaction ID is<etransaction_id>, with no spaces before or after. - Check that Event Type is
<is_event>. - Under Conversion tracking, select your own Tracking Domain and keep S2S Postback URL as the tracking method.
- Set Payout currency to the currency Rakuten pays you in.
is_event=<is_event> field in every postback URL, so add it at the end when you copy it:6
Build the deep link in Rakuten
In the Rakuten Publisher Dashboard, get the link for the advertiser, or build a deep link by hand. A deep link has your ID (Make sure the destination in
id), the advertiser ID (mid) and the destination page (murl):murl is URL-encoded, so the u1 you add next is read as part of the Rakuten link and not as part of the destination.7
Create the offer in ClickFlare
In the offer form:
- Name the offer, for example after the advertiser.
- Select the Rakuten affiliate network you just created.
-
Paste the Rakuten link into Offer URL and turn on Append Click ID to Offer Url. ClickFlare adds
u1={cf_click_id}. You can also add&u1={cf_click_id}yourself. Use one or the other, not both.
u1 value can be up to 72 characters, and Rakuten recommends no special characters. It shows in Rakuten’s reports as the Member ID.Set the payout to Auto so ClickFlare uses the payout value from the postback.8
Register the postback with Rakuten
Log in to Rakuten’s Developer Portal with your Publisher Dashboard credentials. With your API access token, use the Postback API to set up a postback for your publisher ID and paste the ClickFlare URL. The same API lets you update, delete, disable or enable the postback, and check its status.Rakuten can rename fields, send only some of them, reorder them or add static values. You don’t need any of that: the URL above already names each field the way ClickFlare expects. If you can’t call the API yourself, ask Rakuten support or your account manager to set up the postback for you with the URL.
9
Add a lander (optional)
If you send traffic through a lander before the offer, the lander’s CTA must use the ClickFlare click URL, not the Rakuten link. ClickFlare then fills in the click ID when it redirects to the offer. See Paths with landers and offers.
10
Save the campaign and launch
Save the campaign, copy the campaign URL from the Tracking tab and use it in your ads. Before you spend money on traffic, run the checks in Verify the setup.
Preliminary, final and cancelled events
Rakuten can send several postbacks for one sale. Theis_event field tells them apart:
- Preliminary (
is_event=Y). Some advertisers report sales in batches, for example travel and booking sites, pre-orders, or shops that report when the order ships. They send a preliminary event at the time of purchase. Rakuten says to treat everyYevent as preliminary: the advertiser can still remove it. - Final (
is_event=N). When the sale is confirmed, the postback fires again withN. With real-time pixel tracking, theYevent is followed almost immediately by itsNevent. - Cancellation. If the customer cancels or returns the order, Rakuten sends another event with
is_event=N, a negative commission and sale amount, and a new transaction ID. A partial return only carries the returned item’s amount.
etransaction_id, so ClickFlare records each one. That’s why the setup sends is_event as ct:
Your main revenue column then shows final commissions minus cancellations, and the preliminary column shows what’s still waiting for confirmation. A cancellation does add one to the final conversion count, so judge Rakuten campaigns on revenue rather than conversion count.
Rakuten sends one record per product in an order. An order with three different products arrives as three postbacks with the same order ID and three different transaction IDs, each with its own commission.
Rakuten’s postback limits
- 400 ms timeout, one attempt. Rakuten doesn’t send data if your endpoint takes longer than 400 ms, and it doesn’t retry a failed send.
- Postbacks can be disabled without notice. Rakuten says you won’t be told if your postback is disabled automatically. Check it now and then with the Postback API’s endpoint status call.
- Clicks older than 30 days. Rakuten’s Events API keeps click data for 30 days for
u1matching, and transactions from older clicks have nou1. The Postback API pushes the same data, so expect those transactions to arrive without a click ID that ClickFlare can match. - Not for accounting. Rakuten recommends its Signature Reconciliation Feed Reports, not the postback, for reconciling what you’re paid.
Verify the setup
1
Click through the campaign
Open the ClickFlare campaign URL (with a lander, also click the CTA). When the offer loads, the first request goes to
click.linksynergy.com. Check that it has u1= followed by a real ClickFlare click ID, not the literal text {cf_click_id}.2
Test the postback by hand
Copy a real click ID from ClickFlare. Open the postback URL in your browser with test values, for example
https://trk.yourdomain.com/cf/cv?click_id=REAL_CLICK_ID&payout=1&txid=test1&ct=N. The conversion should show on the campaign in the Rakuten final column. This tests ClickFlare’s side only.3
Check the first real transaction
Run an Individual Item Report in Rakuten with the Member ID (u1) field to see that your click IDs arrive. Data can take up to four hours to show there. Then check Logs → Event Logs in ClickFlare for the matching conversion, with
ct set to Y or N.Troubleshooting
Transactions show in Rakuten but not in ClickFlare
Transactions show in Rakuten but not in ClickFlare
Work through these in order:
- The postback is disabled. Check its status with the Postback API’s endpoint status call.
- Your endpoint was too slow. Rakuten skips endpoints that take longer than 400 ms and doesn’t retry.
- The Member ID is empty in Rakuten. The offer URL is missing
u1={cf_click_id}, Signature isn’t enabled on your account, or the lander CTA links straight to Rakuten. - The click is older than 30 days. Rakuten’s event data may no longer have the
u1for it. - The postback is missing is_event. Rakuten requires
is_event=<is_event>in the URL.
Every sale shows up twice
Every sale shows up twice
The preliminary and final events both count as main conversions. Check that both custom conversions exist with the parameters
Y and N, that only Rakuten final is included in main reporting, and that Event Type is <is_event>.Revenue is far too high
Revenue is far too high
Payout still uses the sale amount. Change it to
<commissions> and update the postback with Rakuten.ClickFlare receives a literal field name or cf_click_id
ClickFlare receives a literal field name or cf_click_id
- A literal
<u1>or{u1}means Rakuten didn’t replace the field. Confirm the field names and their format with Rakuten support. - A literal
cf_click_idmeans the offer URL in ClickFlare has the token without braces. It must be{cf_click_id}.
FAQ
Does ClickFlare integrate with Rakuten Advertising?
Does ClickFlare integrate with Rakuten Advertising?
Yes. ClickFlare has a Rakuten Advertising template. You pass the click ID in u1, and Rakuten’s Postback API sends each transaction event to ClickFlare’s S2S postback.
Why does Rakuten need Signature for u1?
Why does Rakuten need Signature for u1?
Rakuten ties
u1 to Signature, its member-level tracking. Without it, u1 isn’t available, and conversions can’t carry the ClickFlare click ID back. Ask your account manager to enable it.Is the Postback API stable?
Is the Postback API stable?
Rakuten labels it beta. It says future changes will affect how you interact with the API, not how the postback works.
Can I count preliminary events as conversions?
Can I count preliminary events as conversions?
Yes. Turn on main reporting for Rakuten preliminary too. Expect double counts for advertisers that send both events, though: most
Y events are followed by an N.Can I send the conversion back to my traffic source?
Can I send the conversion back to my traffic source?
Yes. Each custom conversion is mapped to traffic source postbacks separately, so you can send only Rakuten final to the traffic source and keep preliminary events in ClickFlare.
Related
Macro reference
Every network’s values
Custom conversions
Y and N as ct values
Postback issues
Troubleshoot S2S